![]()
An overview of IAM Federated Access, Trusted Advisor and AWS Billing Controls with an introduction to AWS Linked Accounts.
My last two posts in this AWS Security series have been surrounding Identity & Access Management, with last week’s entry looking at how to create your own custom IAM Policies. In this article, I will offer an overview of Federated Access, Trusted Advisor, AWS Billing Controls. I’ll also include an introduction to AWS Linked Accounts.
As we know we can create users and groups within IAM that can be assigned permissions to access specific resources. What if you don’t want to have to create new IAM accounts for potentially hundreds or more of your personnel? Wouldn’t it be better to use your company’s existing Active Directory accounts instead? Or another example might be, perhaps you are developing a mobile app/game and using AWS to host your infrastructure and you want/need the users to authenticate with their Facebook or Google accounts. What is the best way of managing this process — which could involve potentially millions of end users? Federated AWS access is the solution to these scenarios.
What is Federated Access?
Federated access simply allows external entities to temporarily connect and access AWS resources without requiring an existing IAM user account. Unlike the restriction with IAM users, there are no limits on the number of federated users you can have.
Typically AWS supports two methods of Federation, Enterprise Identity Federation, and Web Identify Federation. Enterprise Identity Federation allows your existing Active Directory users to authenticate to your AWS resources, allowing for a Single sign-on (SSO) approach. Web Identify Federation allows you to make mobile apps created on AWS that integrate with Public Identify Providers (IdPs) for authentication such as Facebook, Google or any OpenID Connect provider.
There are different ways to configure your federated users depending on your requirements. If you search, you will find a host of blog entries showing how to do this — many of the posts from AWS.
Within this article, I’ll offer an overview of how federation within an Active Directory situation should look, and how it works. I’ll show the high-level steps involved in how AD allows this temporary access in conjunction with AWS. For this example, federation within Active Directory has integration with SAML 2.0 (Security Assertion Markup Language) and with the Security Token Service (STS) from AWS.
SAML 2.0 allows for SSO through the exchange of access credentials to be passed between an identity provider (IP) and a service provider (SP) through the means of an Assertion.
The Security Token Service (STS) is an AWS web service that allows you to gain temporary security credentials for federated users via IAM benefiting from existing access roles and policies. More information on STS can be found here on an Amazon Web Services page.
Active Directory Federated Access overview
The diagram below shows the typical steps involved in authenticating a federated user to access AWS services.
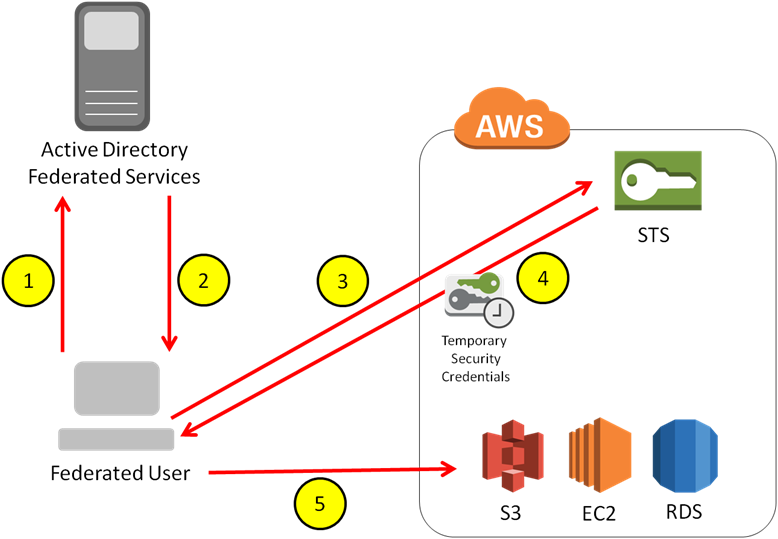
1. The user initiates an authentication against the Active Directory Federated Service (ADFS) Server via a web browser to the SSO URL
2. If authentication is successful via Active Directory credentials, SAML (Security Assertion Markup Language) will then issue an assertion back to the users’ client
3. The SAML assertion is then sent to the Security Token Service (STS) within AWS to assume a role within IAM using the AssumeRoleWithSAML API (more on this API can be found on this AWS Page)
4. STS then responds to the user requesting federated access with temporary security credentials with an assumed role and associated permissions
5. The user then has federated access to the necessary AWS services as per the Role permissions
This is a simple overview of how the federation is instigated from the user. Corporate Identity Federation is ALWAYS authenticated internally first by Active Directory before AWS.
There are a number of configuration steps required to get to the diagram above implemented and for a complete guide and lengthy step by step process about setting up Enterprise Identity Federation (including the installation of the ADFS Server etc, please click here. It discusses how to set up your Active Directory Groups that map to your pre-defined IAM Roles (Step 3 above) for users that do not have an IAM account, resulting in a Single Sign-on method to your AWS infrastructure.
If you are looking to configure Web Identity Federated Access please click here. This will provide you with very specific instructions on how to configure this setup.
AWS Trusted Advisor
The AWS Trusted Advisor is like having your own AWS specialist constantly looking over your shoulder ensuring you are keeping an eye on your infrastructure for optimal performance, security and best practices. It provides prompts and suggestions that you should make to your AWS environment for added security, such as ensuring your root account is using Multi-Factor Authentication (MFA). It can also allow you to save costs by way of notification that certain services/instances haven’t been used for some time and could potentially be powered down.
AWS Trusted Advisor is accessed from the AWS Console under Management Tools:
When you open Trusted Advisor you are presented with a Dashboard. From here it can displays checks for up to 47 different elements across 4 different areas:
- Cost ooptimization
- Security
- Fault Tolerance
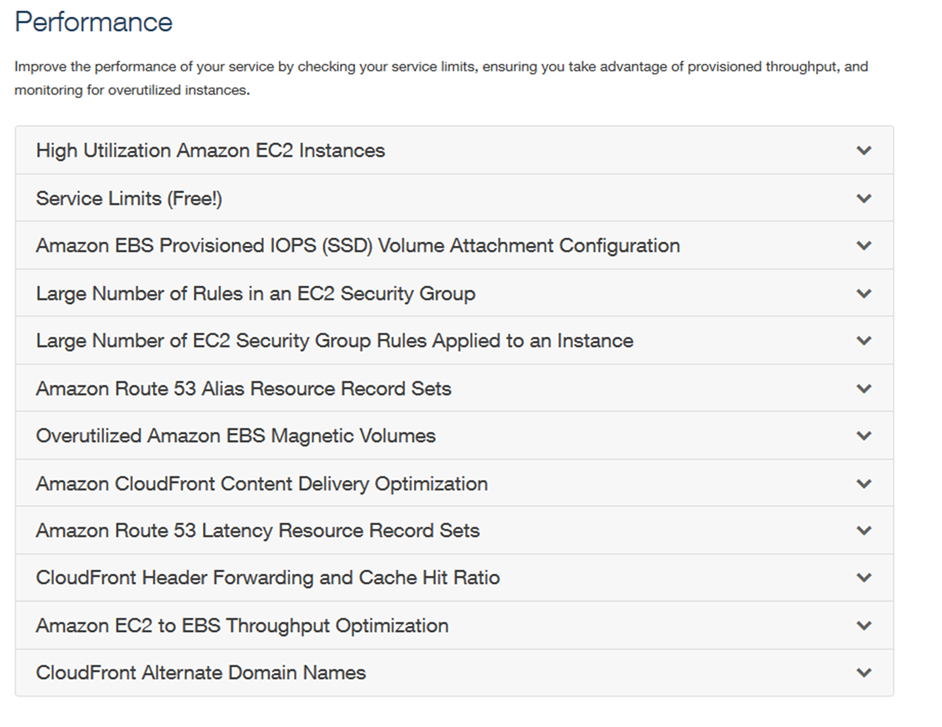
- Performance Improvement
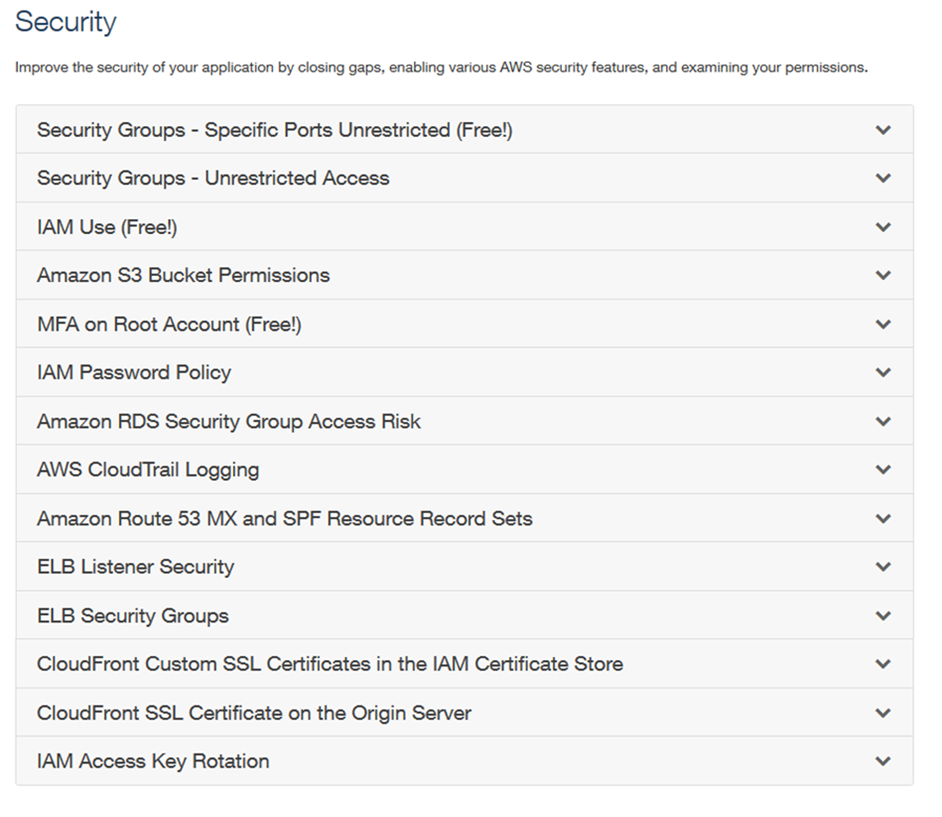
The below screenshots from AWS show the current list checks as of 13th Jan 2016:
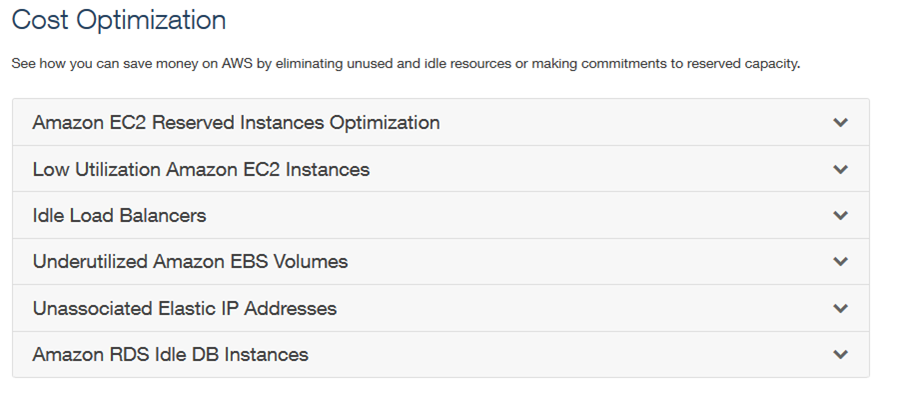
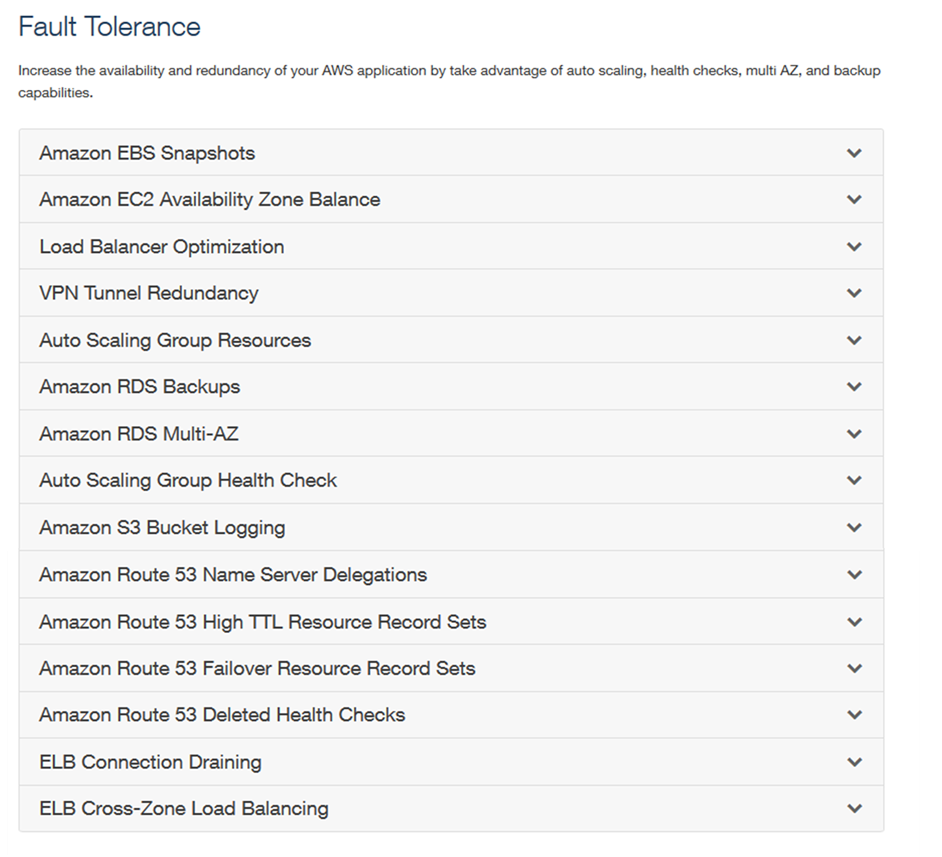
These checks can be performed across a range of AWS Services. However, this level of service is only available to customers with Business-level or Enterprise-level support. If you wish to upgrade your level of support please click here to select your support plan.
The default offers 4 checks that can be performed for free:
- Service Limits (in the Performance category)
- Security Groups – Specific Ports Unrestricted,
- IAM Use
- MFA on Root Account (in the Security category)
The screenshot below shows an example of these free checks:

As you can see, the Trusted Advisor has identified that I have a number of Security Groups that allow unrestricted access. This is a security risk and Trusted Advisor has alerted me of this issue so that I may take action.
Although these free checks are useful, the full power and potential of AWS Trusted Advisor can only be appreciated with the full access to all 47 checks. If you have a large estate to manage, monitor and assess for best practices then I suggest you take full advantage of the Trusted Advisor service within the corresponding support plan. It could help you save a significant amount of money by ensuring your security is optimized against best practices. It will check to ensure you have the right level of instances and that they optimize for size. TA will also check your High Availability configurations to ensure they are in place in the event of a failure.
Typically in an ever-expanding environment, it can be difficult to stay on top of all of these areas, so having a service to monitor your activities and spot things that you may miss is essential in keeping your estate optimized.
AWS Billing Controls
When it comes to monitoring and managing your AWS financial information, you need to ensure this privilege is restricted to the people who are authorized. Billing is linked with IAM to allow specific restrictions of access to be put in place.
By default, your AWS account owner has full access to all billing information. No other users initially have access. The first time that your root account tries to access the billing information you need to perform the steps below as it’s not automatically activated and isn’t initially visible.
1. Log into AWS Console as the AWS account owner (root)
2. Select your account name in the top right and select ‘My Account’
3. Select ‘Edit’ next to IAM User Access to Billing Information and select the checkbox to activate
The root account can now access the Billing & Cost Management from within the console by selecting your username/account in the top right corner > Billing and Cost Management. From here you are able to access information such as your Bills, Budgets, Reports, Payment History, and Method etc. Some very sensitive information.
If you require other users to access this restrictive area you have to grant specific permissions.
Allowing access to Billing information
You can allow permissions for users to access your billing information via IAM policies and permissions. You are able to refine access within Billing and Cost Management further by allowing some people to view specific information only while some users are allowed to modify certain aspects of the billing information. A full range of permissions and restrictions can be found here.
As an example I have created a policy below that allows viewing access to the ‘Billing’, ‘Payment Method’s and the ‘Usage section within the Billing and Cost Management Dashboard:
{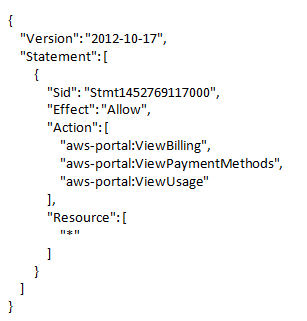
This policy can then be applied to a group or specific user as required. For more information on creating custom IAM policies please see my previous article: Creating an IAM Policy: AWS Security
AWS Linked Accounts (Consolidated Billing)
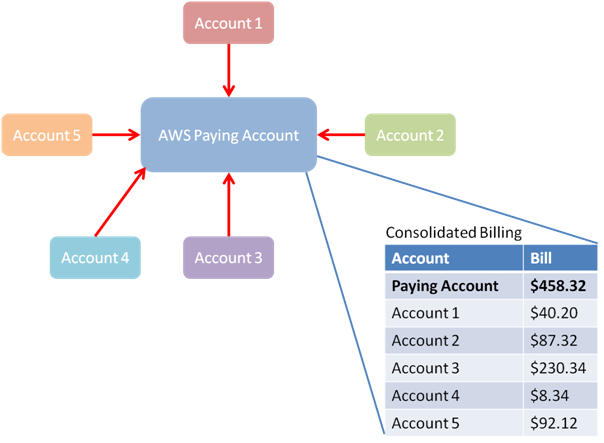
Discussing AWS Linked Accounts follows on nicely from the previous topic of Billing. Linked Accounts allows you to securely link multiple AWS accounts to effectively consolidate all your AWS Billing via a single master Paying Account.
It’s important to point out that by linking accounts, only the billing information is linked, no other information can be accessed between the accounts. Each account still acts completely independent of the other. One account is not able to view AWS services or data from another account.
If you are responsible for the finances across multiple accounts then you are probably aware of how difficult this can be to manage. By consolidating the billing into one Paying Account you reap many advantages. It provides a simple overview of all your accounts each month. Only the Paying Account is charged, and from here you can see the usage of all other accounts in one place. You can even extract charges from separate accounts and export them to a CSV file for father analysis.
The diagram below gives a graphical view of Consolidated Billing.
If you link your account for consolidated billing, I strongly suggest that you enforce strong security on the Paying Account, and certainly implement MFA (Multi-Factor Authentication). For more information on MFA see my previous article here: AWS Security: IAM
How to link your Accounts
To set up Linked accounts and a Paying Account, follow the 6 steps below.
- Log in to the AWS account that you want to become the Paying account and from the Console open the ‘Billing and Cost Management’ Dashboard
- Select ‘Consolidated Billing’
- Select ‘Sign up for Consolidate Billing’
- Select ‘Send a Request’ on the Manage Request and Account page
- Add the e-mail address of the AWS account that you want to link to your Paying account and click ‘Send’
- An e-mail will now be sent to the Account owner of the linked AWS account. From this e-mail, they must follow the link and either ‘Accept’ or ‘Deny’ the linking of the accounts. Once accepted, the AWS accounts are then linked
What are the key elements we have we learned this week?
- It’s possible to implement SSO (Single sign-on) to the AWS Console by federating user access with your existing Active Directory users instead of issuing separate IAM user accounts
- Web Identity Federation can be used to authenticate users for mobile applications built on AWS
- The Trusted Advisor can be used to help manage, identify and implement best practices across your AWS infrastructure and can recommend changes on a Cost optimization, Security, Fault Tolerance and Performance Improvement basis
- We looked at how to grant access to Billing Information through the use of IAM policies
- Finally, we learned that you can optimize your Billing Accounts by using Linked AWS accounts and consolidating your billing information
Next week I will address Simple Storage Service (S3). I’ll explain how to set up Bucket Policies to restrict access to specific buckets in addition to exposing your Buckets for public access. Then, I’ll delve into how CloudFront accesses S3 for Content Delivery Network (CDN) purposes.
Thank you for taking the time to read my article. If you have any feedback please leave a comment below.