![]()
Multi-tenancy is one of the founding principles of cloud computing. To reach an economy of scale that allows every cloud user to scale as needed without paying for or suffering from overprovisioned resources, cloud infrastructure must be oversized for a single user and sized for a pool of potential users that shares the same group of resources during a certain period of time. The cloud allows you to reserve resource instances for a tenant and deploy a group of tenants on the same resources. This is a new way of handling app deployment. In this post, we will show you how to develop multi-tenant applications in Microsoft Azure.
What is a tenant?
A tenant is a private space for a user or a group of users inside an application. A typical way to identify a tenant is using a domain name. If multiple users share a domain name, we say that users live inside the same tenant. If a group uses a reserved domain name that is different from other users, they live in a reserved tenant. We can say that different names identify different tenants. Different domain names can imply different app instances, but that doesn’t tell us anything about deployed resources.
Multi-tenancy is a pattern. Legacy on-premise applications tend to be a single tenant app shared between users. Because of the lack of specific DevOps tasks, provisioning an app for every user can be a costly operation.
Cloud environments allow you to reserve a single tenant for each user (or group of users) to enforce better security policies and to customize a tenant for a specific purpose, as all DevOps tasks can be automated via management APIs.
Creating multi-tenant applications in Microsoft Azure: Scenario
In our scenario, CloudMaker.xyz, a cloud-based development company, has decided to develop a personal accounting web application for individuals and small companies. In this case, the single customer represents the tenant; different companies use different tenants.
Each tenant needs its own private data to enforce data security, so we will reserve a dedicated database for a single tenant. Access to a single database is not an intensive task, as invoice registration will happen in general once a day. Each tenant will also have its own domain name to enforce the identity of each entity.
A new tenant can be created from the company portal application, where new customers register themselves by specifying the tenant name. For the purpose of this example, we will use default ASP.NET MVC templates to style and build up apps and focus on tenant topics.
Creating the Tenant App
Tenant app is an invoice recording application. To brand the tenant, we record the tenant name in app settings inside the web.config file:
<add key="TenantName" value="{put_your_tenant_name}" />
For simplicity purposes, we “brand” the application showing the tenant name in the main layout file where the Application name is shown:
@{
    var tenantName = System.Configuration.ConfigurationManager.AppSettings["TenantName"];
}
<!DOCTYPE html>
<html>
<body>
   <!-- code omitted -->
                @Html.ActionLink(tenantName, "Index", "Home", new { area = "" }, new { @class = "navbar-brand" })
Application content is represented by an invoices page where we record data with a CRUD process. The entry for the invoices is in the navigation bar:
<ul class="nav navbar-nav">
    <li>@Html.ActionLink("Home", "Index", "Home")</li>
    <li>@Html.ActionLink("Invoices", "Index", "Invoices")</li>
    <!-- other code omitted -->
At first, we need to define a model for application in the model folder. Because we need to store data in an Azure SQL database, we can use EntityFramework to create the model from an empty Code First:
public class InvoicesModel : DbContext
{
    public InvoicesModel()
        : base("name=InvoicesModel")
    {
    }
    public virtual DbSet<Invoice> Invoices { get; set; }
}
As we can see, data will be accessed from a SQL database referenced by a connection string in the web.config file:
<add name="InvoicesModel" connectionString="data source=(LocalDb)\MSSQLLocalDB;initial catalog=Tenant.Web.Models.InvoicesModel;integrated security=True;MultipleActiveResultSets=True;App=EntityFramework" providerName="System.Data.SqlClient" /></connectionStrings>
The model class is just for demo purposes:
public class Invoice
{
    public int InvoiceId { get; set; }
    public int Number { get; set; }
    public DateTime Date { get; set; }
    public string Customer { get; set; }
    public decimal Amount { get; set; }
    public DateTime DueDate { get; set; }
}
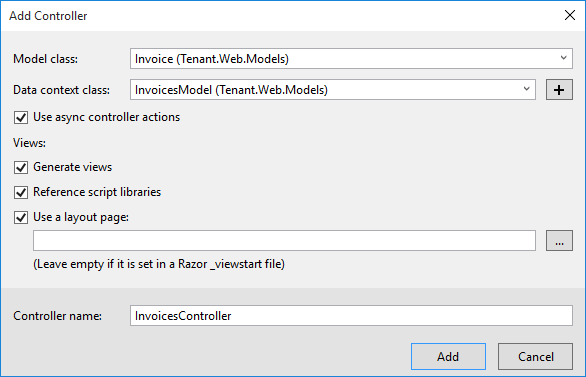
After we try to compile the project to verify that we have not made any mistakes, we can now scaffold this model into a Model-View-Controller (MVC) to have a simple but working app skeleton:
Creating the Portal App
Now, we need to create the portal app starting from the MVC default template. Its registration workflow is useful for making our tenant registration. In particular, we will use the user registration as the tenant registration. We will need to acquire the tenant name and trigger tenant deployment. We need to make two changes to the UI.
First, in the RegisterViewModel, defined under the Models folder, AccountViewModels.cs file, we add a TenantName property:
public class RegisterViewModel
{
    [Required]
    [EmailAddress]
    [Display(Name = "Email")]
    public string Email { get; set; }
    [Required]
    [StringLength(100, ErrorMessage = "The {0} must be at least {2} characters long.", MinimumLength = 6)]
    [DataType(DataType.Password)]
    [Display(Name = "Password")]
    public string Password { get; set; }
    [DataType(DataType.Password)]
    [Display(Name = "Confirm password")]
    [Compare("Password", ErrorMessage = "The password and confirmation password do not match.")]
    public string ConfirmPassword { get; set; }
}
In the Register.cshtml view page, under Views\Account folder, we add an input box:
@using (Html.BeginForm("Register", "Account", FormMethod.Post, new { @class = "form-horizontal", role = "form" }))
{
    @Html.AntiForgeryToken()
    <h4>Create a new account.</h4>
    <hr />
    @Html.ValidationSummary("", new { @class = "text-danger" })
    <div class="form-group">
        @Html.LabelFor(m => m.Email, new { @class = "col-md-2 control-label" })
        <div class="col-md-10">
            @Html.TextBoxFor(m => m.Email, new { @class = "form-control" })
        </div>
    </div>
    <div class="form-group">
        @Html.LabelFor(m => m.Password, new { @class = "col-md-2 control-label" })
        <div class="col-md-10">
            @Html.PasswordFor(m => m.Password, new { @class = "form-control" })
        </div>
    </div>
    <div class="form-group">
        @Html.LabelFor(m => m.ConfirmPassword, new { @class = "col-md-2 control-label" })
        <div class="col-md-10">
            @Html.PasswordFor(m => m.ConfirmPassword, new { @class = "form-control" })
        </div>
    </div>
    <div class="form-group">
        <div class="col-md-offset-2 col-md-10">
            <input type="submit" class="btn btn-default" value="Register" />
        </div>
    </div>
}
Portal applications can be great for allowing the tenant owner to manage its own tenant, configuring or handling subscription-related tasks to the supplier company.
Deploying Portal Application
Before tenant deployment, we need to deploy the portal itself.
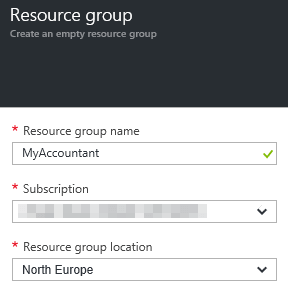
MyAccountant is a complex solution made up of multiple Azure services that must be deployed together. First, we will need to create an Azure Resource Group to collect all the services:
All of the data from different tenants, including the portal itself, need to be contained inside distinct Azure SQL databases. Every user will each have its own database. As a personal service used infrequently it can be a waste of money assigning a reserved quantity of Database Transaction Units (DTUs) to a single database. We can invest in a pool of DTUs to be shared among all SQL database instances.
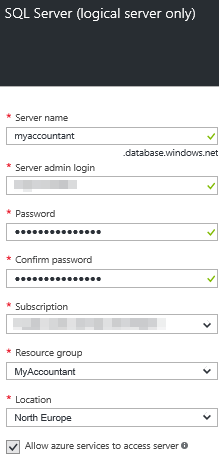
We can start by creating an SQL server service from the portal:
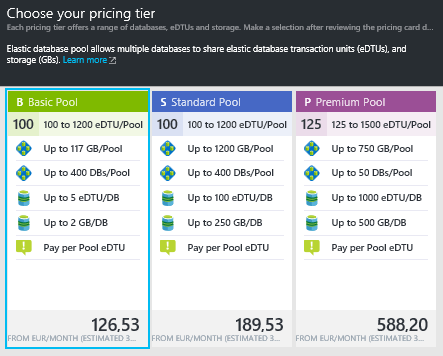
We need to create a pool of database resources (DTU) shared among databases:

We need to configure the pricing tier that defines the maximum resources allocated per database:
The first database that we need to manually deploy is the portal database, where a user will register the tenant. From the MyAccountantPool blade, we can create a new database that will be immediately associated to the pool:
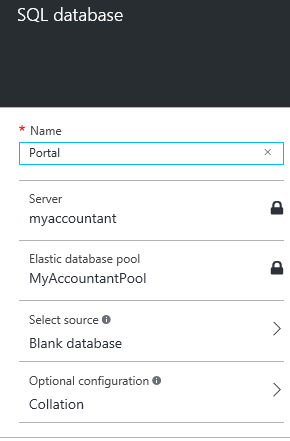
From the database blade, we can see the connection:
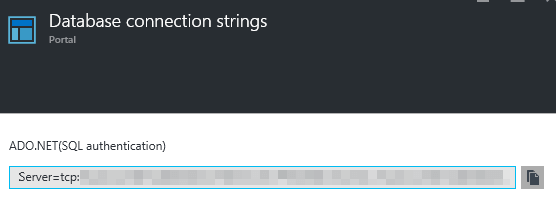
We will use that connection string to configure the portal app in web.config:
<connectionStrings>
    <add name="DefaultConnection" connectionString="Server=tcp: {portal_db}.database.windows.net,1433;Data Source={portal_db};.database.windows.net;Initial Catalog=Portal;Persist Security Info=False;User ID={your_username};Password={your_password};Pooling=False;MultipleActiveResultSets=False;Encrypt=True;TrustServerCertificate=False;Connection Timeout=30;" providerName="System.Data.SqlClient" />
</connectionStrings>
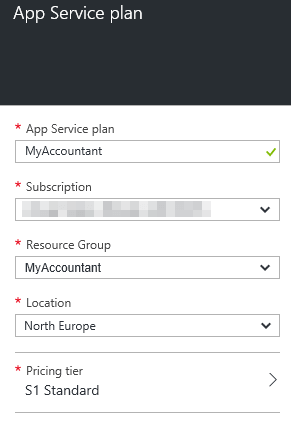
We need to create the shared resource for the web. In this case, we need to create an App Service Plan where we’ll host portal and tenant apps. The initial size is not a problem: we can decide to scale the solution up or out at any time (in this case only when the application is able to scale out – we don’t handle this scenario here).
Next, we need to create the portal web app that will be associated to the Service Plan that we have just created:

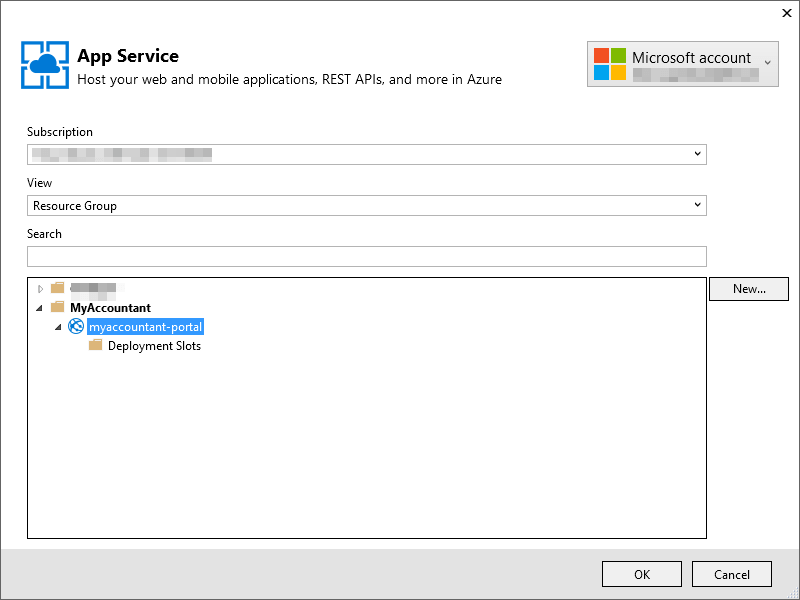
The portal can be deployed from Visual Studio to the Azure subscription by right-clicking on the project root in the Solution Explorer and selecting Publish | Microsoft Azure Web App:
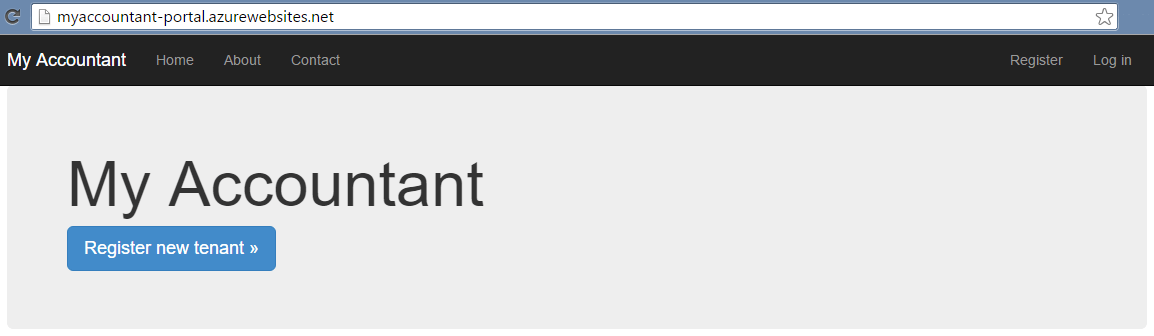
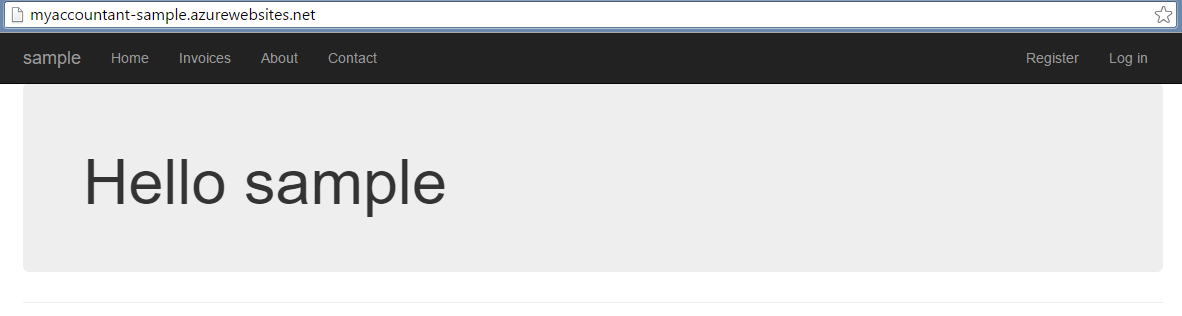
After deployment, the portal is up and running:
Deploy the Tenant App
After tenant registration from the portal, we need to deploy the tenant itself, which is made up of:
- The app itself that is considered as the artifact to be deployed
- A Web App that runs the app, hosted on the already defined Web App plan
- The Azure SQL database the contains data inside the Elastic Pool
- The connection string that connects the database to the WebApp in the web.config file
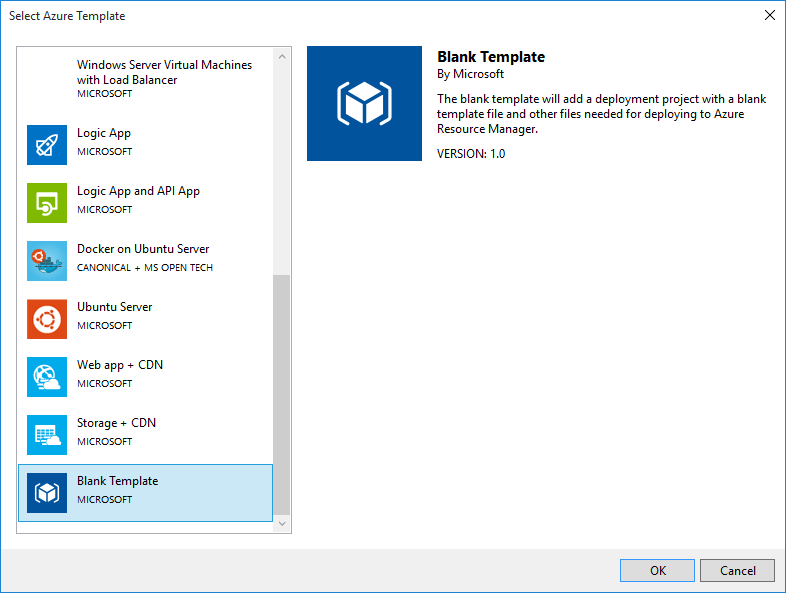
This is a complex activity as it involves many different resources, and different kinds of tasks, from deployment to configuration. For this reason, in Visual Studio we have the Azure Resource Group project where we can configure Web App deployment and configuration, via Azure Resource Manager templates. The project will be called Tenant. Deploy and we will choose a Blank template to do this:
In the azuredeploy.json file, we can create a template like this:
{
  "$schema": "http://schema.management.azure.com/schemas/2015-01-01/deploymentTemplate.json#",
  "contentVersion": "1.0.0.0",
  "parameters": {
    "TenantName": {
      "type": "string",
      "minLength": 1
    },
    "_artifactsLocation": {
      "type": "string"
    },
    "_artifactsLocationSasToken": {
      "type": "securestring"
    }
  },
  "resources": [
    {
      "name": "myaccountant",
      "type": "Microsoft.Sql/servers",
      "location": "[resourceGroup().location]",
      "apiVersion": "2014-04-01-preview",
      "dependsOn": [ ],
      "tags": {
        "displayName": "MyAccountant Sql Server"
      },
      "resources": [
        {
          "name": "AllowAllWindowsAzureIps",
          "type": "firewallrules",
          "location": "[resourceGroup().location]",
          "apiVersion": "2014-04-01-preview",
          "dependsOn": [
            "Microsoft.Sql/servers/myaccountant"
          ],
          "properties": {
            "startIpAddress": "0.0.0.0",
            "endIpAddress": "0.0.0.0"
          }
        },
        {
          "name": "[variables('TenantSqlDbName')]",
          "type": "databases",
          "location": "[resourceGroup().location]",
          "apiVersion": "2014-04-01-preview",
          "dependsOn": [
            "Microsoft.Sql/servers/myaccountant"
          ],
          "tags": {
            "displayName": "Tenant Sql Database"
          },
          "properties": {
            "collation": "[concat('SQL_Latin1_General_CP1_CI_AS')]",
            "edition": "Basic",
            "maxSizeBytes": "1073741824"
          }
        }
      ]
    },
    {
      "name": "MyAccountant",
      "type": "Microsoft.Web/serverfarms",
      "location": "[resourceGroup().location]",
      "apiVersion": "2014-06-01",
      "dependsOn": [ ],
      "tags": {
        "displayName": "MyAccountant"
      },
      "properties": {
        "name": "MyAccountant",
        "sku": "Standard",
        "workerSize": "Small",
        "numberOfWorkers": 1
      },
      "resources": [
        {
          "name": "[variables('TenantWebAppName')]",
          "type": "Microsoft.Web/sites",
          "location": "[resourceGroup().location]",
          "apiVersion": "2015-08-01",
          "dependsOn": [
            "[resourceId('Microsoft.Web/serverfarms/', 'MyAccountant')]"
          ],
          "tags": {
            "[concat('hidden-related:', resourceGroup().id, '/providers/Microsoft.Web/serverfarms/MyAccountant')]": "Resource",
            "displayName": "Tenant Web App"
          },
          "properties": {
            "name": "[variables('TenantWebAppName')]",
            "serverFarmId": "[resourceId('Microsoft.Web/serverfarms/', 'MyAccountant')]",
            "siteConfig": {
              "connectionStrings": [
                {
                  "Name": "InvoicesModel",
                  "ConnectionString": "[concat('Server=tcp:myaccountant.database.windows.net,1433;Data Source=myaccountant.database.windows.net;Initial Catalog=', variables('TenantSqlDbName'), ';Persist Security Info=False;User ID={your_username};Password={your_password};Pooling=False;MultipleActiveResultSets=False;Encrypt=True;TrustServerCertificate=False;Connection Timeout=30;')]",
                  "Type": "Sql Database"
                }
              ]
            }
          },
          "resources": [
            {
              "name": "appsettings",
              "type": "config",
              "apiVersion": "2015-08-01",
              "dependsOn": [
                "[concat('Microsoft.Web/sites/', variables('TenantWebAppName'))]"
              ],
              "tags": {
                "displayName": "WebAppSettings"
              },
              "properties": {
                "TenantName": "[parameters('TenantName')]"
              }
            },
            {
              "name": "MSDeploy",
              "type": "extensions",
              "location": "[resourceGroup().location]",
              "apiVersion": "2015-08-01",
              "dependsOn": [
                "[concat('Microsoft.Web/sites/', variables('TenantWebAppName'))]"
              ],
              "tags": {
                "displayName": "TenantWebAppDeploy"
              },
              "properties": {
                "packageUri": "[concat(parameters('_artifactsLocation'), '/Tenant.Web/package.zip', parameters('_artifactsLocationSasToken'))]",
                "dbType": "None",
                "setParameters": {
                  "IIS Web Application Name": "[variables('TenantWebAppName')]"
                }
              }
            }
          ]
        }
      ]
    }
  ],
  "variables": {
    "TenantWebAppName": "[concat('myaccountant-', parameters('TenantName'))]",
    "TenantSqlDbName": "[concat(parameters('TenantName'))]"
  }
}
The template is quite complex. Remember that on SQL connections, string username and password should be provided inside the template.
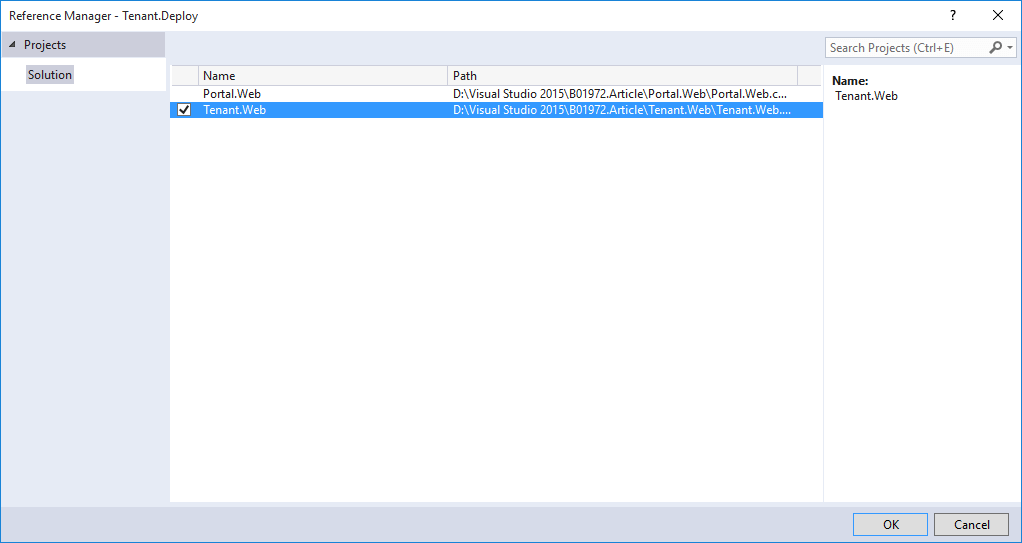
We need to reference Tenant.Web project from the deployment project as we need to deploy tenant artifacts (the project bits):
To support deployment, we need to create an Azure storage account back to the Azure portal:

To understand how it works, we can manually run a deployment directly from Visual Studio by right-clicking the deployment project from the Solution Explorer and selecting Deploy. An initial dialog will appear for deploying a “Sample” tenant:
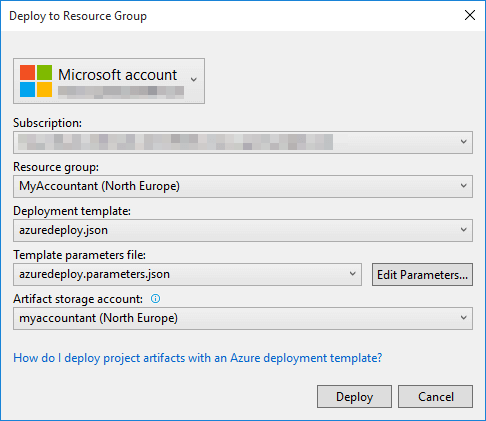
Here, we can see a connection to the Azure subscription by selecting an existing Resource Group or creating a new one, and the template that describes the deployment composition. The template requires some parameters from the Edit Parameters window:
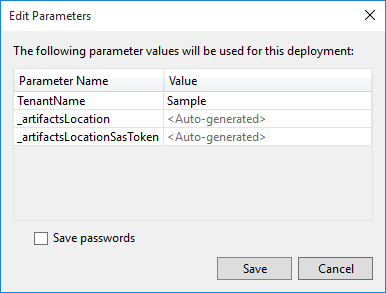
- The tenant name
- The artifact location and SasToken that are automatically added having selected the Azure storage account from the previous dialog
Now, via the included Deploy-AzureResourceGroup.ps1 PowerShell file, Azure resources are deployed: The artifact is copied with the AzCopy.exe command to the Azure storage in the Tenant. Web container as a package.zip file and the Resource Manager can start allocating resources.
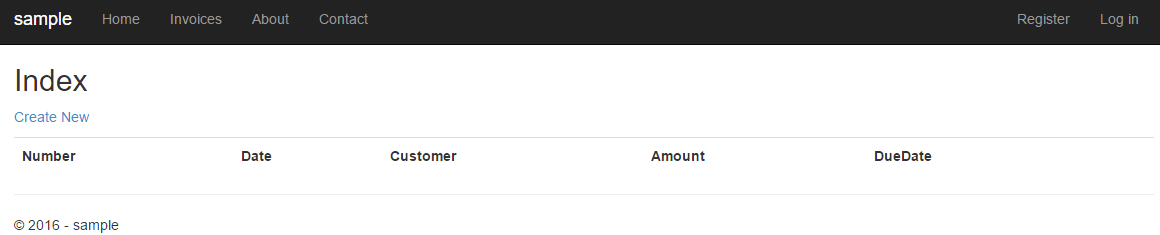
We can see that tenant is deployed:
Automate the tenant deployment process
To complete our solution, we need to invoke this deployment process from the portal application during the registration process call in ASP.NET MVC. For the purposes of this post, we will just invoke the execution without defining a production-quality deployment process.
We can make a checklist before proceeding:
- We already have an Azure Resource Manager template that deploys the “customized” tenant for the user
- Deployment is made with a PowerShell script in the Visual Studio deployment project
- A new registered user for our application does not have an Azure account: As service publisher, we must offer a dedicated Azure account, with our credentials, to deploy the new tenants
Azure offers many different ways to interact with an Azure subscription:
- The classic portal
- The new portal
- The resource portal
- Azure REST API
- Azure .NET SDK and other platforms
- The Azure CLI open source CLI
- PowerShell
For our requirements, that means we can make some considerations in integrating our application:
-
- We need to reuse the same ARM template we have defined
- We can reuse the PowerShell experience, but we would also use our experience as .NET, REST, or other platform developers
- Authentication is the real discriminator in our solution: The user is not an Azure subscription user and we don’t want to make this a constraint
Interacting with the Azure REST API, the API from which every other solution depends on, requires that all invocations must be authenticated to the Azure Active Directory of the subscription tenant. As we have already mentioned, the user is not a subscription-authenticated user.
So, we need an unattended authentication to our Azure API subscription using a dedicated user for this purpose, encapsulated into a component that is executed by the ASP.NET MVC application in a secure manner, to perform the tenant deployment.
The only environment that offers an out-of-the-box solution for our needs (that allows us to write less code) is the Azure Automation service.
Before proceeding, we start by creating a dedicated user for this purpose so that, for security reason, we can disable a specific user at any time. Please take note:
-
-
- Never use the credentials you used to register the Azure subscription in a production environment!
- For automation implementation, we need an Azure AD tenant user, so we cannot use Microsoft accounts (Live or Hotmail).
-
To create the user, we need to go to the classic portal, as Azure Active Directory has no equivalent management UI in the new portal. We need to select the tenant directory, that is the one in the new portal that is visible in the upper right-hand corner:
![]()
From the classic portal, go to the Azure Active Directory and select the tenant:

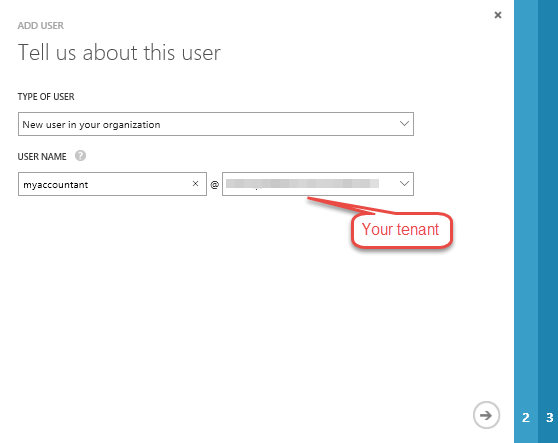
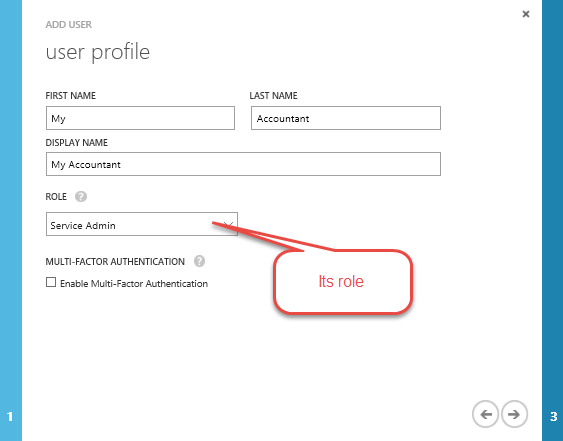
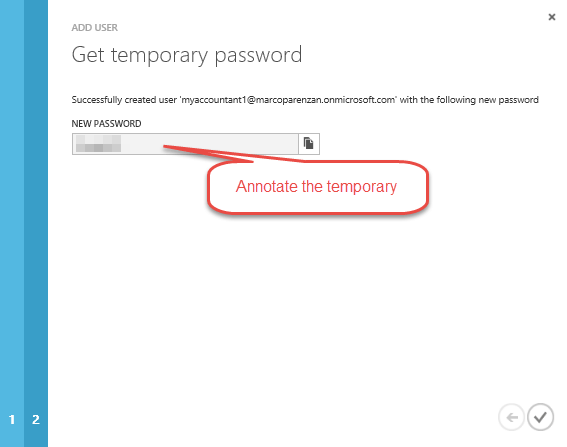
Press Add User and type a new username:
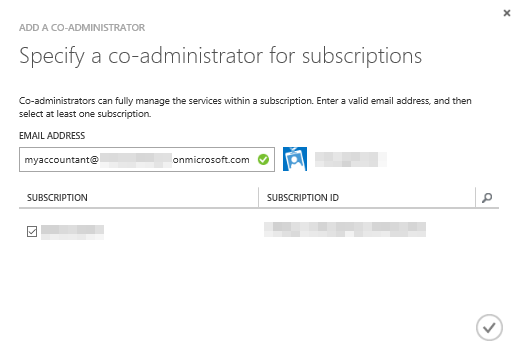
Next, we will go to the administrator management in the setting tab of the portal as we need to define the user as a co-administrator in the subscription that we will use for deployment.
With the temporary password, we need to manually log into https://portal.azure.com/ (open the browser in private mode) with these credentials because we need to change the password, as it is generated as “expired.”
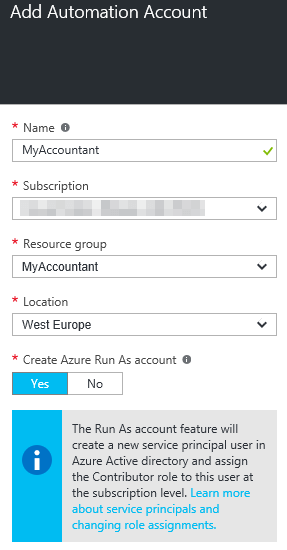
We are now ready to proceed. Back in the new portal, we select a new Azure Automation account:
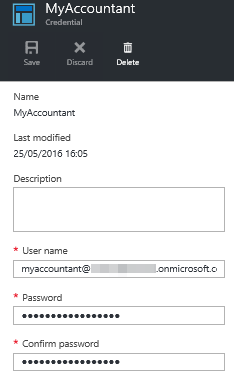
The first thing we need to do inside the account is to create a credential asset to store the newly created AAD credentials to use inside PowerShell scripts to log in on Azure:
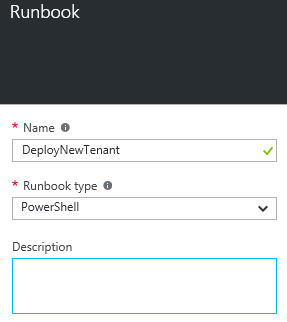
We can now create a Runbook, an automation task that can be expressed in several different ways:
-
-
- Graphical
- PowerShell
-
We will choose the second option:
Because we can edit it directly from the portal, we can write a PowerShell script for our purposes. It is an adaptation from the one we used in a standard way in the deployment project inside Visual Studio. The difference is that you can run it inside a Runbook and Azure, and it uses already deployed artifacts that are already in the Azure storage account that we created earlier.
Before proceeding, we need two Ids from our subscription:
-
-
- The subscriptionId
- The tenantId
-
The two parameters can be discovered with PowerShell, as we can perform a Login-AzureRmAccount Cmdlet and copy them from the output:

The code is not production quality (it needs some optimization) but for demo purposes:
param (
    $WebhookData,
    $TenantName
)
# If runbook was called from Webhook, WebhookData will not be null.
if ($WebhookData -ne $null) {
    $Body = ConvertFrom-Json -InputObject $WebhookData.RequestBody
    $TenantName = $Body.TenantName
}
# Authenticate to Azure resources retrieving the credential asset
$Credentials = Get-AutomationPSCredential -Name "myaccountant"
$subscriptionId = ‘{your subscriptionId}’
$tenantId = ‘{your tenantId}’
Login-AzureRmAccount -Credential $Credentials -SubscriptionId $subscriptionId -TenantId $tenantId
$artifactsLocation = 'https://myaccountant.blob.core.windows.net/myaccountant-stageartifacts'
$ResourceGroupName = 'MyAccountant'
# generate a temporary StorageSasToken (in a SecureString form) to give ARM template the access to the template and to the artifacts$StorageAccountName = 'myaccountant'
$StorageContainer = 'myaccountant-stageartifacts'
$StorageAccountKey = (Get-AzureRmStorageAccountKey -ResourceGroupName $ResourceGroupName -Name $StorageAccountName).Key1
$StorageAccountContext = (Get-AzureRmStorageAccount -ResourceGroupName $ResourceGroupName -Name $StorageAccountName).Context
$StorageSasToken = New-AzureStorageContainerSASToken -Container $StorageContainer -Context $StorageAccountContext -Permission r -ExpiryTime (Get-Date).AddHours(4)
$SecureStorageSasToken = ConvertTo-SecureString $StorageSasToken -AsPlainText -Force
#prepare parameters for the template
$ParameterObject = New-Object -TypeName Hashtable
$ParameterObject['TenantName'] = $TenantName
$ParameterObject['_artifactsLocation'] = $artifactsLocation
$ParameterObject['_artifactsLocationSasToken'] = $SecureStorageSasToken
$deploymentName = 'MyAccountant' + '-' + $TenantName + '-'+ ((Get-Date).ToUniversalTime()).ToString('MMdd-HHmm')
$templateLocation = $artifactsLocation + '/Tenant.Deploy/Templates/azuredeploy.json' + $StorageSasToken
# execute
New-AzureRmResourceGroupDeployment -Name $deploymentName `
                                   -ResourceGroupName $ResourceGroupName `
                                   -TemplateFile $templateLocation `
                                   @ParameterObject `
                                   -Force -Verbose
The script is executable in the Test pane, but for production purposes, it needs to be deployed with the Publish button.
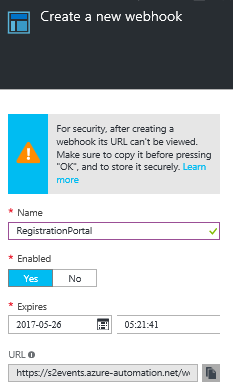
Now, we need to execute this Runbook from the outside ASP.NET MVC Portal that we have already created. We can use WebHooks for this purpose. WebHooks are user-defined HTTP callbacks that are usually triggered by some event, in our case, new tenant registration. Since they use HTTP, they can be integrated into web services without adding new infrastructure.
Runbooks can be directly exposed as a WebHook that provides HTTP endpoints natively without the need to provide one ourselves.
Here are a few things to remember at this stage:
-
-
- WebHooks are public with a shared secret in the URL, so it is “secure” if we don’t share it
- As a share, it expires, so we need to handle the WebHook update in the service lifecycle
- As a shared secret, if more users are needed, more WebHooks are needed, as the URL is the only way to recognize who invoked it (again, don’t share WebHooks)
- Copy the URL at this stage as it is not possible to recover; you will need to delete it and generate a new one
- Write it directly in the portal web.config app settings
<add key="DeplyNewTenantWebHook" value="https://s2events.azure-automation.net/webhooks?token={your_token}"/>
-
We could set some default parameters if needed, and then we can create it.
To invoke the WebHook, we will use the System.Net.HttpClient to create a Post request, putting in the body a JSON object containing the TenantName:
var requestBody = new {
    TenantName = model.TenantName
};
var httpClient = new HttpClient();
var responseMessage =
    await httpClient.PostAsync(
        ConfigurationManager.AppSettings["DeplyNewTenantWebHook"],
        new StringContent(JsonConvert.SerializeObject(requestBody))
    );
This code is used to customize the registration process in the AccountController:
public async Task<ActionResult> Register(RegisterViewModel model)
{
    if (ModelState.IsValid)
    {
        var user = new ApplicationUser { UserName = model.Email, Email = model.Email };
        var result = await UserManager.CreateAsync(user, model.Password);
        if (result.Succeeded)
        {
            await SignInManager.SignInAsync(user, isPersistent:false, rememberBrowser:false);
            // handle webhook invocation here
            var requestBody = new {
                TenantName = model.TenantName
            };
            var httpClient = new HttpClient();
            var responseMessage =
                await httpClient.PostAsync(
                    ConfigurationManager.AppSettings["DeplyNewTenantWebHook"],
                    new StringContent(JsonConvert.SerializeObject(requestBody))
                );
            // handle webhook invocation here
            return RedirectToAction("Index", "Home");
        }
        AddErrors(result);
    }
    // If we got this far, something failed, redisplay form
    return View(model);
}
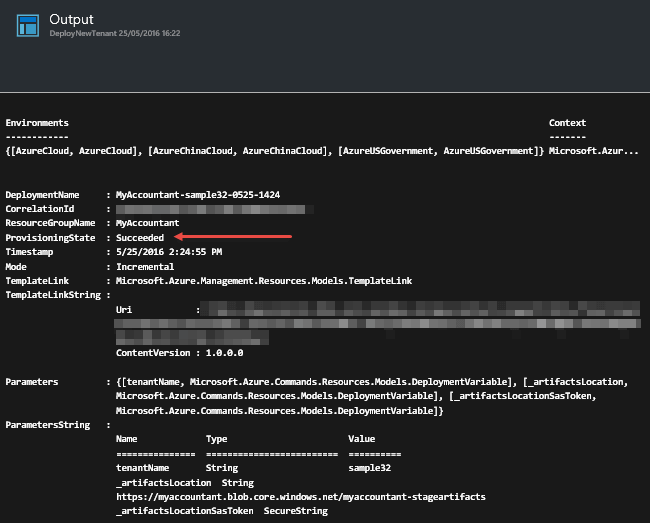
The ResponseMessage is again a JSON object that contains a JobId that we can use to programmatically access the executed job. We can check the output of the execution from the portal:
Conclusion
Azure can change the way we write our solutions by giving us a set of new patterns and powerful services to use for development. In particular, we have learned how to:
-
-
- Create multi-tenant apps to ensure confidentiality for users
- Deploy ASP.NET Web Apps in App Services
- Provision computing resources with App Services Plans
- Deploy SQL in Azure SQL Databases
- Provision computing resources with Elastic Pool
- Declare a deployment script with Azure Resource Manager and Azure Resource Template with Visual Studio cloud deployment projects
- Automate ARM PowerShell script execution with Azure Automation and Runbooks
-
There are a lot of things that we can do with what we have learned:
-
-
- Write better .NET code for multi-tenant apps
- Authenticate users with Azure Active Directory service
- Leverage deployment tasks with Azure Service Bus messaging
- Create more interaction and feedback during tenant deployment
- Learn how to customize ARM templates to deploy other Azure storage services like DocumentDb, Azure Storage, and Azure Search
- Handle more PowerShell for Azure Management tasks
-
Code can be found on GitHub: https://github.com/marcoparenzan/CreateMultitenantAppsInAzure
For a full kick start on Microsoft Azure why not start with our Introduction to Microsoft Azure Course