![]()
The internet was not originally architected to do all of the amazing things that it does today. A Content Delivery Network (CDN) is a network that serves web content to users based on their geographic location, the origin of the page, and the content delivery server itself. CDNs carry a significant portion of the world’s Internet traffic. In doing so, they help mitigate some of the toughest challenges of delivering content over the Internet. Microsoft Azure released its own version, Azure CDN, to make the Internet work better, deliver media at scale, and to enable all of the connected experiences you can imagine. In this post, we’ll review how to manage your cloud content assets using Azure CDN and .Net client library, we will take a closer look at what Azure CDN offers, and we’ll walk you through the process of implementing an Azure CDN origin server.
What is Azure CDN?
The Microsoft Azure Content Delivery Network offers developers a global solution for delivering high-bandwidth content hosted in Azure or any other location. Using the CDN, you can cache publicly available objects loaded from Azure blob storage, web applications, virtual machines, application folders, or other HTTP/HTTPS locations. The CDN is used for delivering static content such as images, style sheets, documents, files, client-side scripts, and HTML pages as well as serving dynamic content, such as a PDF report or a graph based on specified inputs.
The major advantages of using the CDN are lower latency and faster delivery of content to users irrespective of their geographical location in relation to the data center where the application is hosted.
How does Azure CDN work?
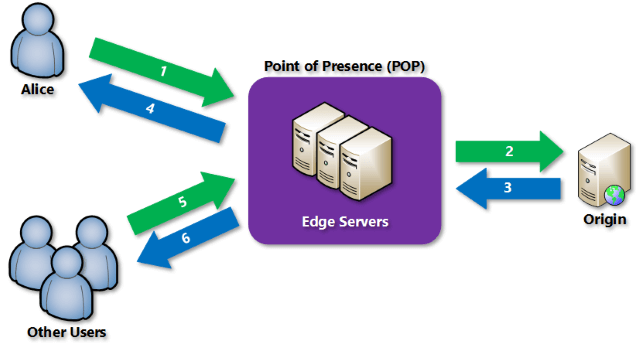
Here is a typical scenario for Azure CDN: A user requests a file using a URL with a special domain name, such as <endpointname>.azureedge.net. The DNS routes the request to the best performing Point-of-Presence (POP) location. Usually, this is the POP that is geographically closest to the user. If the edge servers in the POP do not have the file in their cache, the edge server requests the file from the origin, which can be an Azure Web App, Azure Cloud Service, Azure Storage account, or any publicly accessible web server, etc.
The origin returns the file to the edge server, including optional HTTP headers describing the file’s Time-to-Live (TTL).The edge server caches the file and returns the file to the original requestor (in this case, our user Alice, below). The file remains cached on the edge server until the TTL expires. If the origin did not specify a TTL, the default TTL is seven days. Additional users may then request the same file using that same URL, and may also be directed to that same POP. If the TTL for the file hasn’t expired, the edge server returns the file from the cache. This results in a faster, more responsive user experience.
To explain this progress in a clear way, we’re going to implement an Azure CDN origin server. Using an Azure blob storage account, we’ll create two different containers with different block blobs, then we’ll manage the blobs in two different containers with different expiration dates by using a .Net client library.
Getting started with Azure CDN
There are three Azure CDN products: Azure CDN Standard from Akamai, Azure CDN Standard from Verizon, and Azure CDN Premium from Verizon. The cost depends on Azure CDN POP Locations and outbound transfer data. Instead of using POP locations to decide which Azure CDN product to use, Microsoft recommends that you consider features and end-user performance. Test the performance with both providers to choose the right Azure CDN product for your users.
You can learn more information about Azure CDN Features in the official Azure documentation, and if you want more details about Azure CDN pricing, please refer to official Azure pricing and the Azure pricing calculator to evaluate the options based on your budget and requirements.
In action: Integrate an Azure storage account with Azure CDN
To start, we’ll create a resource group that will contain all of the resources in this test. Next, we’ll create a storage account ‘testoriginblob,’ which is blob storage as an origin server of Azure CDN. The simplest way is to create the storage account via the Azure portal.
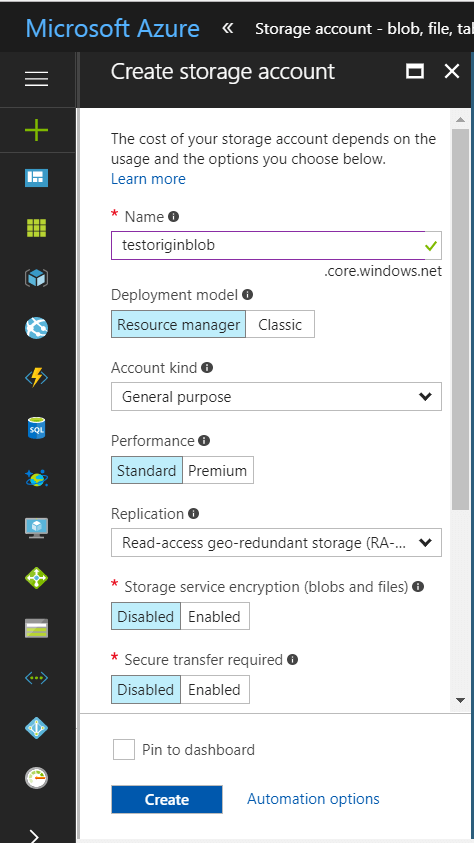
After you have successfully created the blob storage account, hang on to the URL, as well’ll need this when we create our new CDN profile.
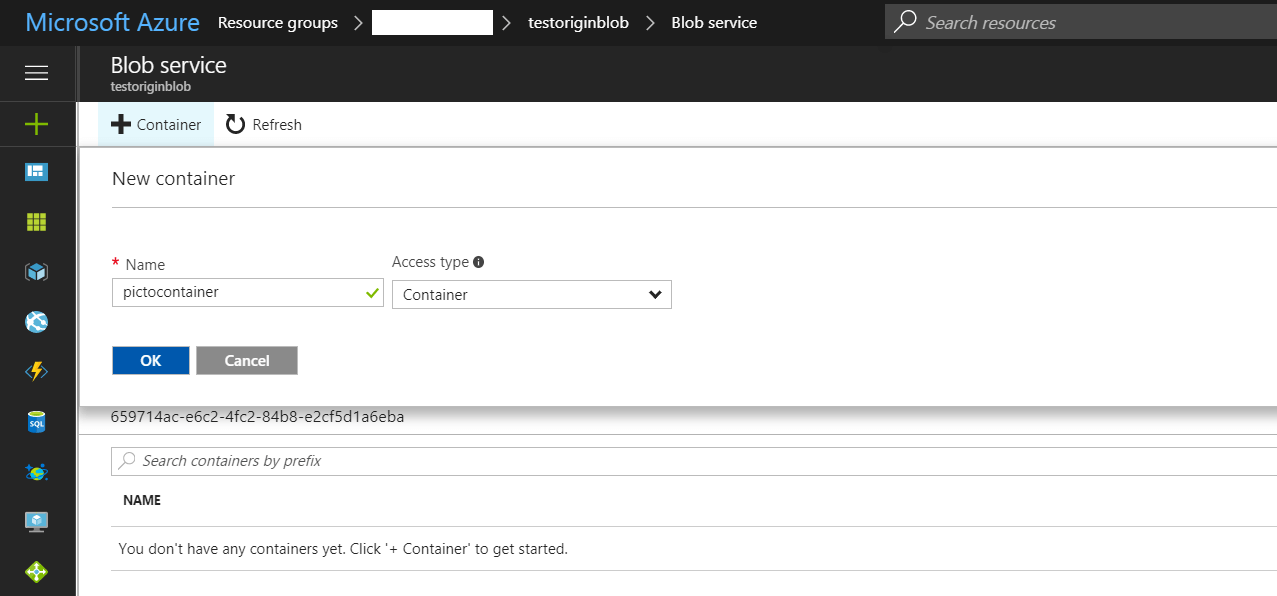
Now, we can create two testable containers, which are ‘pictocontainer’ and ‘imagecontainer’, and then upload two pictures in each container. When creating the container in blob storage, there is a ‘blob’ and a ‘container ‘ type. By default, container data is private to the account owner. When you choose ‘blob,’ this means that it will allow public read access for blobs. If you choose to use a ‘Container’ this will allow public read and list access to the entire container.
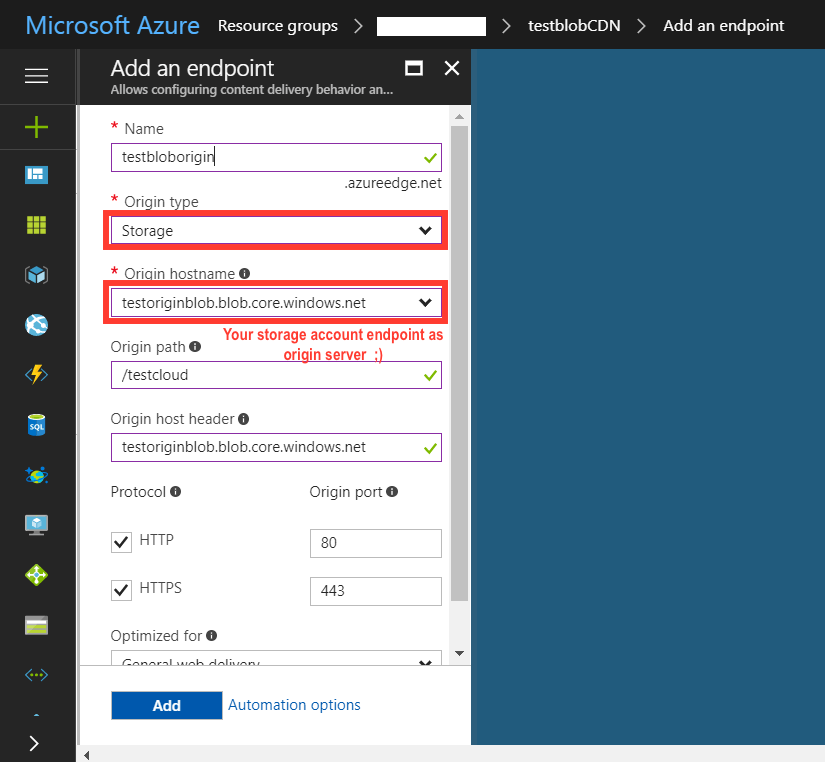
To enable CDN for the storage account, we’ll create a CDN profile. When configuring the CDN endpoint, we’ll point the origin server to the host of your storage account.
Azure supports custom CDN endpoint for any origin. This includes the ability to create an origin in your own data center, an origin provided by third party cloud providers, etc. This means that we can use any origin with Azure CDN.
Azure CDN also supports some additional features. From storage account “Azure CDN” blade, click the CDN endpoint from the list to open the CDN configuration blade. We can enable additional CDN features for delivery, such as compression, query strings, or geo-filtering. We can also add custom domain mapping to your CDN endpoint and enable custom domain HTTPS. To use this feature of the Azure CDN premium offering from Verizon, please refer to Using the Azure CDN to access blobs with custom domains over HTTPS for more information.
In action: Managing expiration of Azure Storage blobs in Azure CDN
We’re going to manage cloud assets such as pictures in a programming way to set the different expiration dates as a general rule for containers that contain pictures stored in block blobs in different containers. In our scenario, the blob service in Azure Storage is one of several Azure-based origins integrated with Azure CDN. Any publicly accessible blob content can be cached in Azure CDN until its time-to-live (TTL) elapses. The TTL is determined by the Cache-Control header in the HTTP response from Azure Storage.
The Cache-Control general-header field is used to specify directives that must be obeyed by all caching mechanisms along the request/response chain. The directives specify behavior intended to prevent caches from adversely interfering with the request or response. These directives typically override the default caching algorithms. Cache directives are unidirectional in that the presence of a directive in a request does not imply that the same directive is to be given in the response.
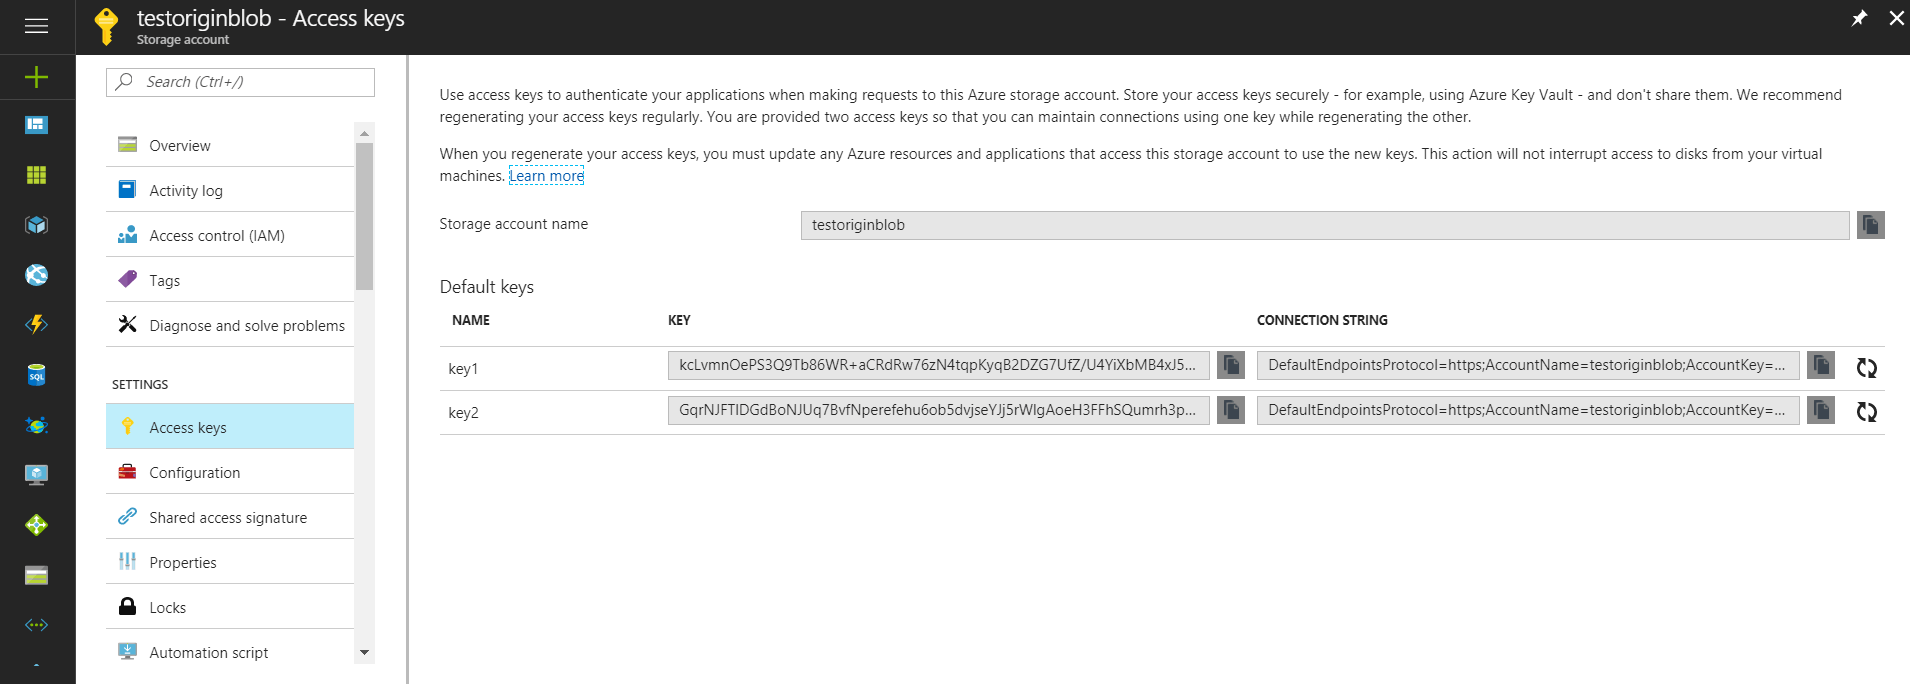
To access blob storage in a programming way, we first need to create a C# console project. Then, we should get the connection string of your storage account. Let’s go to the ‘Access Keys’ blade to get the access key or the connection string.
Next, we should add this information in an app.config file like below:
<appSettings>
     <add key="StorageConnectionString" value="DefaultEndpointsProtocol=https;AccountName=[ Your storage account name ];AccountKey=[ account key ];EndpointSuffix=core.windows.net" />
</appSettings>
In the program.cs file, we can start to create a sample program that will call the testblobCDN function in the main function, and it will deal with the exceptions when the program fails. Here is the sample code:
 public class Program
   {
       static void Main(string[] args)
       {
           //Console.WriteLine("Azure Blob Storage - Getting Started Samples\n");
           TestblobCDN.CallBlobGettingStartedSamples();
           Console.ReadLine();
       }
   }
}
Following best practices in programming, we will write the method for the read configurations. Here is the sample code in common.cs class:
  namespace BlobStorage
{
    using System;
    using Microsoft.Azure;
    using Microsoft.WindowsAzure.Storage;
    public static class Common
    {
        public static CloudStorageAccount CreateStorageAccountFromConnectionString()
        {
            CloudStorageAccount storageAccount;
 	const string Message = "Invalid storage account information provided. Please confirm the AccountName and AccountKey are valid in the app.config file - then restart the sample.";
           try
            {
                storageAccount = CloudStorageAccount.Parse(CloudConfigurationManager.GetSetting("StorageConnectionString"));
            }
            catch (FormatException)
            {
                Console.WriteLine(Message);
                Console.ReadLine();
                throw;
            }
            catch (ArgumentException)
            {
                Console.WriteLine(Message);
                Console.ReadLine();
                throw;
            }
            return storageAccount;
        }
    }
}
Finally, in testBlob.cs, which is the principal part of our program, we’re going to read the blob list in ímagecontainer and pictocontainer and then set the cache control header as two hours for blobs in imagecontainer and one hour for blobs in pictocontainer. Here is the sample code:
using System;
using System.IO;
using System.Linq;
using System.Threading.Tasks;
using Microsoft.WindowsAzure.Storage;
using Microsoft.WindowsAzure.Storage.Auth;
using Microsoft.WindowsAzure.Storage.Blob;
using Microsoft.WindowsAzure.Storage.RetryPolicies;
namespace BlobStorage
{
    class TestblobCDN
    {
        public static void CallBlobGettingStartedSamples()
        {
            // Block blob basics
            GettingBlobsOperationsAsync().Wait();
        }
        private static async Task GettingBlobsOperationsAsync()
        {
            Console.WriteLine("1. Loading blob storage ...");
            // Retrieve storage account information from connection string
            // CloudStorageAccount storageAccount = CloudStorageAccount.Parse(connectionString);
            CloudStorageAccount storageAccount = Common.CreateStorageAccountFromConnectionString();
            // Create a blob client for interacting with the blob service.
            CloudBlobClient blobClient = storageAccount.CreateCloudBlobClient();
            // Create a reference to the container
            CloudBlobContainer pictoContainer = blobClient.GetContainerReference("pictocontainer");
            CloudBlobContainer imageContainer = blobClient.GetContainerReference("imagecontainer");
            Console.WriteLine(" Picto container reference is {0} \n image container reference 2 is {1}", pictoContainer, imageContainer);
            BlobRequestOptions requestOptions = new BlobRequestOptions() { RetryPolicy = new NoRetry() };
            await pictoContainer.CreateIfNotExistsAsync(requestOptions, null);
            await imageContainer.CreateIfNotExistsAsync(requestOptions, null);
            Console.WriteLine("2.1 List Blobs in picto Container");
            foreach (IListBlobItem picto in pictoContainer.ListBlobs(useFlatBlobListing: true))
            {
                // Blob type will be CloudBlockBlob, CloudPageBlob or CloudBlobDirectory
                // Use blob.GetType() and cast to appropriate type to gain access to properties specific to each type
                Console.WriteLine("- {0} (type: {1})", picto.Uri, picto.GetType());
                Console.WriteLine("3.1 Setting picto storage expiration date...");
                CloudBlob pictoblob = (CloudBlob)picto;
                // Set the CacheControl property to expire in 1 hour (3600 seconds)
                pictoblob.Properties.CacheControl = "public, max-age=3600";
                pictoblob.SetProperties();
            }
            Console.WriteLine("2.2 List Blobs in image Container");
            foreach (IListBlobItem image in imageContainer.ListBlobs())
            {
                // Blob type will be CloudBlockBlob, CloudPageBlob or CloudBlobDirectory
                // Use blob.GetType() and cast to appropriate type to gain access to properties specific to each type
                Console.WriteLine("- {0} (type: {1})", image.Uri, image.GetType());
                Console.WriteLine("3.2 Setting image storage expiration date...");
                CloudBlob imageblob = (CloudBlob)image;
                // Set the CacheControl property to expire in 2 hour (7200 seconds)
                imageblob.Properties.CacheControl = "public, max-age=7200";
                imageblob.SetProperties();
            }
        }
    }
}
Demonstration time:
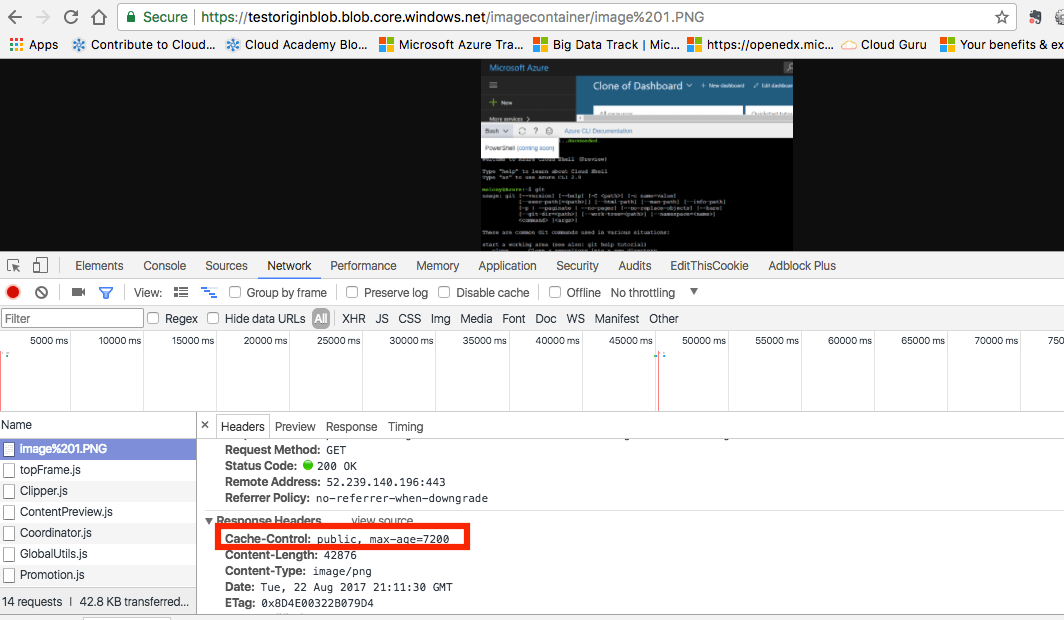
After launching our program, we can go to the Azure storage account via the Azure portal to get the URL for our blobs. In our case, it will be a URL like the one below:
https://testoriginblob.blob.core.windows.net/imagecontainer/image1.PNG
https://testoriginblob.blob.core.windows.net/pictocontainer/picto1.PNG
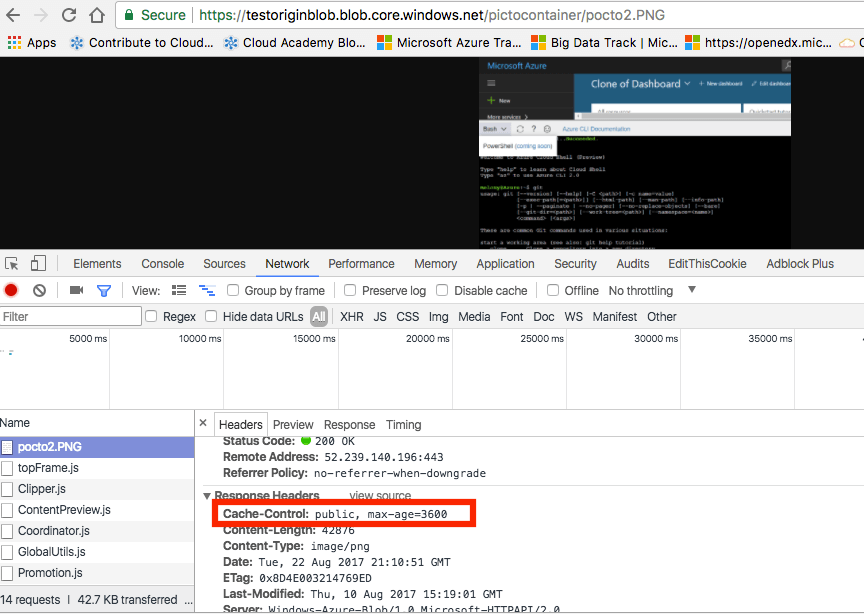
Next, we can use our browser’s network blade to check out the cache control of our pictures. In our test, I used Google Chrome. We can see that the pictures in the control cache for imagecontainer and pictocontainer’s have the max-age 7200s (2 hours) and 3600s (1 hour). Here is the screenshot for pictures in the image container:
Here is the screenshot for pictures in the picto container:
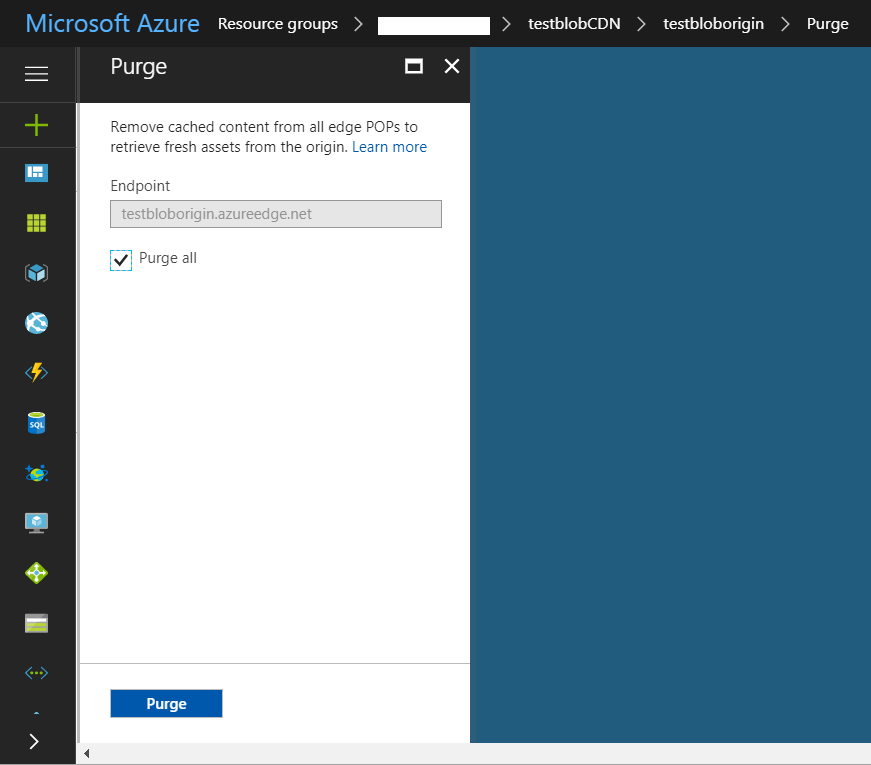
Purge an Azure CDN endpoint
Azure CDN edge nodes will cache assets until the asset’s time-to-live (TTL) expires. After the asset’s TTL expires, when a client requests the asset from the edge node, the edge node will retrieve a new, updated copy of the asset to serve the client request and refresh the cache.
To make sure your users always obtain the latest copy of your assets, the best practice is to version your assets for each update and publish them as new URLs. CDN will immediately retrieve the new assets for the next client requests.
Other times, you may want to purge cached content from all edge nodes and force them all to retrieve new, updated assets. This could be due to updates to your web application, or to quickly update assets that contain incorrect information. Note that purging only clears the cached content on the CDN edge servers. Any downstream caches, such as proxy servers and local browser caches, may still hold a cached copy of the file. It’s important to remember this when you set a file’s time-to-live. You can force a downstream client to request the latest version of your file by giving it a unique name every time you update it, or by taking advantage of query string caching.
Conclusion
In writing this post, I really enjoyed switching from the Azure portal and C# .net programming. Since the cloud is the new normal, we’re not only going to use basic components such as compute, database, storage, and network. Management and support services on the cloud will become more and more important in our projects to help us improve performance and facilitate our work.
The greatest advantage of working with Microsoft Azure is that we can use our past experience with other Microsoft solutions. Other examples include Azure PowerShell, Azure CLI, client library in C#.net, node.js, or Ruby. Working with Azure is really a joy, so stay tuned for new posts on working with Azure!