![]()
AWS has just added two cool new (and long-awaited) features to the EC2 API. The first feature is related to AWS Identity and Access Management (IAM) roles associated with EC2 instances and the ability to add, remove, and replace them. The second one is about Amazon Elastic Block Store (EBS) volumes and the ability to modify existing volumes. In this post, we’ll review these new AWS EC2 features, and we’ll talk about how we can take advantage of them in a few real-world scenarios. Both can be used in instances running Linux or Windows systems.
IAM Roles and EC2 Instances
Security is a very important aspect when designing a new architecture in the cloud. Many of us don’t really think of it until our platform is already in production.
Because of this, and before continuing, let’s review IAM best practices:
– Users: Create individual users. This means that each person that needs access to our AWS account must have his/her own user account. Do not share user accounts.
– Permissions: Grant the least amount of privileges possible. Users should only have the permissions necessary to get the job done; no more, no less.
– Groups: This is the best way to avoid issues as the number of users grows. Create groups, assign users to groups, and always give permissions only to these groups. You can add a user to many groups depending on his/her job function or responsibilities.
– Auditing: Enable AWS CloudTrail to get logs of API calls. This will help us to know who did what, when, and where, whenever necessary.
– Conditions: With conditions, we restrict access even further. We can restrict based on tags. For instance, a user will be able to stop, start, and/or terminate only instances that have his/her username in a tag, or if the tag “Environment” is set to “Development,” for example.
– Password: Configure a strong password policy.
– Rotate: Regularly enforce the rotation of user credentials:
- While the first set of credentials is still active, create a second set of credentials that will also be active by default.
- Update all applications to use the new credentials.
- Change the state of the first set of credentials to Inactive.
- Using only the new credentials, confirm that your applications are working well.
- Delete the first set of credentials.
– MFA: Enable MFA at least for privileged users.
– Sharing: Use IAM roles to share access.
– Root: Reduce or remove the use of the root account.
– Roles: Always use IAM roles for Amazon EC2 instances.
Now let’s focus on this final point: IAM Roles for Amazon EC2 instances.
If we also take into consideration the rule “Regularly enforce the rotation of user credentials,” then these two simple security rules are going to make the maintenance of our application a little difficult. We have to pass through those 5 steps to be sure that our application is going to work with the new set of keys.
As an example, let’s take an old piece of software that stores data on an NFS mount. This was our first version. After a few months, we were given the task of improving our application using Amazon S3 to store that data as it provides not only scalability and high availability but also durability. So, we start to make the changes to it. In this case, we can add the logic in our application to obtain the credentials, access, and secret keys from a configuration file or from environment variables. Of course, this is not the ideal way to do it. If we are regularly enforcing the rotation of credentials we will need to change these application credentials as well.
The correct way to do this is by using IAM roles for EC2 instances. This will give our application the protection needed to make requests to the AWS S3 API, and at the same time, we won’t have to worry about rotating credentials.
So, we will create a new IAM policy with the appropriate permissions. Next, we will create a new IAM role using EC2 as a trust entity, and we can add the policy to it. Now, we can launch a new instance assigning the newly created IAM role, deploy our application into that new instance, and finally terminate the old instance. In other words, we start to roll an incremental deployment to replace all of the instances that we need to upgrade with our new code and assign the new IAM role to each one.
Everything is good up to this point. But what if we are not allowed to simply terminate instances and launch new ones to replace them? This is where a new feature comes to the rescue: Attaching an IAM role to an existing EC2 instance.
How do I attach an IAM role to an existent instance?
After we have created our IAM role, we can assign it to our instances using the AWS CLI:
aws ec2 associate-iam-instance-profile \
    --instance-id i-00112233aabbccddd \
    --iam-instance-profile Name=MyAppDataRole
This command will give us the following output:
{
    "IamInstanceProfileAssociation": {
        "InstanceId": "i-00112233aabbccddd",
        "State": "associating",
        "AssociationId": "iip-assoc-0a0b11aa22bbb334d",
        "IamInstanceProfile": {
            "Id": "AIPAJFXMQ55GM44DA3KUA",
            "Arn": "arn:aws:iam::123456789012:instance-profile/MyAppDataRole"
        }
    }
}
And that’s it! Easy, right? We can now test our application without providing credentials.
If we need to replace the IAM role assigned to an instance for any reason, we can run the following command:
aws ec2 replace-iam-instance-profile-association \
    --association-id iip-assoc-0a0b11aa22bbb334d \
    --iam-instance-profile Name=MyNewAppDataRole
If we don’t know the AssociationId but we know the InstanceId, run the following command:
aws ec2 describe-iam-instance-profile-associations --filters "Name=instance-id,Values=i-00112233aabbccddd"
Finally, if you want to remove the association of the IAM role with the instance, run the following command:
aws ec2 disassociate-iam-instance-profile --association-id iip-assoc-0a0b11aa22bbb334d
Output:
{
    "IamInstanceProfileAssociation": {
        "InstanceId": "i-00112233aabbccddd",
        "State": "disassociating",
        "AssociationId": "iip-assoc-0a0b11aa22bbb334d",
        "IamInstanceProfile": {
            "Id": "AIPAJFXMQ36GM43DA3KUA",
            "Arn": "arn:aws:iam::099912429458:instance-profile/MyAppDataRole"
        }
    }
}
Now we can associate, replace the association, and remove the association of IAM roles to and from existing instances using the AWS CLI. As I mentioned before, this is very useful when we cannot terminate the instances and create new ones. I personally had this case with Windows systems with SQL Server installed that are joined to a domain, but there plenty of other cases where this applies.
Elastic Volumes
The second long-awaited new feature is the ability to change the size of and type of an existing EBS.
In the past, if we needed to add capacity to a volume, we had to create a snapshot from it, then we create a new volume using that snapshot and set the new desired capacity. After that, we had to unmount the smaller volume from the instance within the operating system, attach the new volume, detach the old volume, and finally mount the new one. This was a lot of work for a simple task. And I didn’t even mention that we should stop the instance to ensure the integrity of the disk, and start it again when finished.
Let’s learn the steps required to modify an existing EBS:
* Let’s ssh to our instance to see the current set of disks:
(I’m using the IP address 10.10.10.236 and mykey.pem as an example; you have to use the correct values for your case.)
ssh -i mykey.pem ec2-user@10.10.10.236
Let’s assume that we have launched an Amazon Linux instance with 2 volumes of 8 GB each. So, when we run the lsblk command, this will be the output:
[ec2-user@ip-10-10-10-236 ~]$ lsblk
NAME    MAJ:MIN RM SIZE RO TYPE MOUNTPOINT
xvda    202:0   0 8G 0 disk
└─xvda1 202:1   0 8G 0 part /
xvdb    202:16  0 8G 0 disk
└─xvdb1 202:17  0 8G 0 part
[ec2-user@ip-10-10-10-236 ~]$ exit
* Find out the VolumeId of the volume we want to modify:
aws ec2 describe-instances \
    --instance-ids i-01ea4c9c2b940f554 \
    --query "Reservations[*].Instances[*].BlockDeviceMappings[*].Ebs" \
    --output json
This command will show us the information we need:
[
  [
    [
      {
        "Status": "attached",
        "DeleteOnTermination": true,
        "VolumeId": "vol-035f13e9d6babd174",
        "AttachTime": "2017-02-26T06:16:38.000Z"
      },
      {
        "Status": "attached",
        "DeleteOnTermination": false,
        "VolumeId": "vol-06f1be2c19d8b8b5a",
        "AttachTime": "2017-02-26T06:16:38.000Z"
      }
    ]
  ]
]
The first one is the volume that has the root partition. The second one is the volume we want to modify. The first volume can be modified, but the instance has to be stopped, and the modification is made in another instance by detaching from the first one and attaching in the other instance. For now, we are going to modify only the vol-06f1be2c19d8b8b5a volume.
* Let’s see the volume’s information:
aws ec2 describe-volumes --volume-ids vol-06f1be2c19d8b8b5a
The output would be something like this:
{
  "Volumes": [
    {
      "AvailabilityZone": "us-east-1c",
      "Attachments": [
        {
          "AttachTime": "2017-02-26T06:16:38.000Z",
          "InstanceId": "i-01ea4c9c2b940f554",
          "VolumeId": "vol-06f1be2c19d8b8b5a",
          "State": "attached",
          "DeleteOnTermination": false,
          "Device": "/dev/sdb"
        }
      ],
      "Encrypted": false,
      "VolumeType": "gp2",
      "VolumeId": "vol-06f1be2c19d8b8b5a",
      "State": "in-use",
      "Iops": 100,
      "SnapshotId": "",
      "CreateTime": "2017-02-26T06:16:38.818Z",
      "Size": 8
    }
  ]
}
We can see here that the size is 8 GB, and the type is gp2.
* Let’s modify the volume’s size to 50 GB and change the type to io1:
aws ec2 modify-volume \
    --volume-id vol-06f1be2c19d8b8b5a
    --size 50
    --volume-type io1
Output:
{
  "VolumeModification": {
    "TargetSize": 50,
    "TargetVolumeType": "io1",
    "ModificationState": "modifying",
    "VolumeId": "vol-06f1be2c19d8b8b5a",
    "TargetIops": 100,
    "StartTime": "2017-02-26T06:29:34.321Z",
    "Progress": 0,
    "OriginalVolumeType": "gp2",
    "OriginalIops": 100,
    "OriginalSize": 8
  }
}
Note the values:
- OriginalSize: 8
- OriginalVolumeType: gp2
- TargetSize: 50
- TargetVolumeType: io1
Also, note that the value of the key ModificationState is modifying.
After a few minutes, if you run the describe-volumes command again, you will see the changes applied:
aws ec2 describe-volumes --volume-ids vol-06f1be2c19d8b8b5a
Output:
{
  "Volumes": [
    {
      "AvailabilityZone": "us-east-1c",
      "Attachments": [
        {
          "AttachTime": "2017-02-26T06:16:38.000Z",
          "InstanceId": "i-01ea4c9c2b940f554",
          "VolumeId": "vol-06f1be2c19d8b8b5a",
          "State": "attached",
          "DeleteOnTermination": false,
          "Device": "/dev/sdb"
        }
      ],
      "Encrypted": false,
      "VolumeType": "io1",
      "VolumeId": "vol-06f1be2c19d8b8b5a",
      "State": "in-use",
      "Iops": 100,
      "SnapshotId": "",
      "CreateTime": "2017-02-26T06:16:38.818Z",
      "Size": 50
    }
  ]
}
Pretty easy, huh? Well, there is one other thing that we need to do: Resize the volume within our instance.
So, let’s do that now.
Next, ssh into the instance again:
ssh -i mykey.pem ec2-user@10.10.10.236
Now, let’s check our disks:
[ec2-user@ip-10-10-10-236 ~]$ lsblk
NAME    MAJ:MIN RM SIZE RO TYPE MOUNTPOINT
xvda    202:0    0   8G  0 disk
└─xvda1 202:1    0   8G  0 part /
xvdb    202:16   0  50G  0 disk
└─xvdb1 202:17   0   8G  0 part
We can see here that our /dev/xvdb1 partition is still 8G, but the disk is now 50G. We are on the right track. Let’s resize that partition using parted:
[ec2-user@ip-10-10-10-236 ~]$ sudo parted /dev/xvdb
GNU Parted 2.1
Using /dev/xvdb
Welcome to GNU Parted! Type 'help' to view a list of commands.
In the (parted) prompt, let’s type “unit s” and press Enter to change the measure to sectors.
Next, let’s type “print” and press Enter, to see the current partitions. This will show us:
Model: Xen Virtual Block Device (xvd)
Disk /dev/xvdb: 104857600s
Sector size (logical/physical): 512B/512B
Partition Table: msdos
Number Start End       Size      Type    File system Flags
  1    2048s 16777215s 16775168s primary ext4
Now, delete the partition number 1 typing “rm 1” and press Enter in the (parted) prompt.
Next, type “mkpart primary 2048s 100%” and press Enter. This is because the start of the partition 1 is the sector 2048 and now we want to use all the space on the disk, the 100%.
Finally, type “quit” and press Enter to exit the parted utility.
Let’s check our new partition for errors:
[ec2-user@ip-10-10-10-236 ~]$ sudo e2fsck -f /dev/xvdb1
e2fsck 1.42.12 (29-Aug-2014)
Pass 1: Checking inodes, blocks, and sizes
Pass 2: Checking directory structure
Pass 3: Checking directory connectivity
Pass 4: Checking reference counts
Pass 5: Checking group summary information
/dev/xvdb1: 14/524288 files (0.0% non-contiguous), 70290/2096896 blocks
Everything seems to be working. Now, verify that the partition is using the full capacity of the disk:
[ec2-user@ip-10-10-10-236 ~]$ lsblk
NAME    MAJ:MIN RM SIZE RO TYPE MOUNTPOINT
xvda    202:0    0   8G 0 disk
└─xvda1 202:1    0   8G 0 part /
xvdb    202:16   0  50G 0 disk
└─xvdb1 202:17   0  50G 0 part
Excellent! We have successfully modified the size of the partition!
However, before doing all of that, we have to consider the following:
- All of the partition from the volume we want to expand must be unmounted.
- Create a snapshot of the volume before this process. If something goes wrong, we can restore it from that last snapshot.
- If you want to expand the root partition, then you have to stop the instance, detach the volume, and attach it to another instance. Make the changes there and attach it back to the original instance.
In case we are using a Windows Server instance:
First, login into the instance and open Computer Management. Expand Storage and then click on Disk Management:
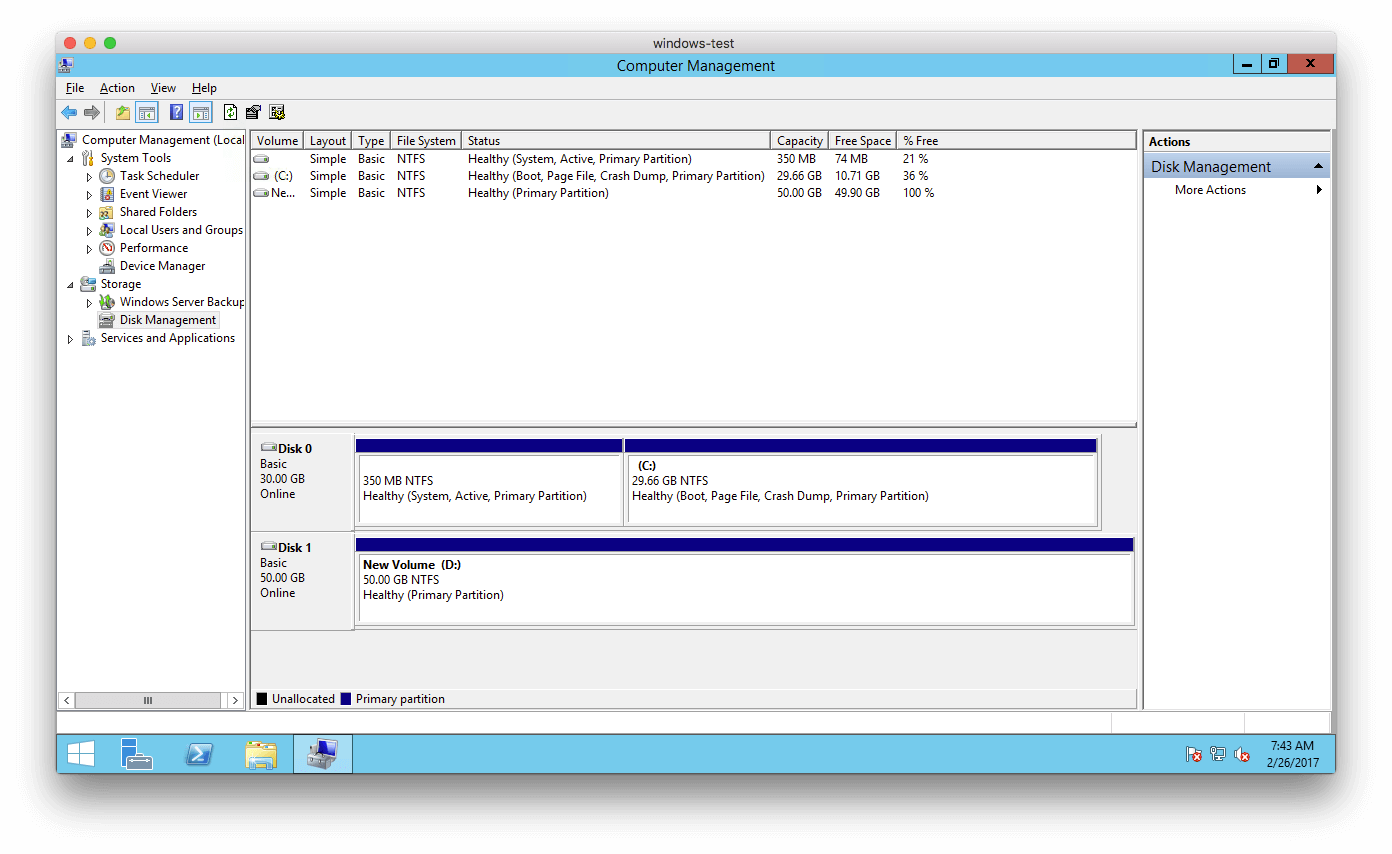
We want to expand the Disk 1 from 50 GB to 100 GB. We have to run the following command in our workstation:
aws ec2 modify-volume --volume-id vol-0f6253ddfe034a075 --size 100 --volume-type io1
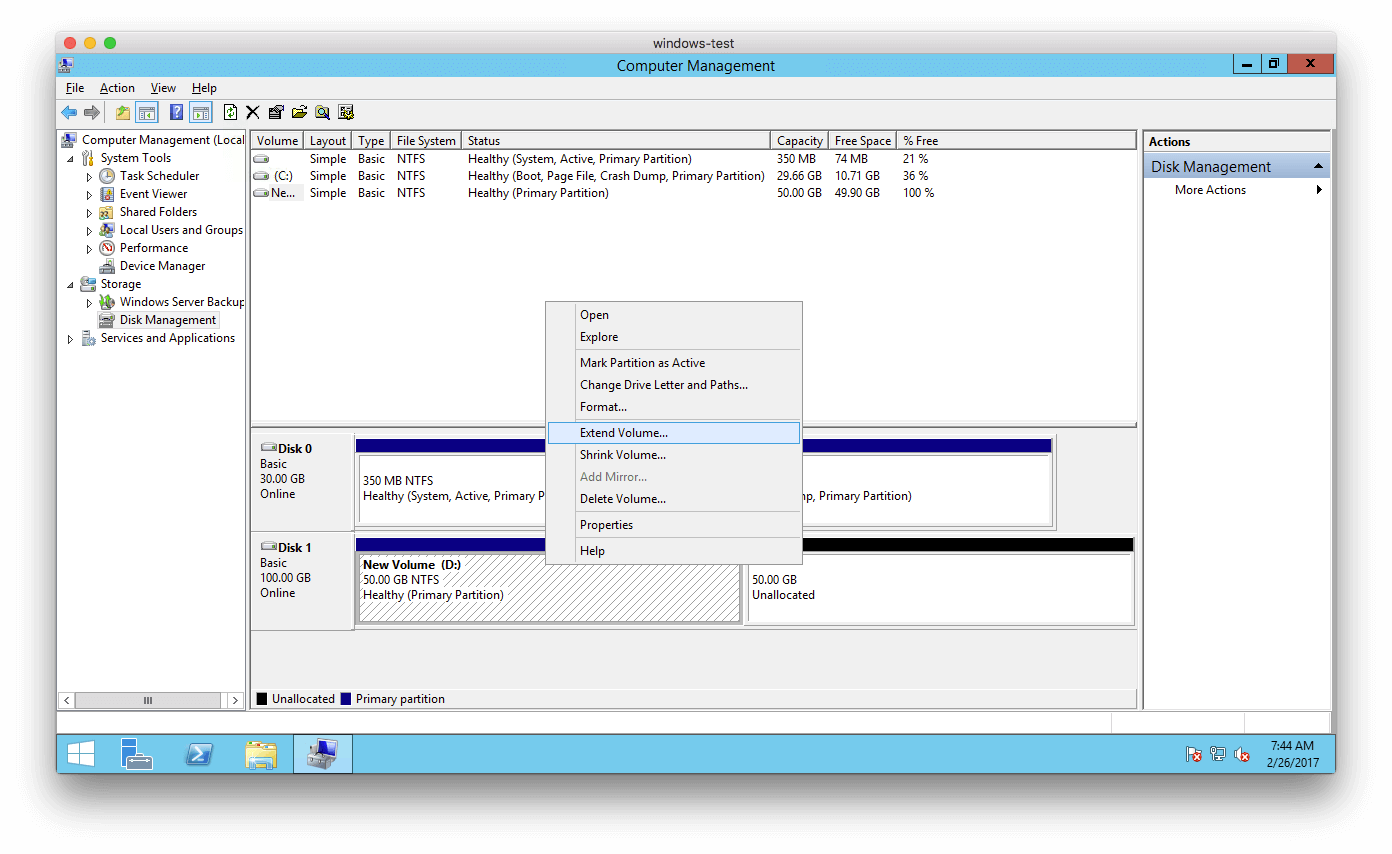
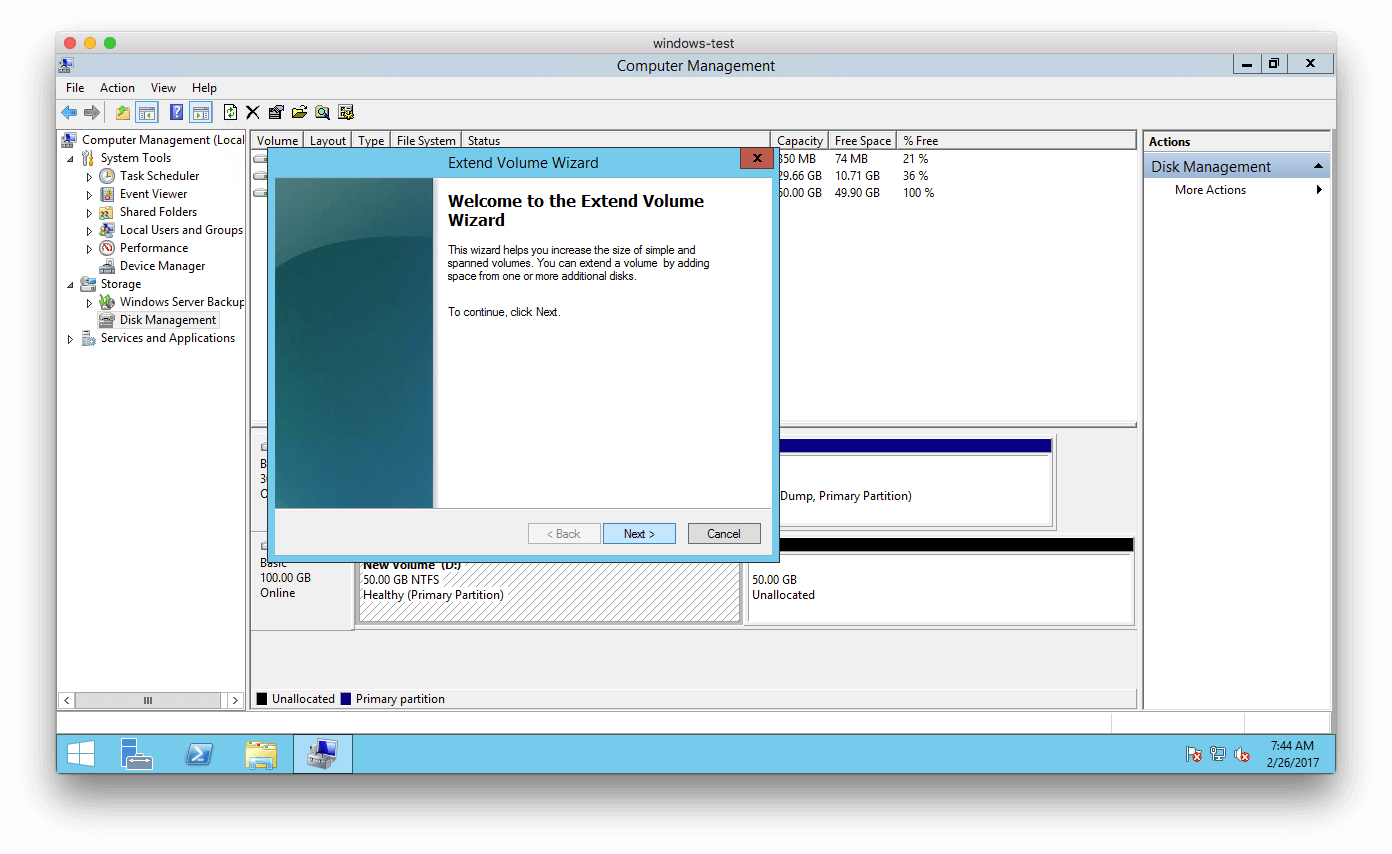
After running the command, go back to the Windows instance and you will see that the disk has been expanded, but we have 50 GB unallocated. To use all of that space, we have to right-click the already created partition and select Expand Volume…:
Click on “Next >“…
Click on “Next >” again:

And click “Finish“:

Now, we can see the new partition using the 100 GB!

There are some factors to take into consideration when modifying EBS volumes, and I will summarize them here:
- As I mentioned previously, we will need to stop the instance to make the modification. In this case, we have to detach the volume and attach it to another instance. When the modifications are complete, we have to re-attach the volume to the original instance.
- Magnetic volumes from the previous generation cannot be modified using this method. We will have to use the old method of creating a snapshot and restoring into a new volume.
- We can only increase the size of the disk, we cannot shrink it. The advice from AWS documentation is to create a new smaller volume and copy the content to it.
- We have to wait at least 6 hours before making another modification to the same volume.
- Any instance created before November 1, 2016, must be stopped and restarted if we modify a volume in it. Or, we have to detach and attach the volume.
- M3.medium is treated as the current generation. M3.large, m3.xlarge, and m3.2xlarge are treated as previous generation instances.
You can see these considerations in more detail on Considerations for Modifying EBS Volumes.
To learn more about AWS EC2 instances, take a look at Cloud Academy AWS EC2 courses here.