![]()
Introducing IaC Tools Within an Amazon Web Services Environment

![]()
It’s no secret that automation is an ongoing, evolving trend in IT. Cloud computing and virtualization are making it faster to do more with less manual intervention. Infrastructure as a Code (IaC), also known as programmable infrastructure, is a DevOps practice that makes the process of managing your infrastructure easy, reliable, and rapid. In this post, we’ll explore some IaC tools within an Amazon Web Services environment.
Today’s system administrators don’t have to log into a server to install and configure software. With the cloud, we may have hundreds of servers in our platforms, and tools like Chef, CFEngine, Puppet, and Ansible to automate the tasks that were once done manually. Today, we can have many servers, with all of the needed services configured within minutes. And with the DevOps movement, we can ensure continuous integration and delivery.
Continuous integration and delivery are two very important practices when implementing DevOps, and they are primarily related to code. For instance, when we develop a new feature in our software we commit the changes, then merge them into a testing branch. There, the code is built, and after that, the binaries, if applicable, are deployed to our testing environment, followed by manual or automated tests. If all goes well and we have the approval, those changes are merged to the next branch in the pipeline and the testing process starts again. Finally, after a new approval, the changes reach the production branch to be deployed to the public.
This is a typical workflow that can be managed by any CI/CD or automation service like Jenkins, TeamCity, Bamboo, TravisCI, etc. However, this process is not always related to code. With virtualization, we have virtual servers, virtual networking, and virtual storage (and more). The time to have a new server, or many servers, was reduced drastically. Let’s focus on the Cloud and let’s see what advantages we have now. Every main cloud provider has API’s to manage and communicate to all services and tools they offer. This means that we can create, delete or change servers and services using commands. These commands can have simple or complex parameters to give more details about the final state we want on them. Of course, those commands and additional files can be part of scripts, and those scripts and files can be version controlled.
The cloud brings additional advantages. Most cloud providers have APIs to manage and communicate to all of the services and tools that they offer. This means that we can create, delete, or change servers and services using commands. These commands can have simple or complex parameters to provide additional details about the desired final state. Of course, those commands and additional files can be part of scripts, and those scripts and files can be version controlled.
We also have many tools that will allow us to define our servers, networking, and any other components that our infrastructure will need to work properly, as source code. These tools have been evolving alongside the DevOps movement. This leads us to what is now known as Infrastructure as Code, or IaC. IaC is a DevOps concept where we manage and treat our infrastructures in a descriptive model, just as we would do with code.
Using Amazon Web Services as our cloud provider, let’s see how we can take advantage of IaC and explore the tools that we can use.
First, let’s make an API call requesting the launch of two m4.large instances into a subnet: AWS EC2 API Reference
https://ec2.amazonaws.com/?Action=RunInstances
&ImageId=ami-31814f58
&InstanceType=m4.large
&MaxCount=2
&MinCount=1
&KeyName=my-key-pair
&SubnetId=subnet-b2a249da
&AUTHPARAMS
Now, let’s go a little further and make the same API request using the AWS CLI:
aws ec2 run-instances \
    --image-id ami-31814f58 \
    --instance-type m4.large \
    --count 2 \
    --key-name my-key-pair \
    --subnet-id subnet-b2a249da
We can see here that making a simple request or running a command will allow us to create two new servers based on an image, add them to a subnet, and specify a key pair to connect to them. Both ways can be added to scripts. These scripts, as we mentioned, can be version controlled. The problem is that managing changes to our infrastructure is very difficult when it gets more complex.
Now, let’s try it with an AWS CloudFormation template:
{
    "AWSTemplateFormatVersion": "2010-09-09",
    "Description": "Launch an EC2 Instance Example",
    "Resources": {
        "MyInstance": {
            "Type": "AWS::EC2::Instance",
            "Properties": {
                "ImageId": "ami-31814f58",
                "InstanceType": "m4.large",
                "KeyName": "my-key-pair",
                "SubnetId", "subnet-b2a249da"
            }
        }
    }
}
This is a much better way. Instead of writing a bunch of commands into a script, we are defining how our infrastructure is going to be by listing its components as items in a human-readable format, JSON or YAML in the case of CloudFormation templates, and other tools that we will review later in this article. In this case, a simple EC2 instance will be launched, just to give us a look at the foundation of IaC.
Let’s continue by listing the other things that we would need for our infrastructure to work:
All of the parts of our full infrastructure have their own APIs. This means that we can create the commands needed to have everything scripted. Starting with the networking (VPC and subnets), and going up to the servers (EC2 instances), cache (ElastiCache), load balancers (ELBs), name resolution (Route 53), monitoring and alerting (CloudWatch), queues (SQS), and databases (RDS). This is our first approach to IaC.
This is just the tip of the iceberg. Launching servers using commands is the easiest part. What about installing our application? Or configuration of the different services? What about performance tweaks to our servers? If our application runs on a web server like Apache, Nginx, Tomcat, or others, how does it get installed? Launching an EC2 instance is not enough; we need to install software there. However, we shouldn’t do all of it manually.
Ok, enough with the theory, let’s start working on something interesting. We will be using AWS CodePipeline as our continuous delivery tool, GitHub as our source provider, and AWS CloudFormation as our deployment provider.
We will learn how to create a continuous delivery pipeline that will be updated when we issue a push to the master branch. This the most basic example of how we can automate the creation, deletion, and update of our infrastructure.
To get started, we will need to create a repository on GitHub.
To create your repository, you can follow this guide, or you can fork my repository infrastructure-as-code.
We will use an existing AWS CloudFormation example template that creates a highly available and scalable WordPress site.
Within the template, we are going to create an Auto Scaling Group, an Elastic Load Balancer, and one RDS.
Along with the template you just downloaded, create a new file with the parameters we are gong to pass to our CloudFormation template. Name it beta-configuration.json:
{
    "Parameters": {
        "KeyName": "beta-key",
        "DBUser": "betaUser",
        "DBPassword": "betaPassword123"
    }
}
Make sure that you have an EC2 key pair with the same name as the “KeyName” parameter, in this case, “beta-key”.
If you forked my repository, you only need to create the EC2 key pair.
An important security principle that we should always follow is to give no more permissions than necessary for the job.
Specifically, in AWS we have to enforce the use of IAM roles for our EC2 instances. So, let’s do that (again, if you forked my repository, you already have the needed files, you only have to run the AWS CLI commands):
When we create a new IAM role, we need to create or use a trust policy. In this case, we need CodePipeline to assume the role that we are going to create to be able to create, delete, or update CloudFormation stacks:
Save the following JSON on a file called: pipeline-trust-policy.json
{
    "Version": "2012-10-17",
    "Statement": [
        {
            "Effect": "Allow",
            "Principal": {
                "Service": "codepipeline.amazonaws.com"
            },
            "Action": "sts:AssumeRole"
        }
    ]
}
And run the following command to create the IAM role that we will use with CodePipeline:
aws iam create-role \
    --role-name MyPipelineRole \
    --assume-role-policy file://pipeline-trust-policy.json
Now, save the following JSON in a file named: pipeline-role-policy.json
{
    "Version": "2012-10-17",
    "Statement": {
        "Action": [
            "s3:*",
            "cloudformation:CreateStack",
            "cloudformation:DescribeStacks",
            "cloudformation:DeleteStack",
            "cloudformation:UpdateStack",
            "cloudformation:CreateChangeSet",
            "cloudformation:ExecuteChangeSet",
            "cloudformation:DeleteStack",
            "cloudformation:DescribeChangeSet",
            "cloudformation:SetStackPolicy",
            "iam:PassRole",
            "sns:Publish"
        ],
        "Effect": "Allow",
        "Resource": "*"
    }
}
And run the following command to grant the appropriate accesses to our new IAM role:
aws iam put-role-policy \
    --role-name MyPipelineRole \
    --policy-name MyPipelinePolicy \
    --policy-document file://pipeline-role-policy.json
Now, we have to give CloudFormation the ability to create, terminate, and update EC2 instances, Auto Scaling Groups, Elastic Load Balancers, and RDSs. We are going to follow the same process as with CodePipeline: We will create a trust policy and assign it to a new IAM role:
Copy the following JSON to a file named: cfn-trust-policy.json
{
    "Version": "2012-10-17",
    "Statement": [
        {
            "Effect": "Allow",
            "Principal": {
                "Service": "cloudformation.amazonaws.com"
            },
            "Action": "sts:AssumeRole"
        }
    ]
}
And run the following command to create our new IAM role:
aws iam create-role \
    --role-name MyCloudFormationRole \
    --assume-role-policy file://cfn-trust-policy.json
This one will be used by our CloudFormation stack. Now let’s assign a policy to it.
Create a new file named cfn-role-policy.json and add the following JSON:
{
    "Version": "2012-10-17",
    "Statement": {
        "Effect": "Allow",
        "Action": [
            "ec2:*",
            "autoscaling:*",
            "elasticloadbalancing:*",
            "rds:*"
        ],
    "Resource": "*"
}

}
And finally, let’s attach the policy to our new IAM role:
aws iam put-role-policy \
    --role-name MyCloudFormationRole \
    --policy-name MyCloudFormationPolicy \
    --policy-document file://cfn-role-policy.json
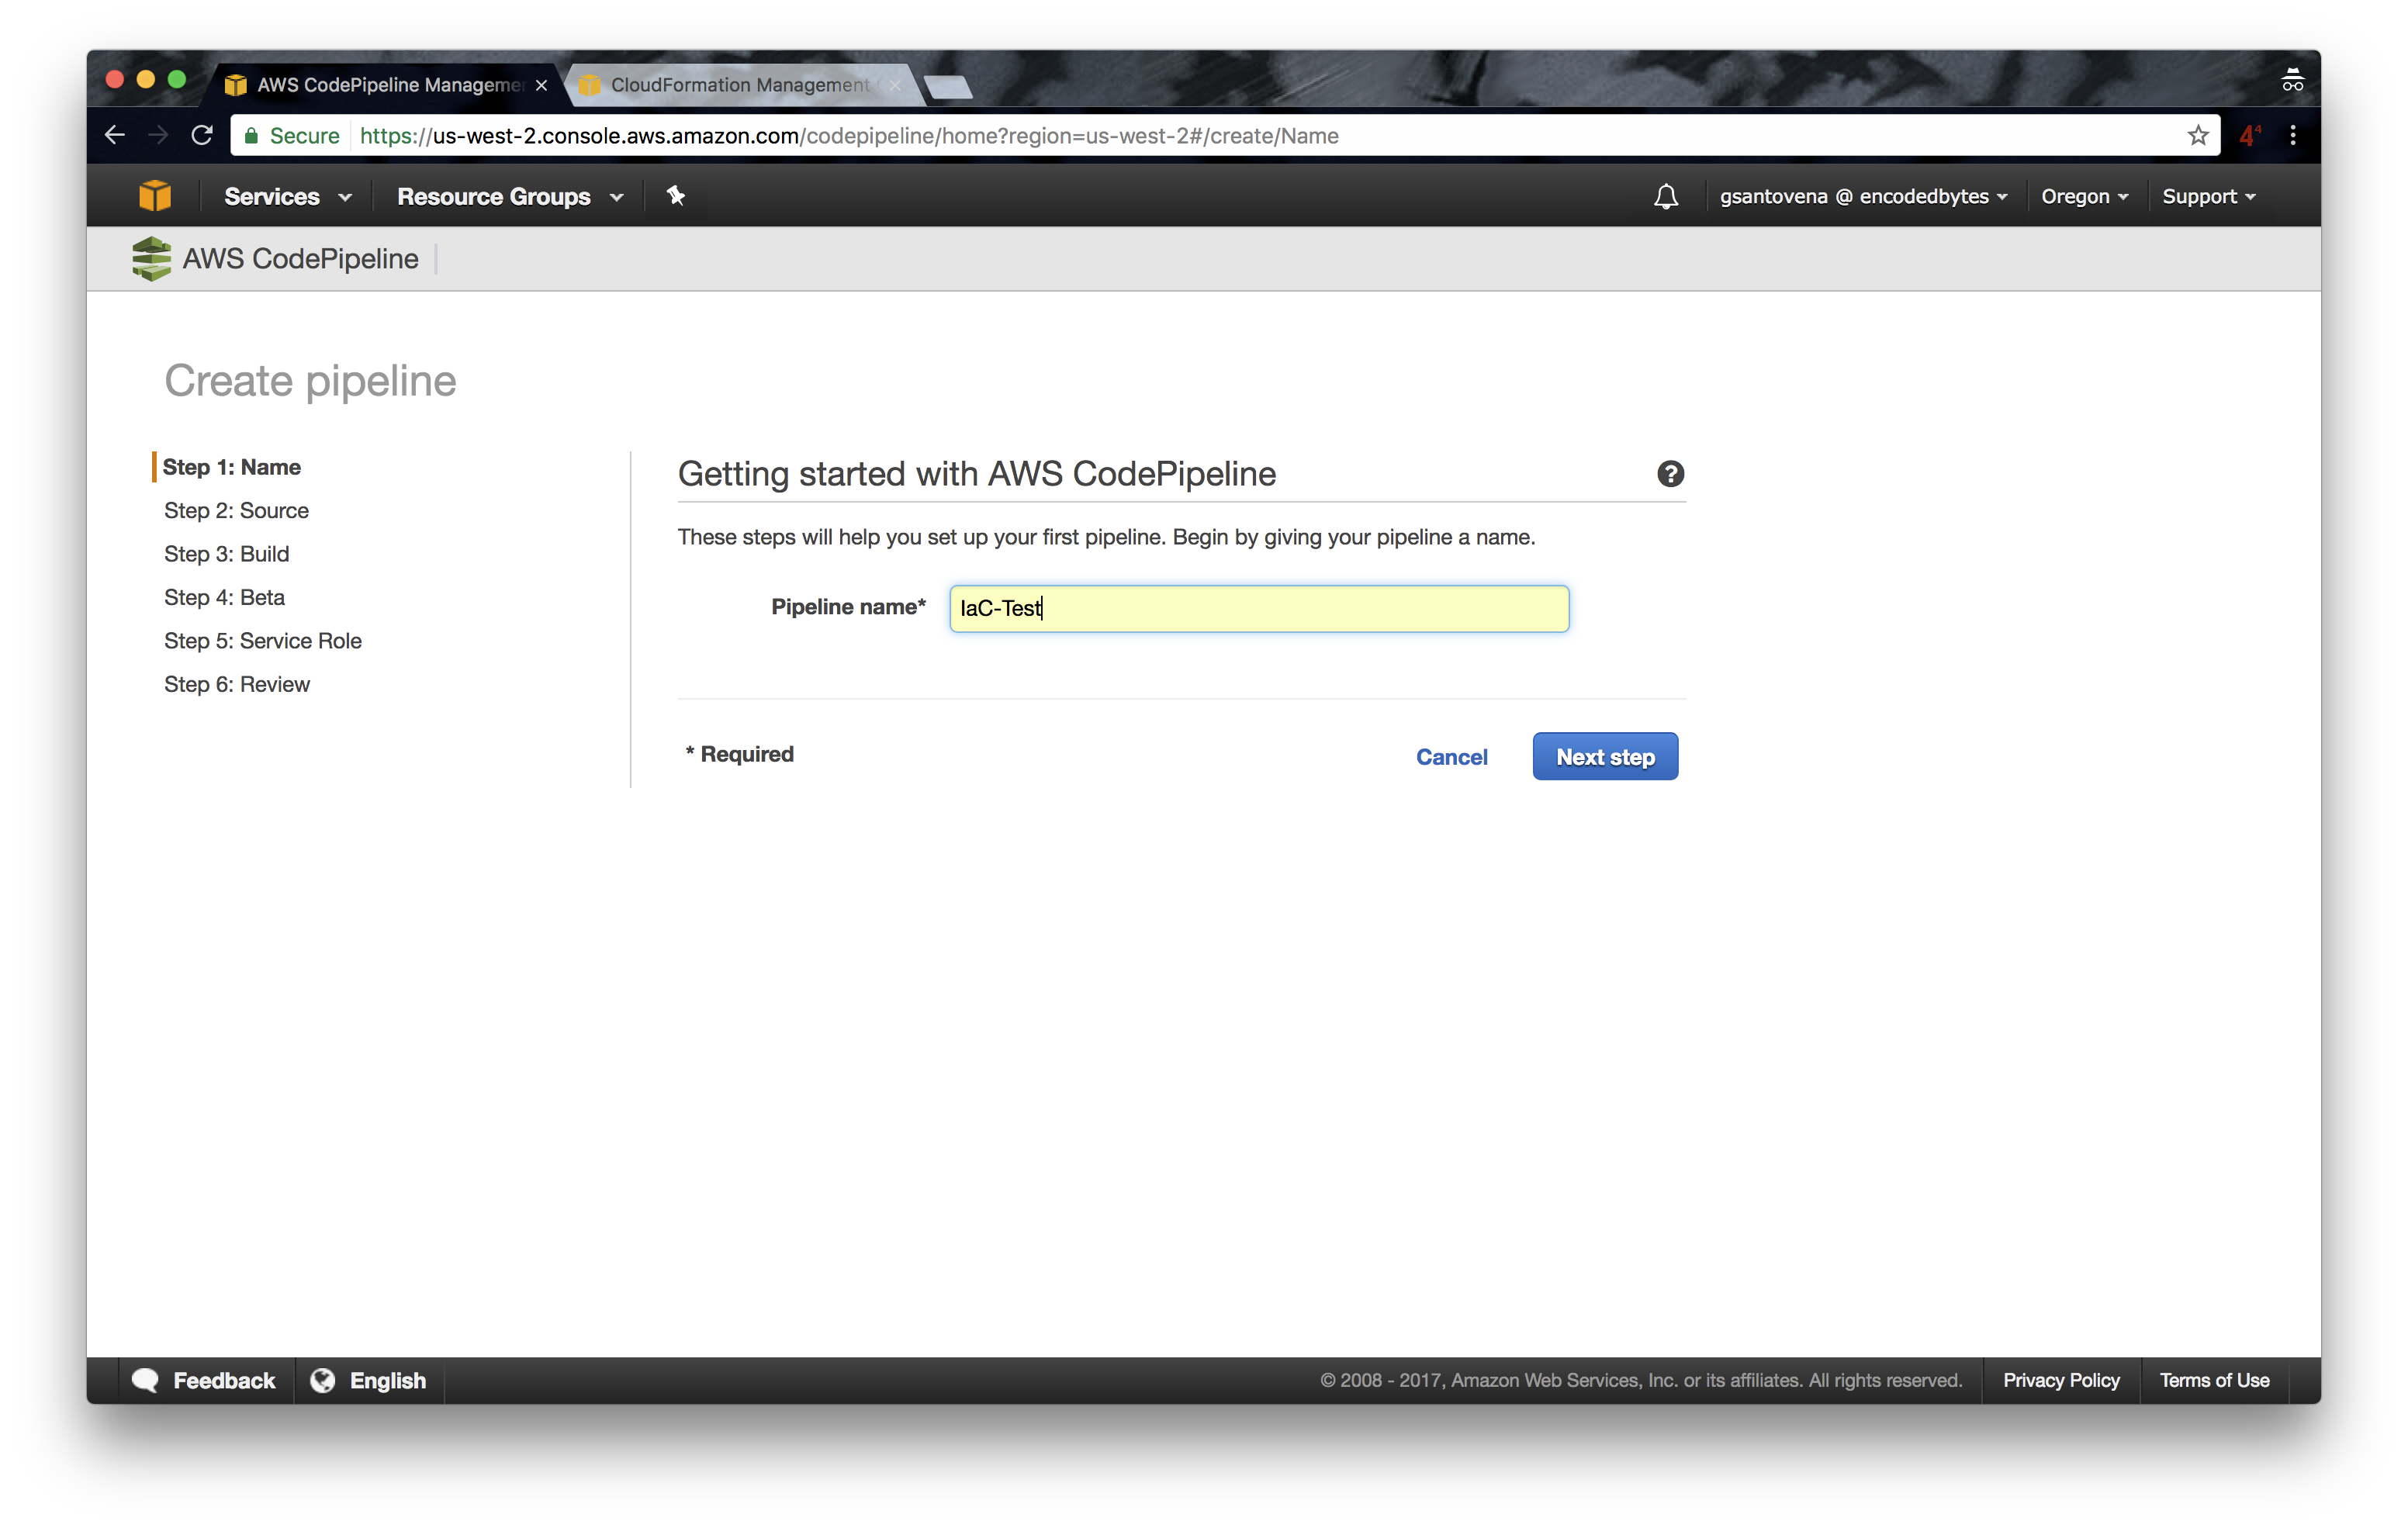
Ok. Now, we’re ready to create our pipeline!
From the AWS documentation: AWS CodePipeline is a continuous delivery service you can use to model, visualize, and automate the steps required to release your software.
3. In the next step, select GitHub as source provider. The other options we have here are S3 and AWS CodeCommit:
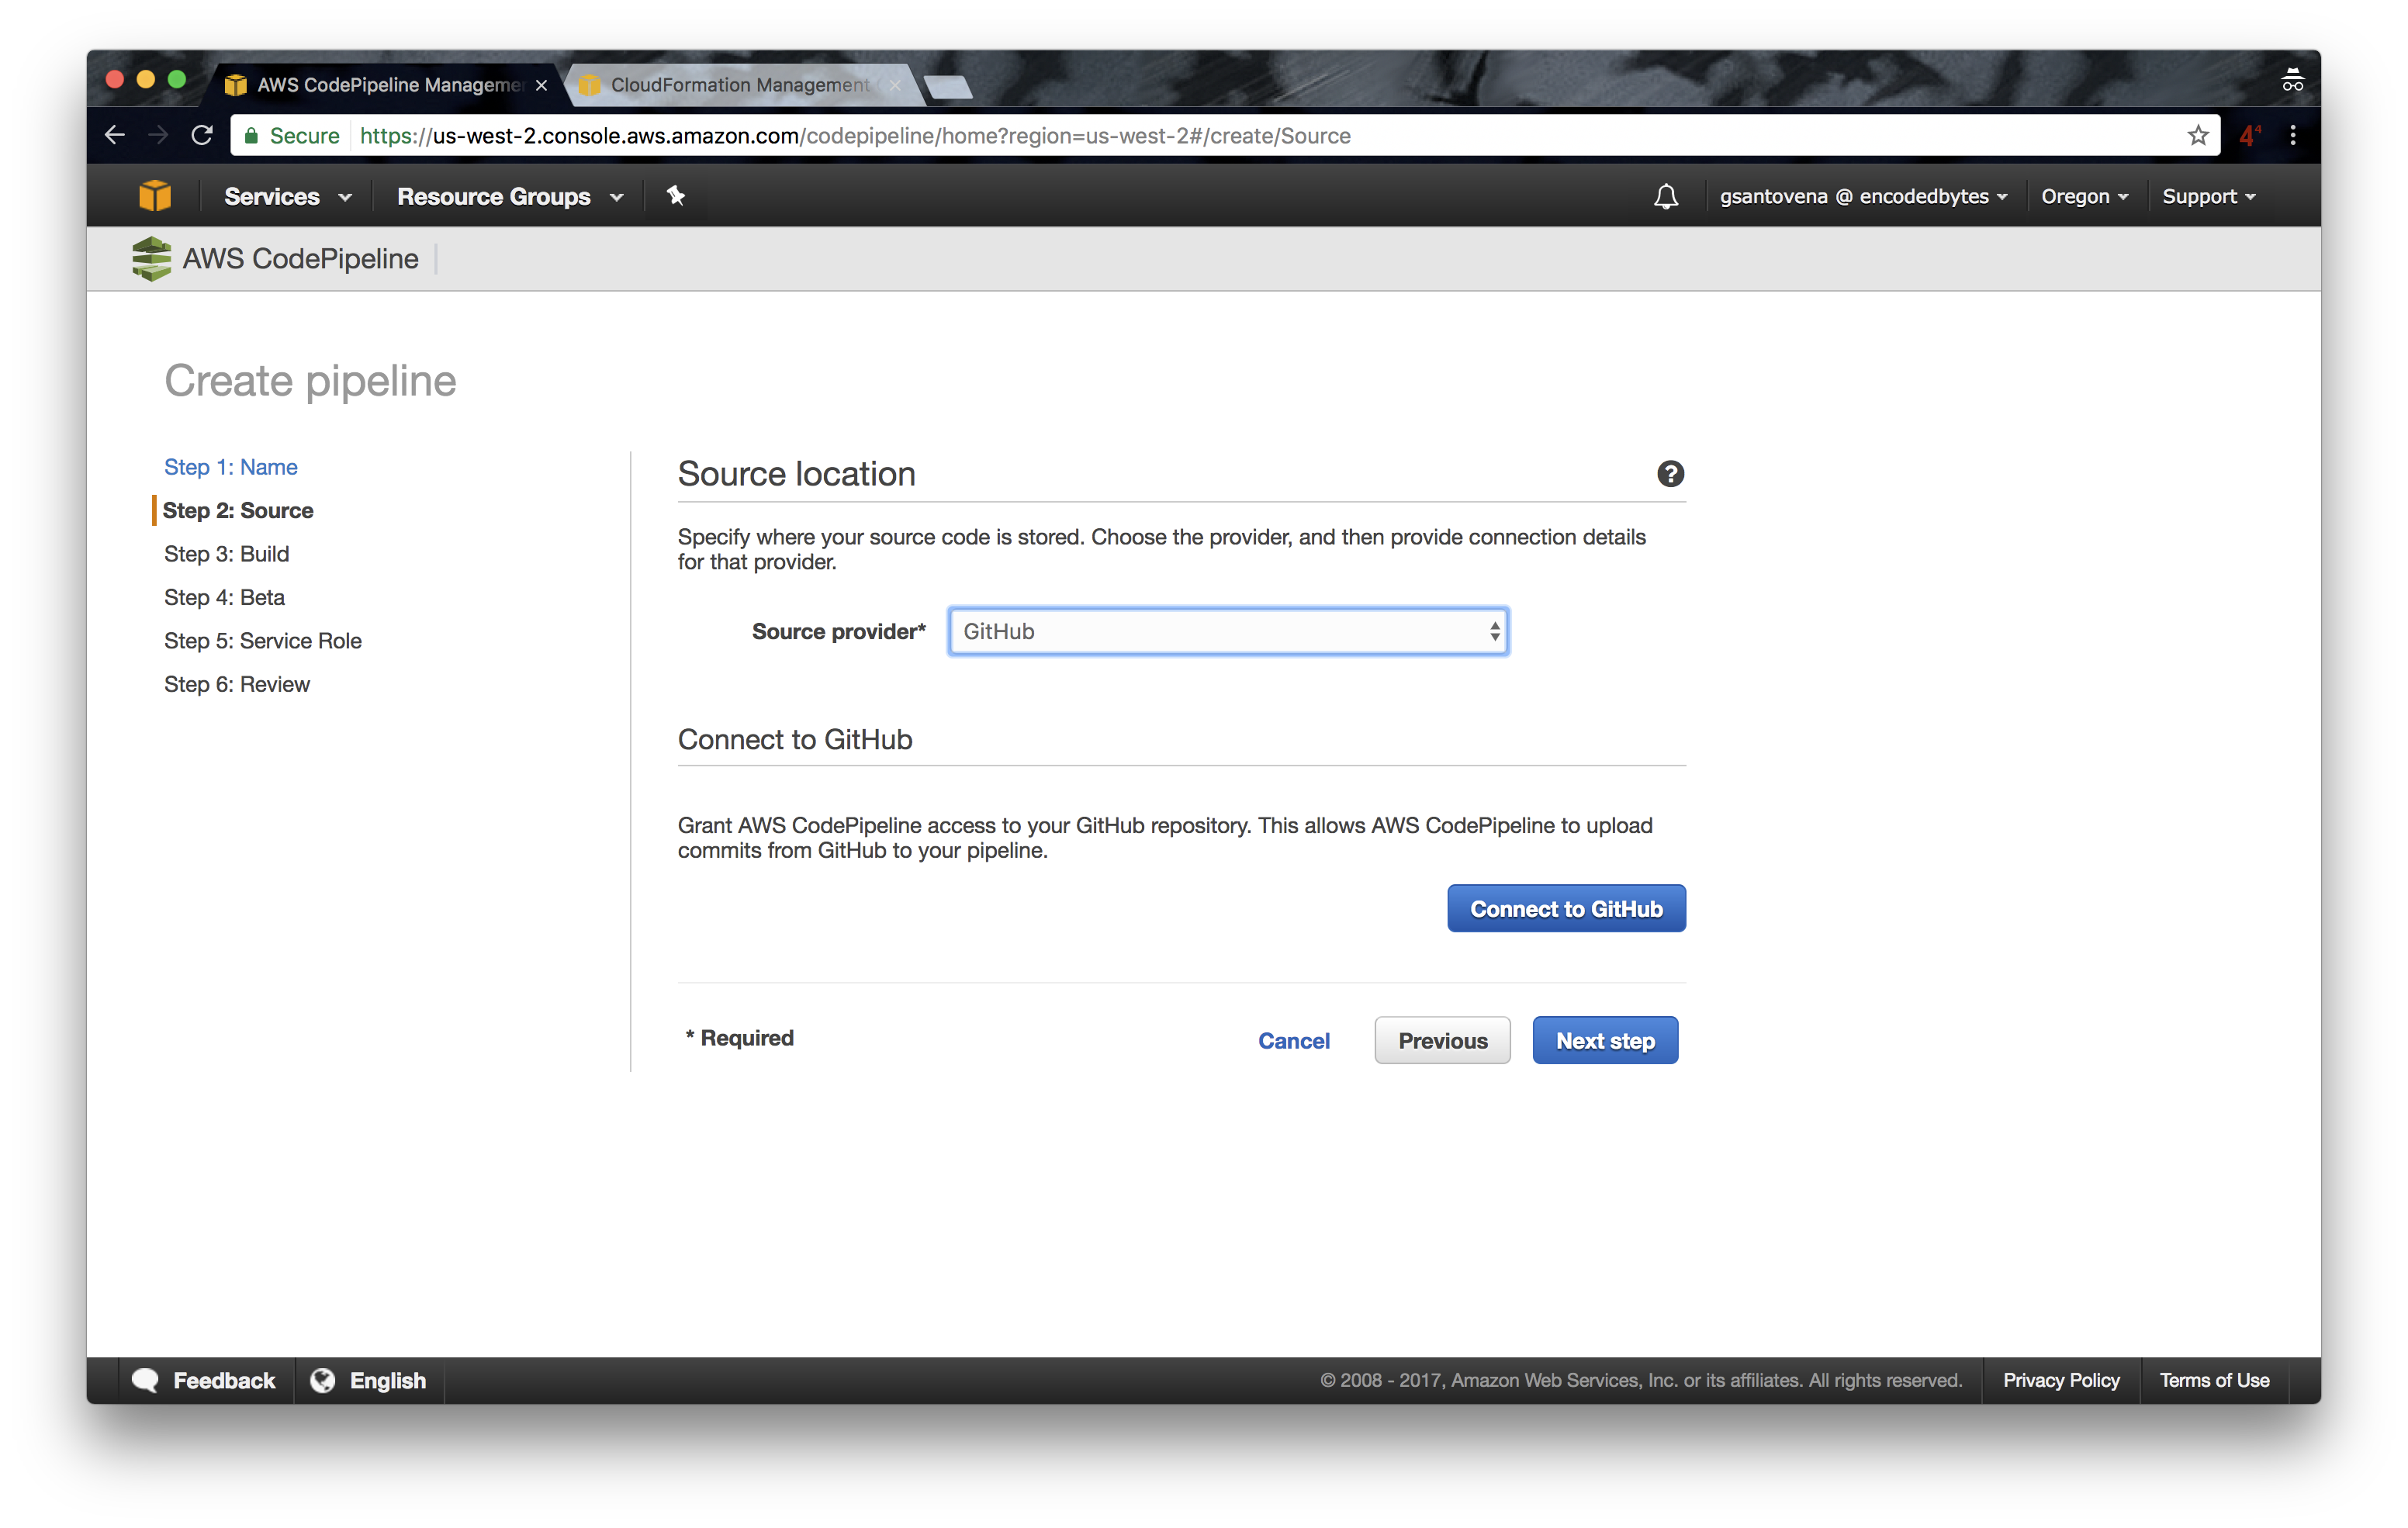
3.1 Click on “Connect to GitHub.” This will give CodePipeline access to GitHub, and we will see a list of our repositories.
3.2 Next, we can enter the repository name and the branch we want to use for this step. We can add more steps later.
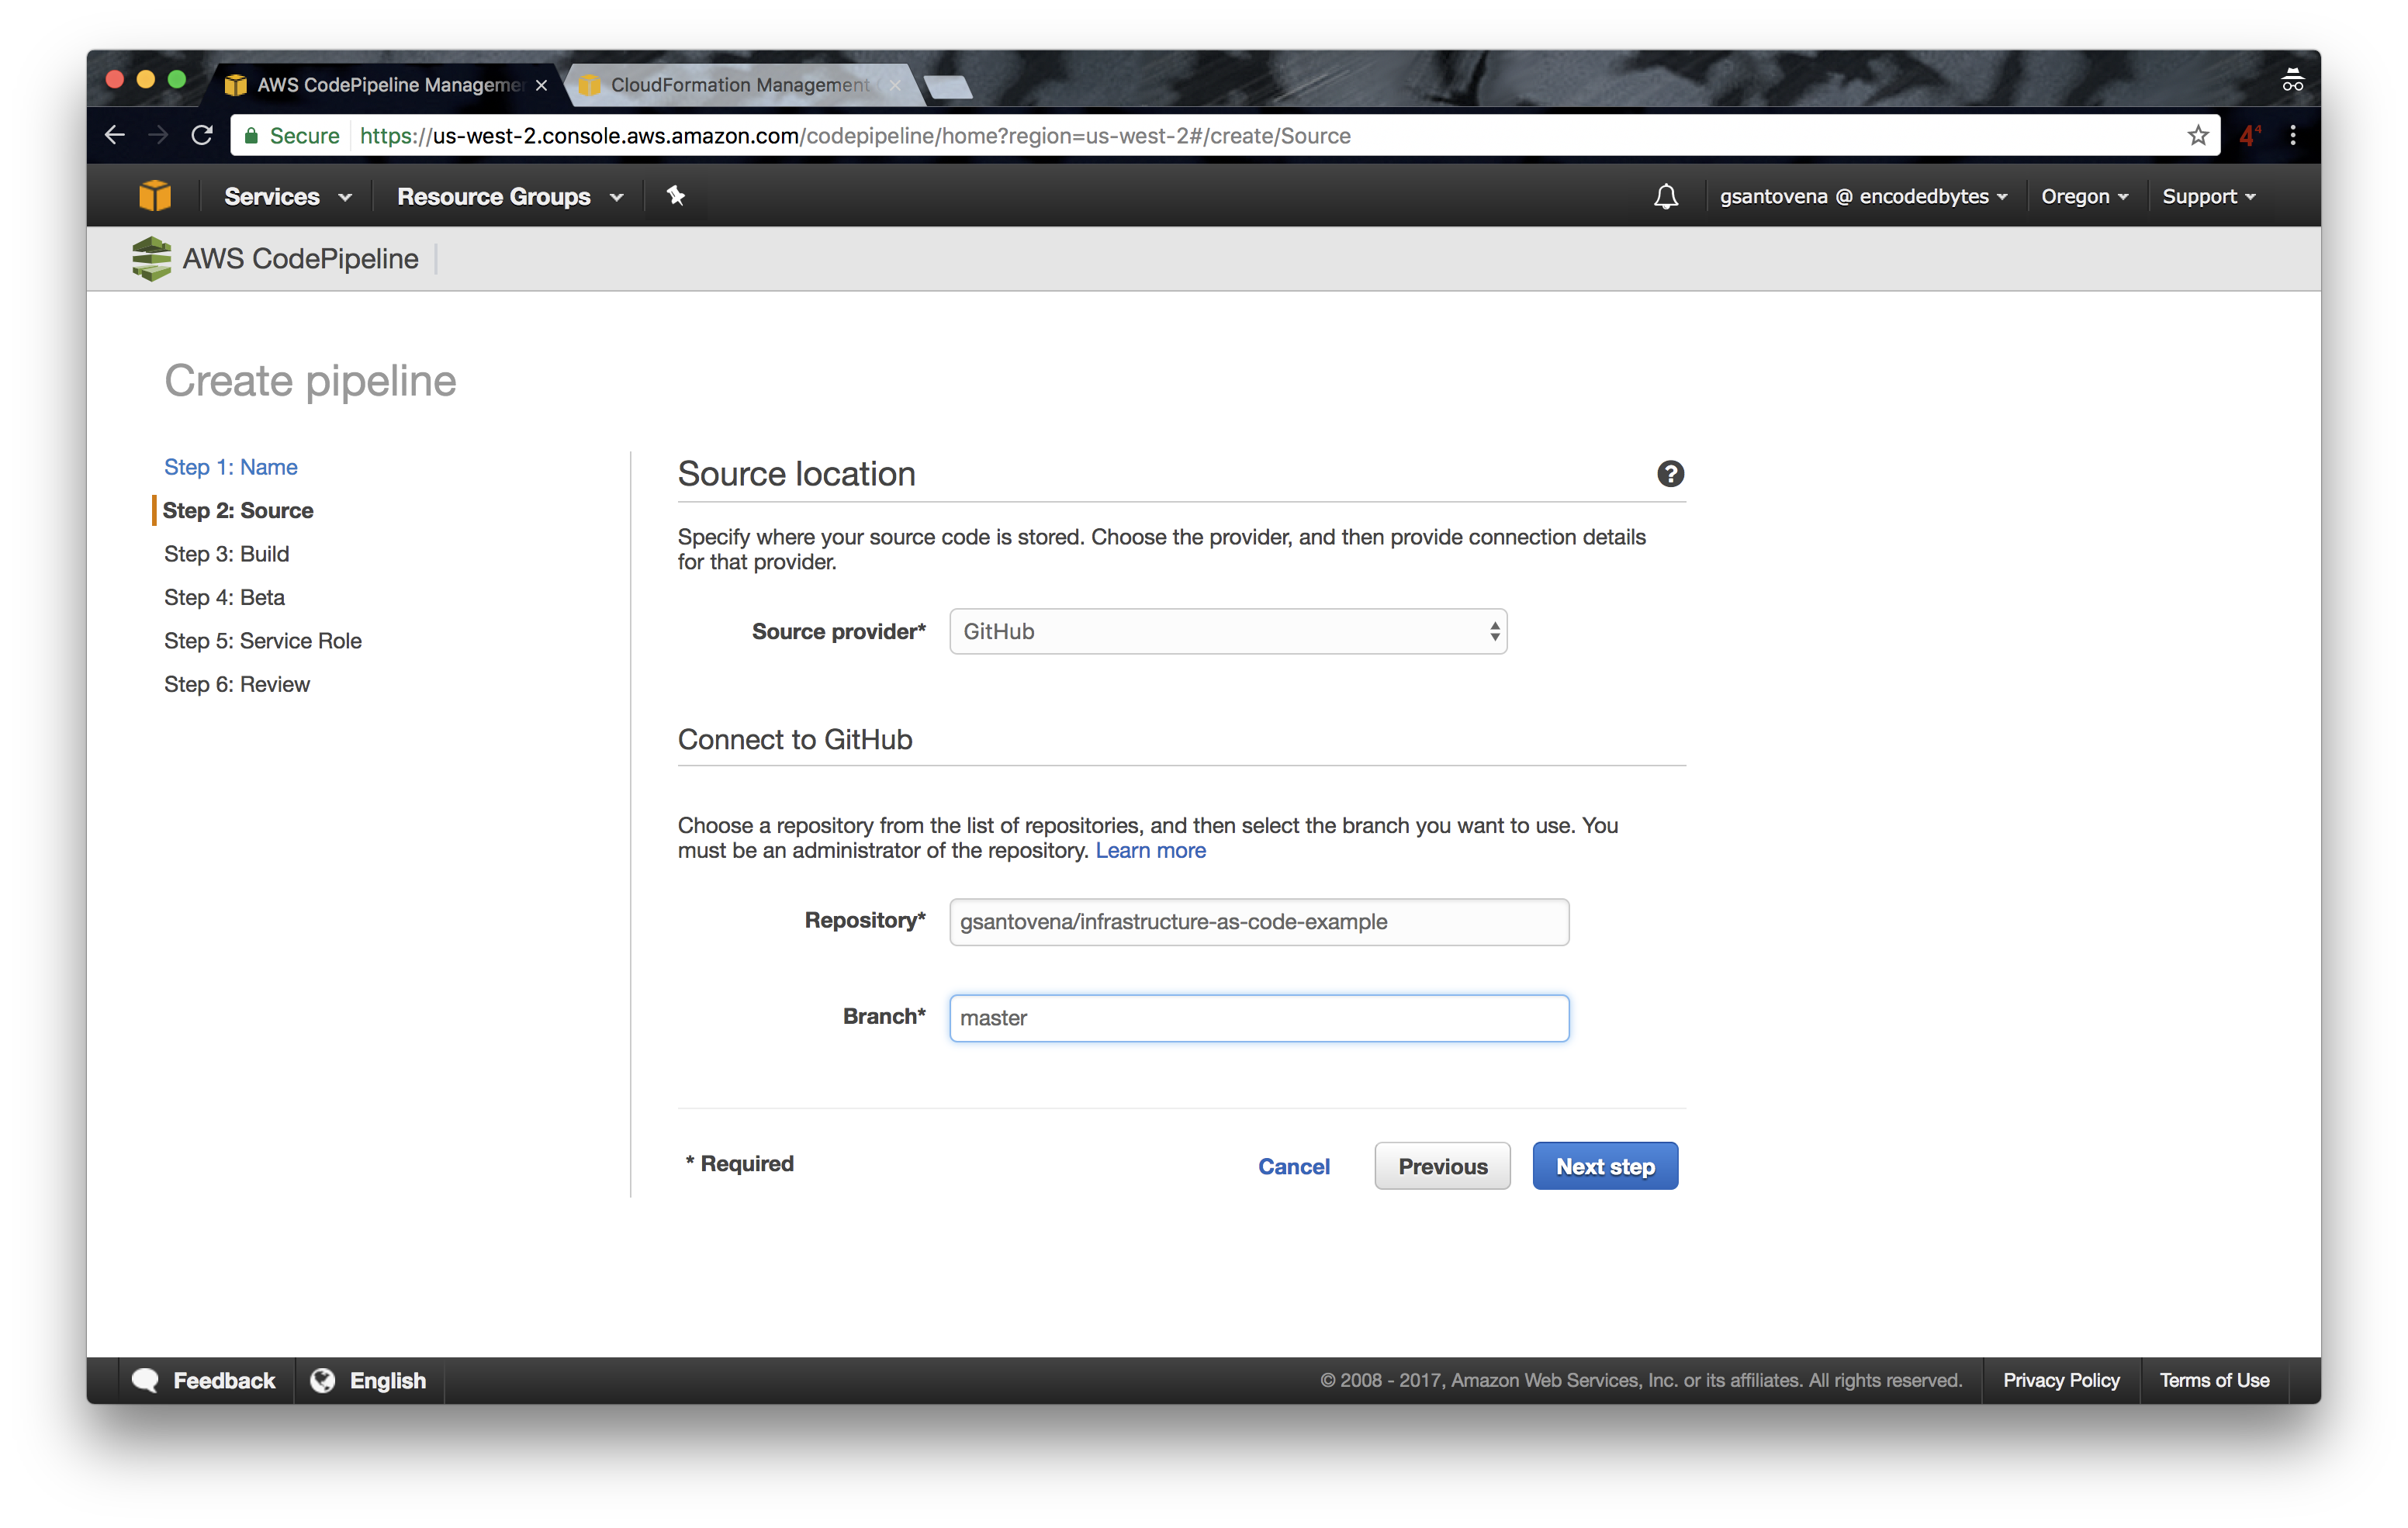
Remember to change ‘gsantovena’ for your own GitHub username.
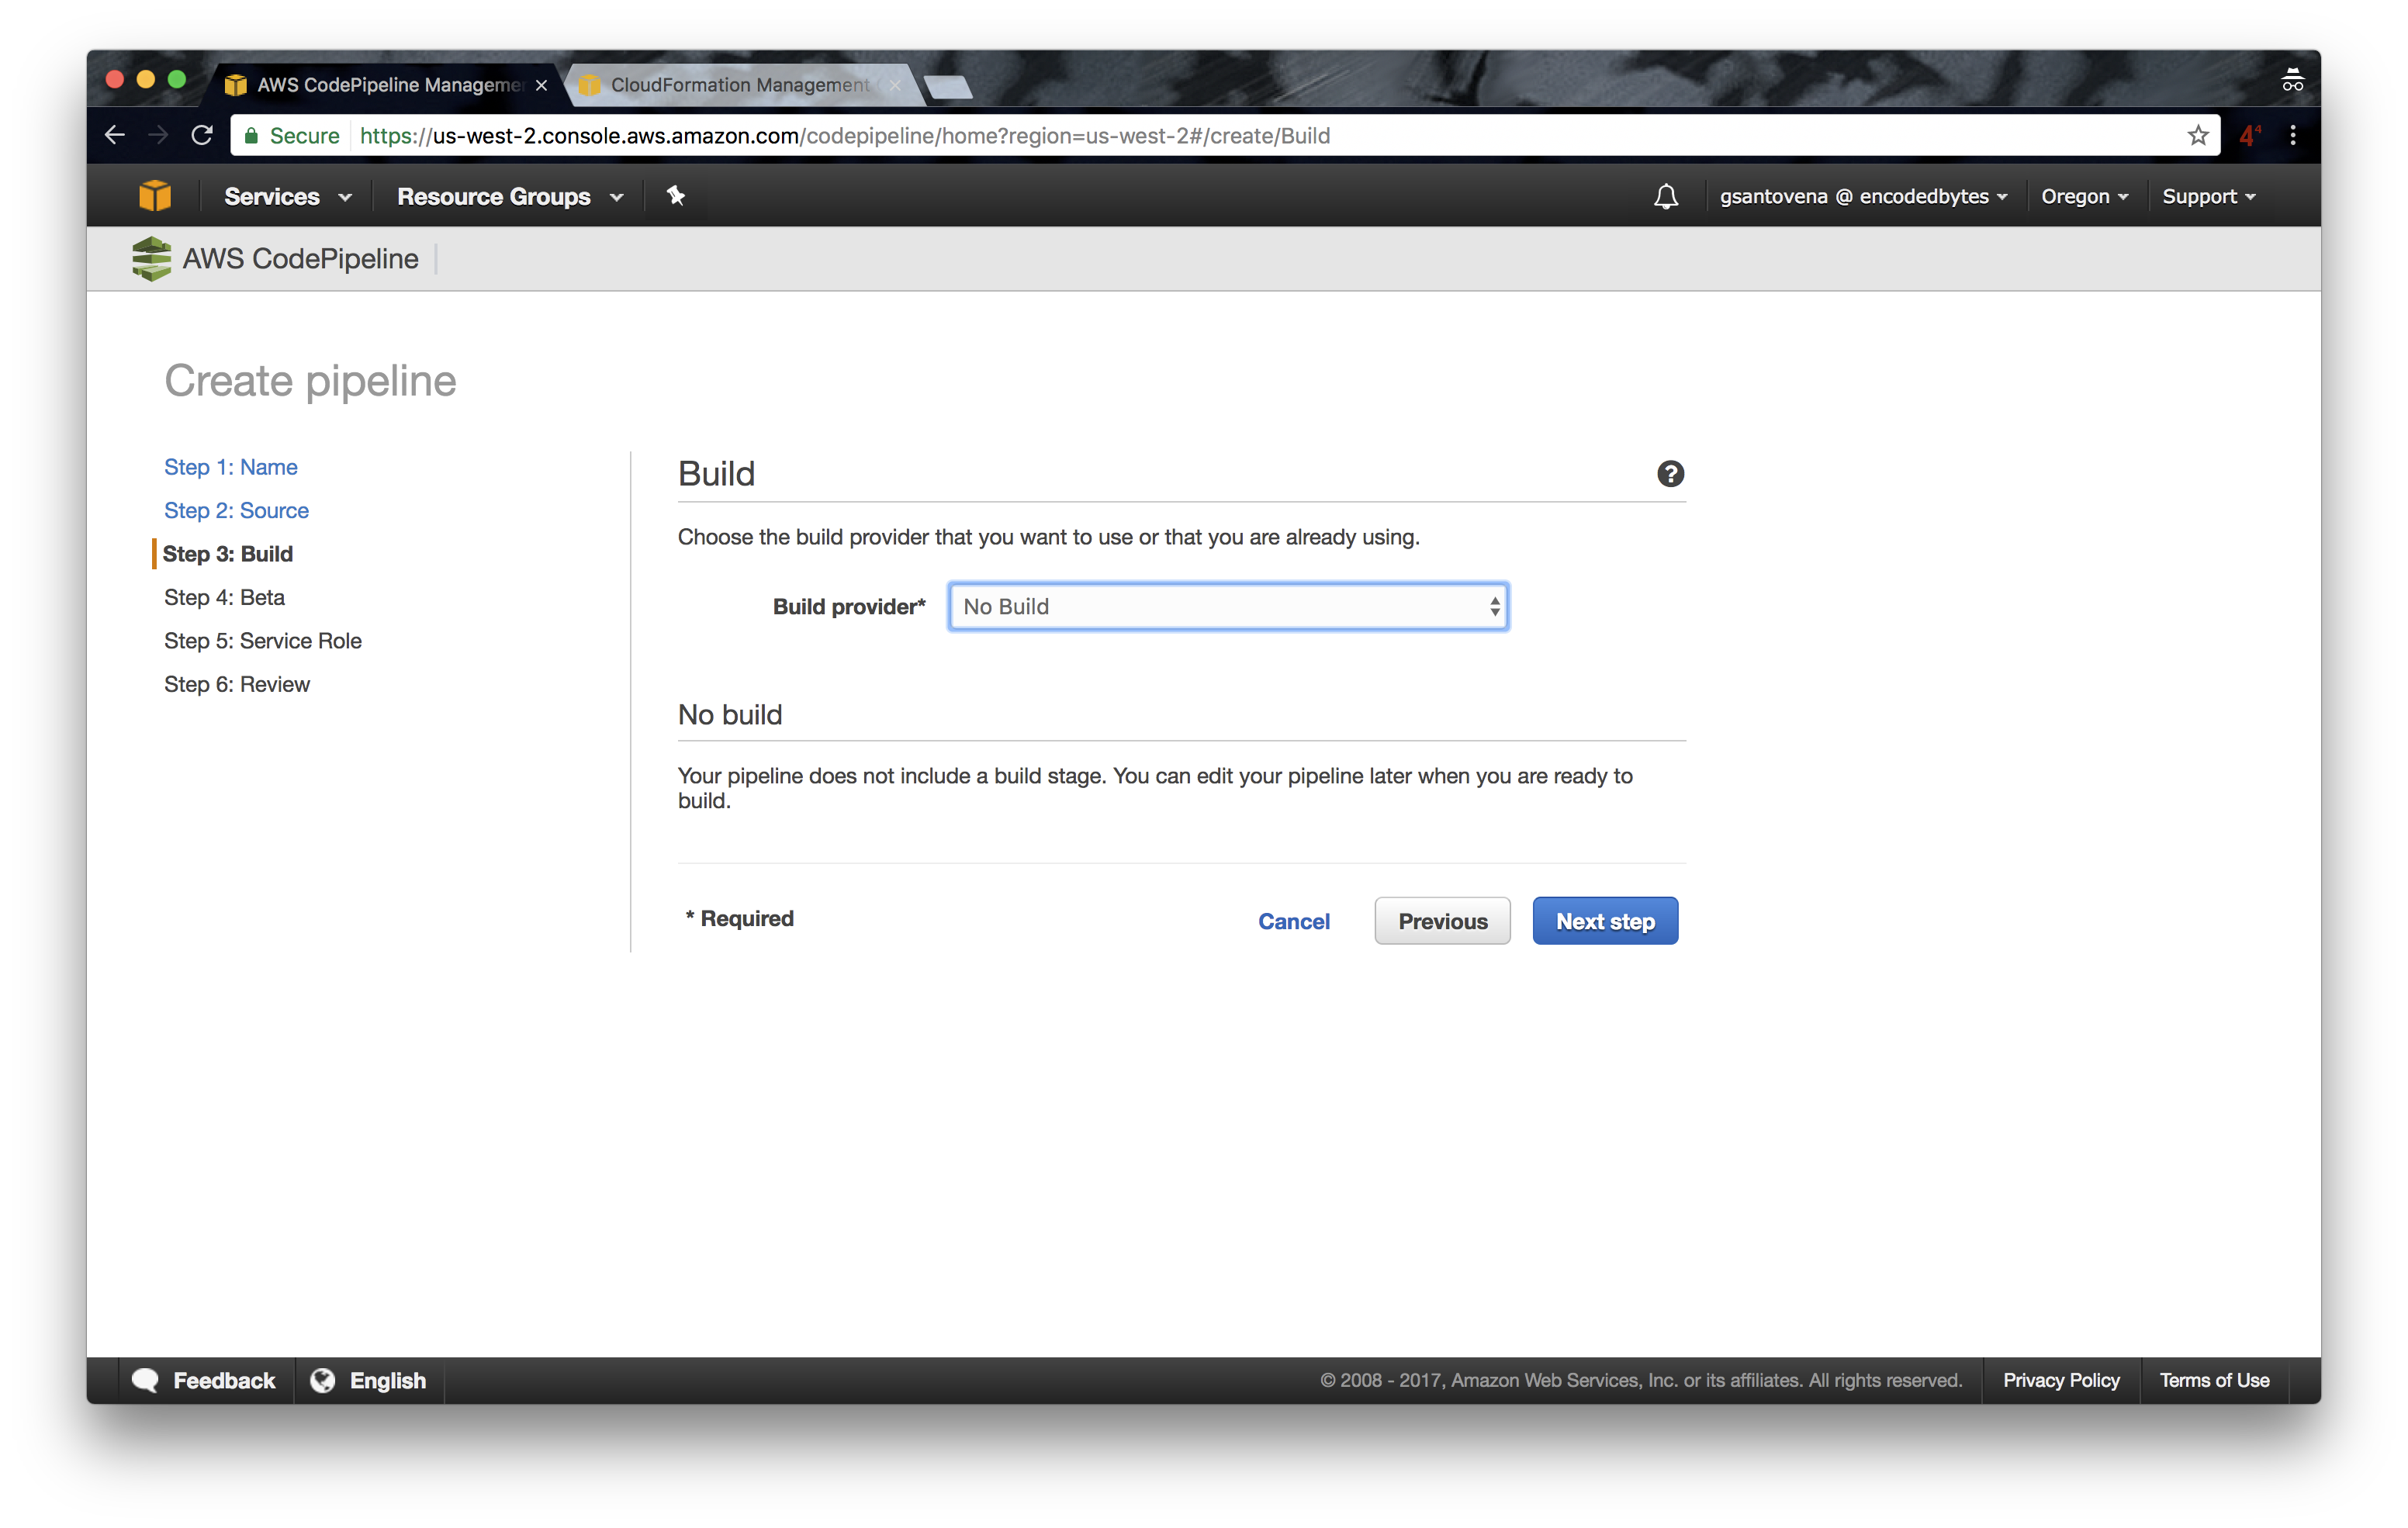
4. As we are not building code, only deploying our infrastructure, we need to select ‘No Build’ in the Build step:
5. In the Beta step, fill in as in the image below:
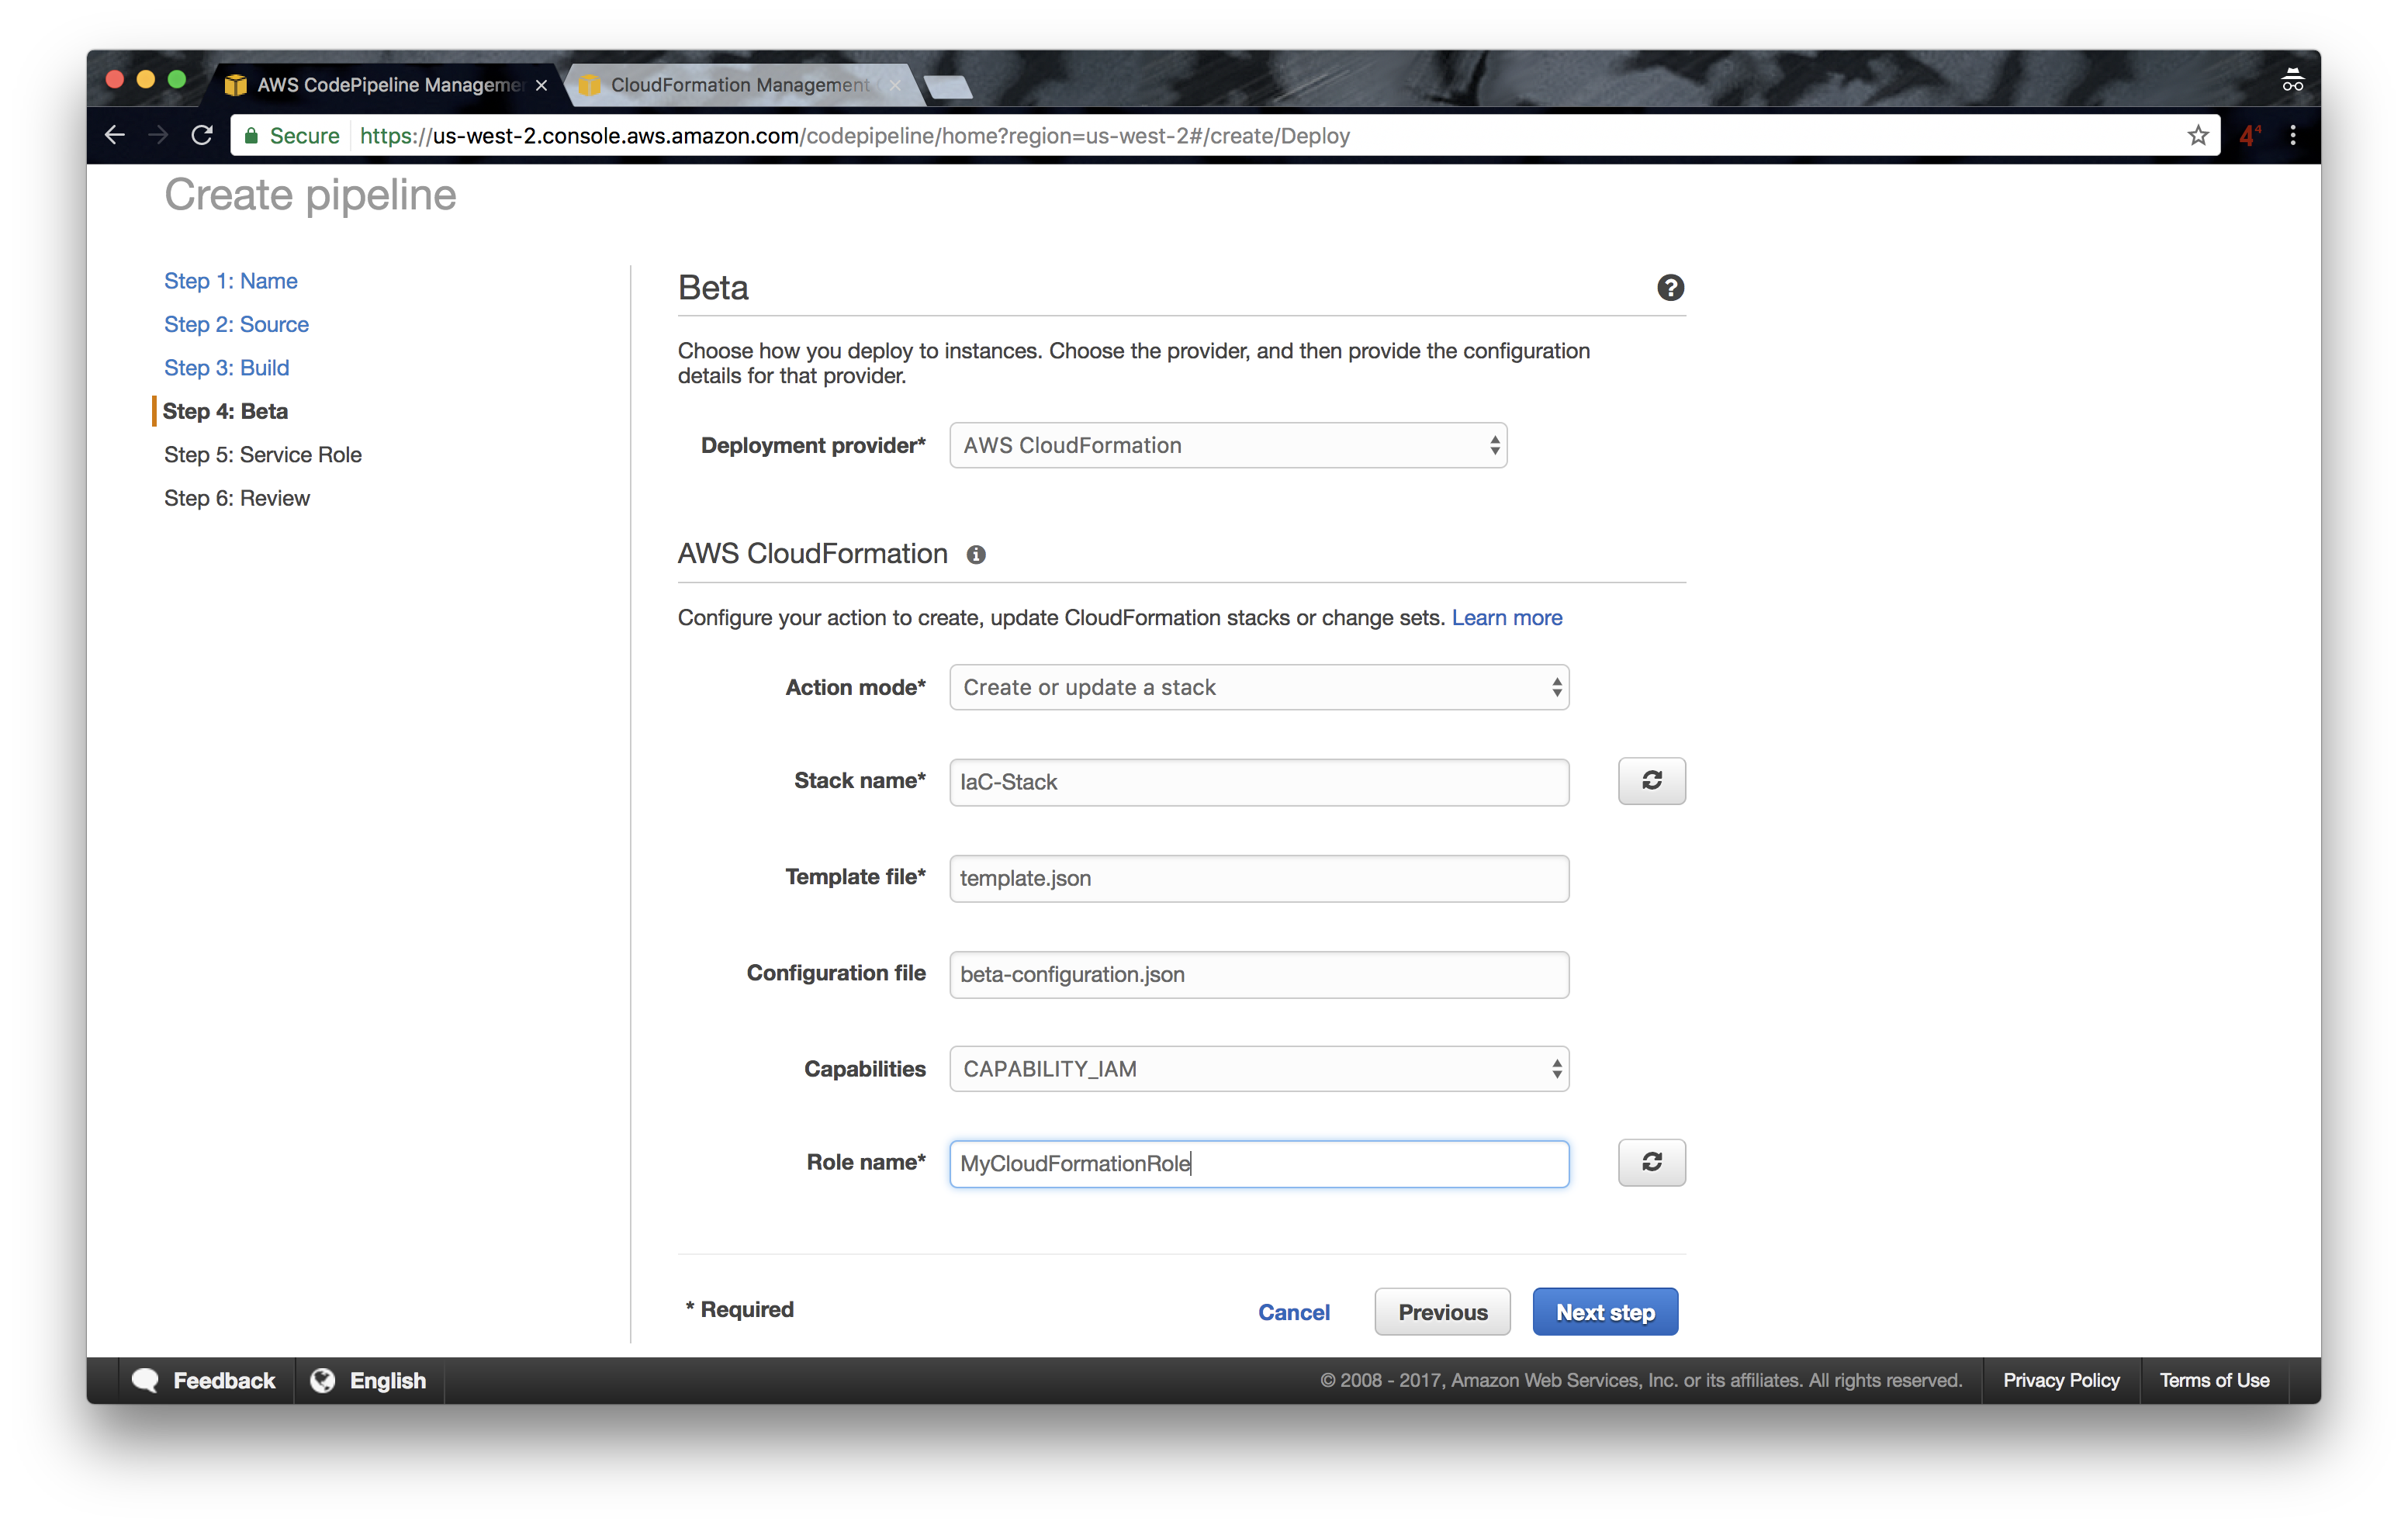
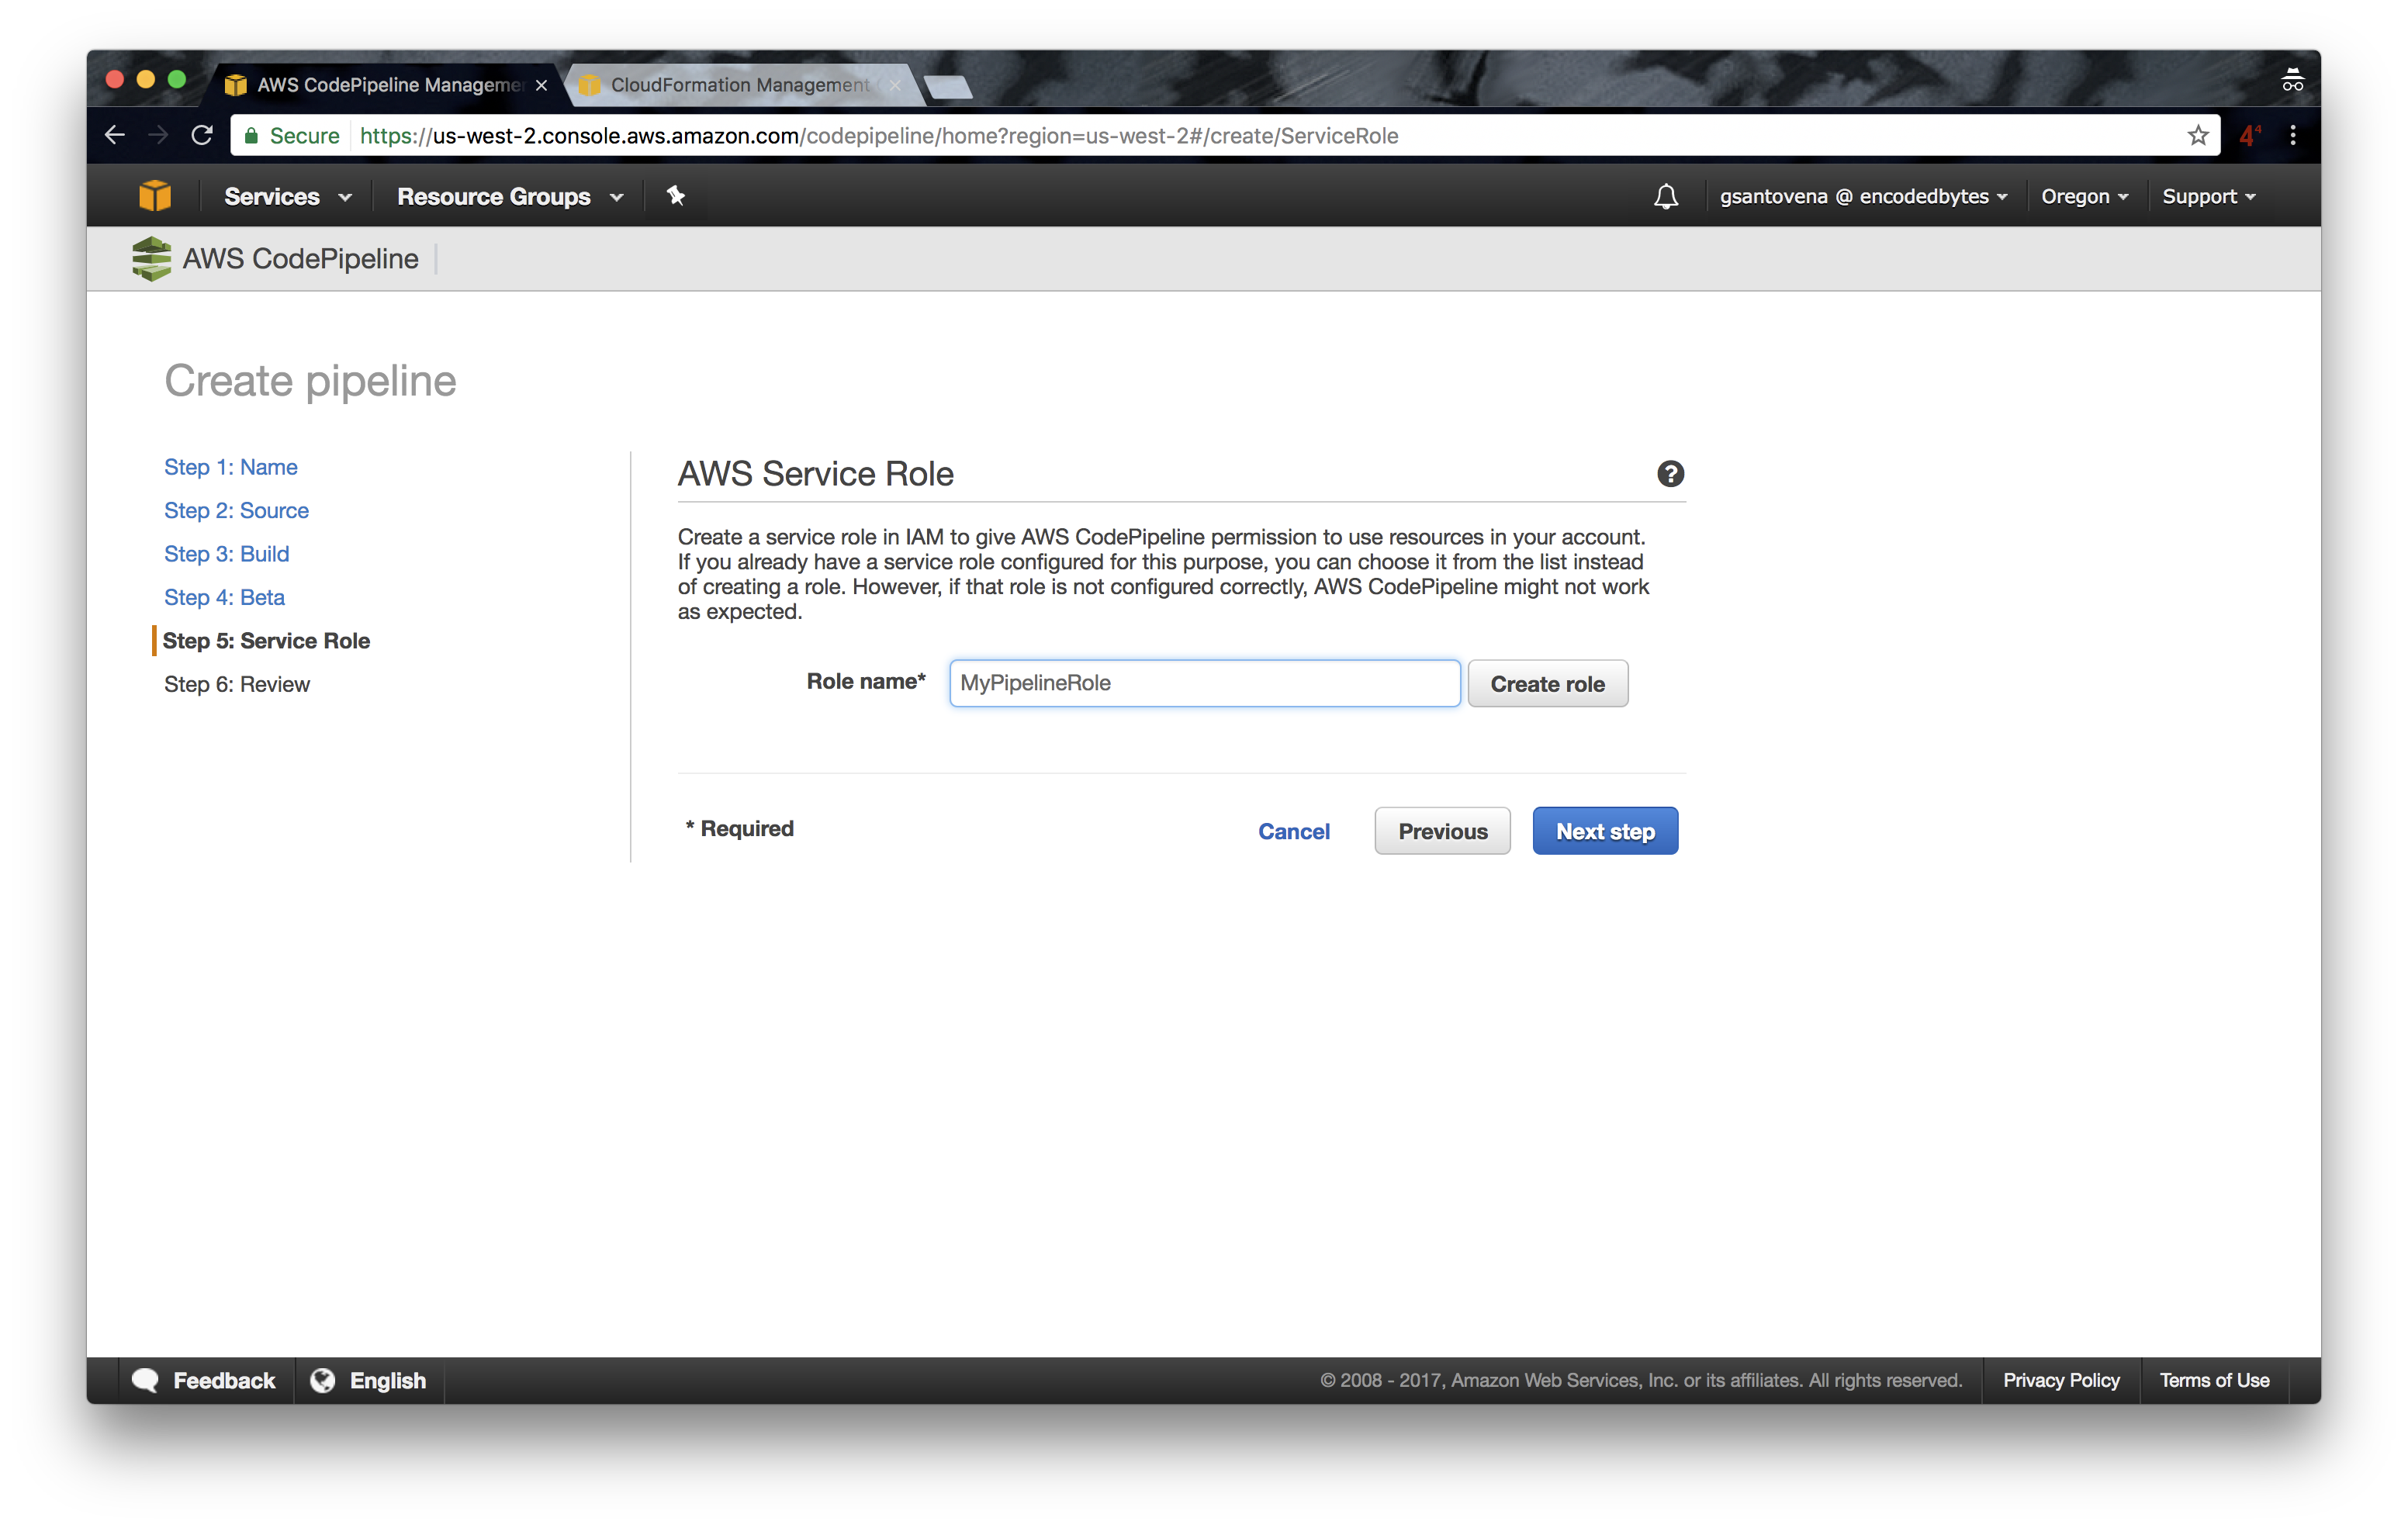
6. Enter the name of the IAM role we created earlier:
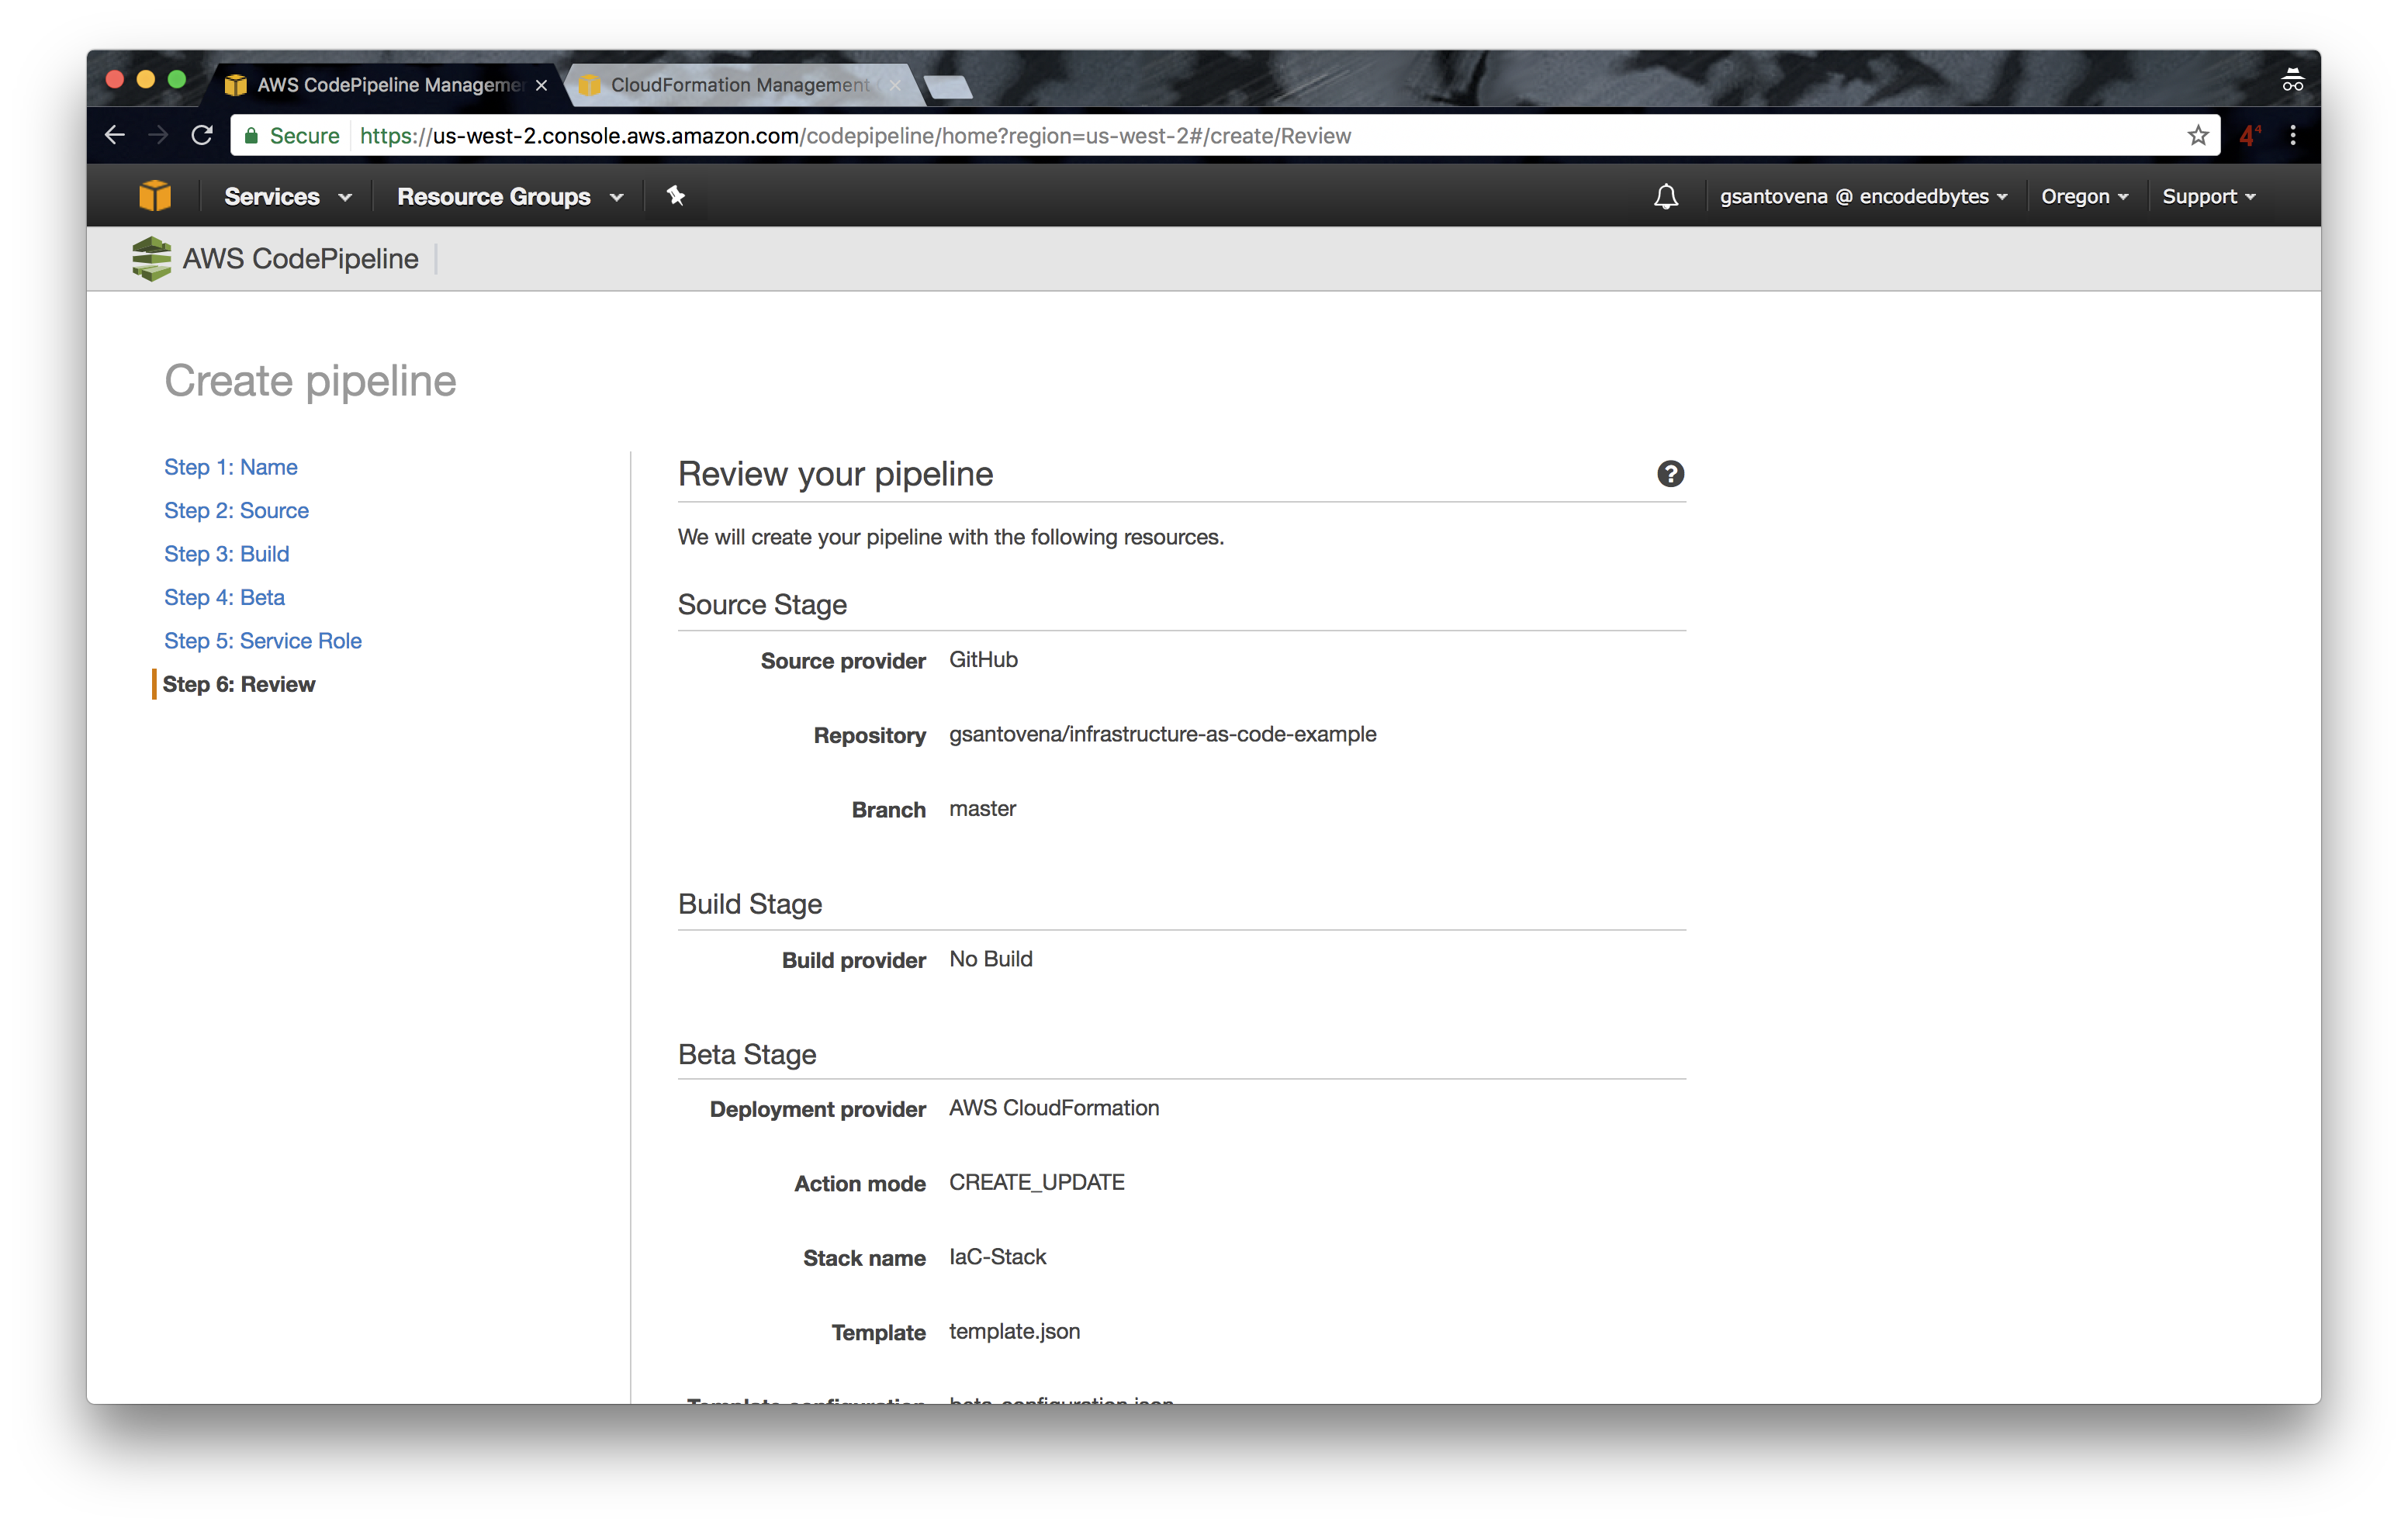
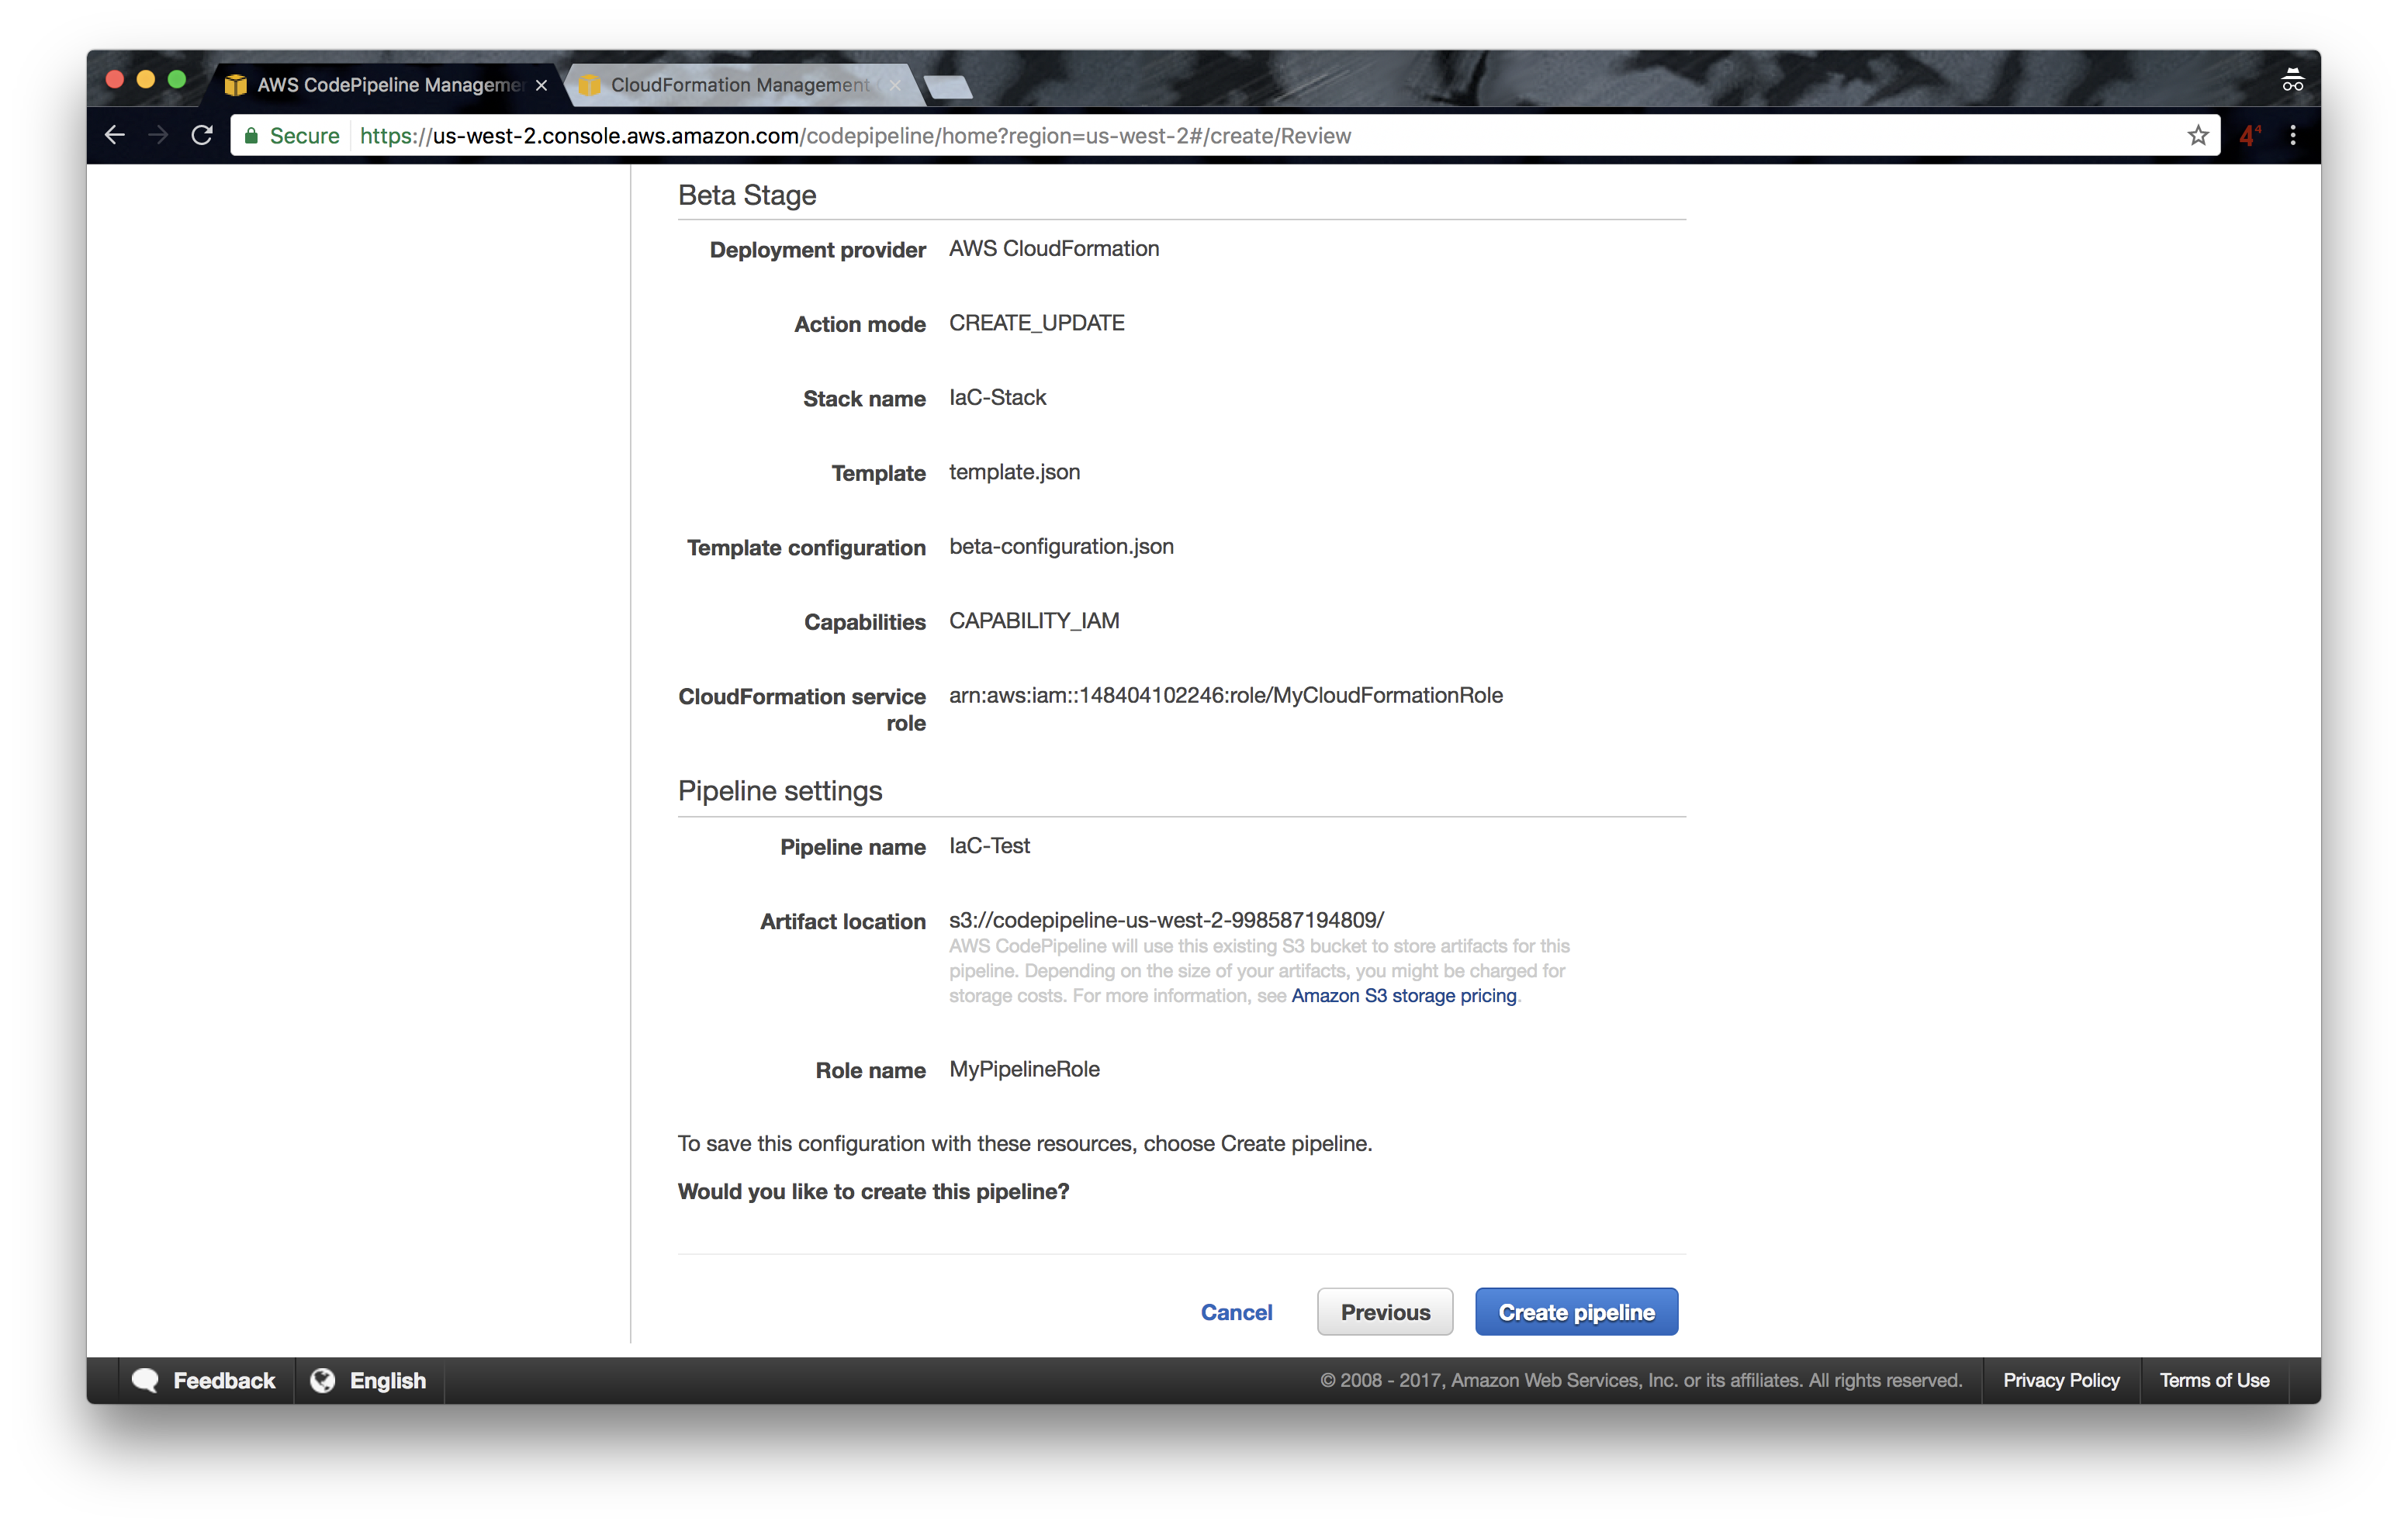
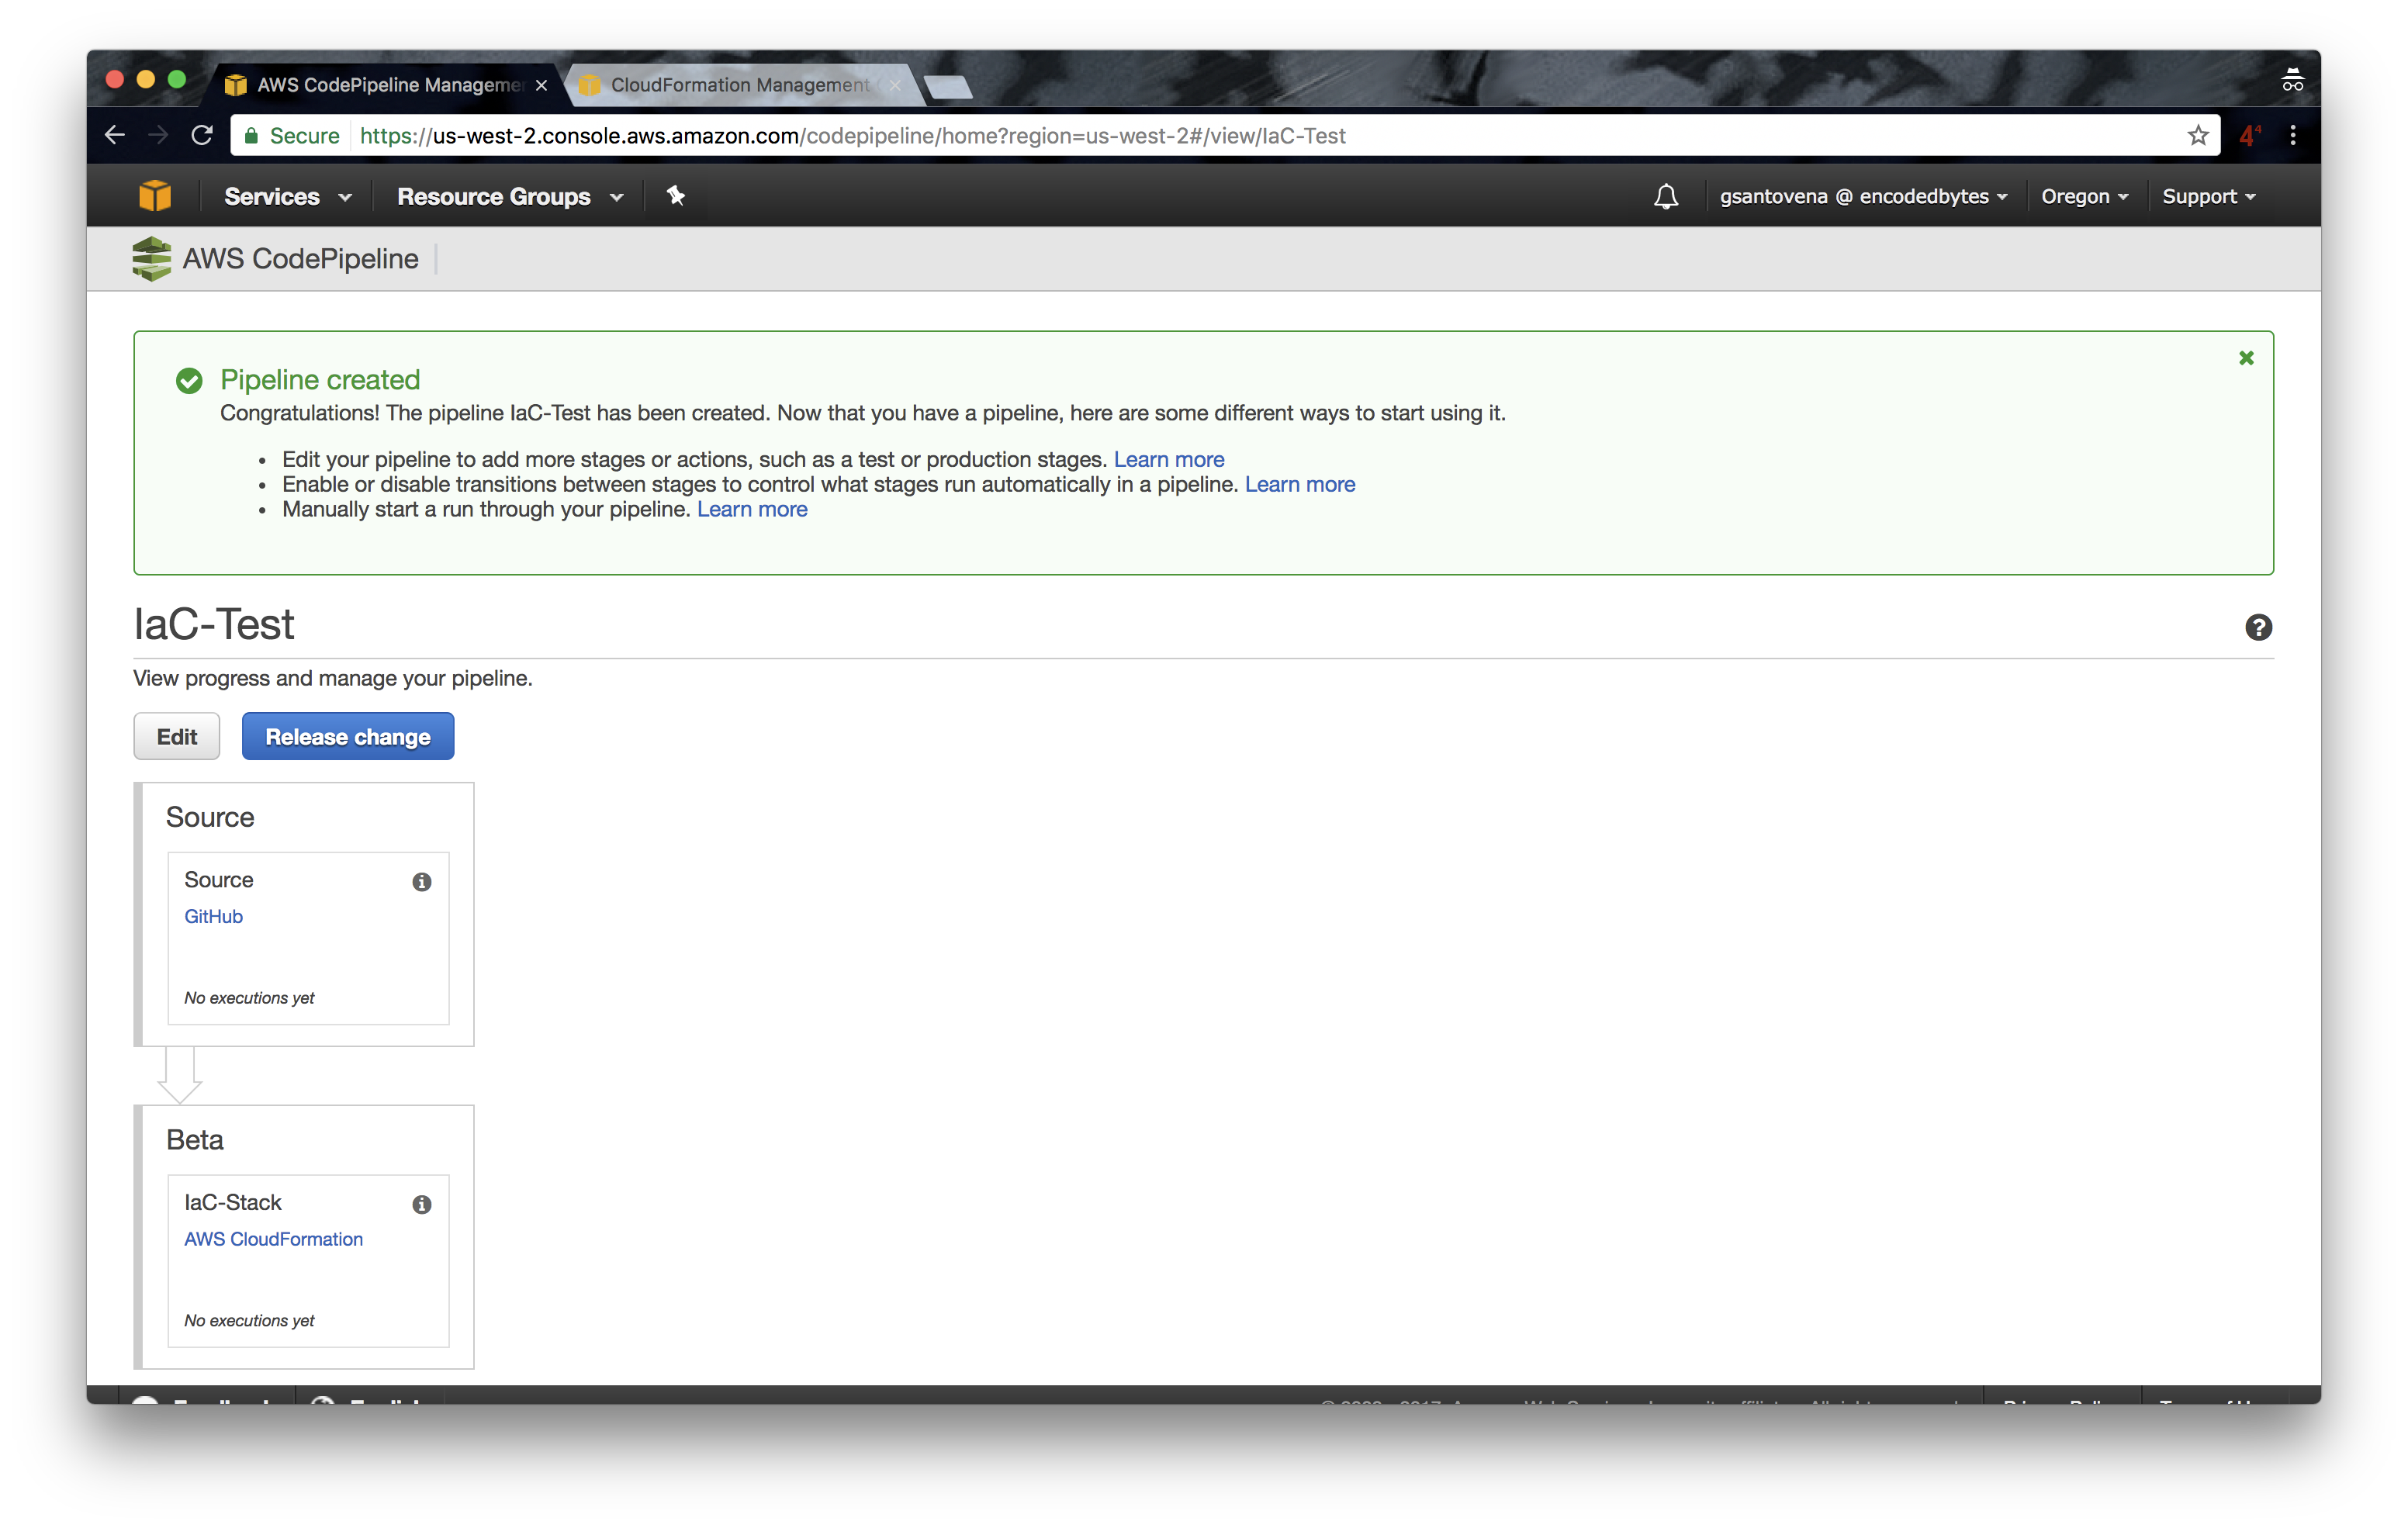
7. Review your pipeline and click on “Create Pipeline”:
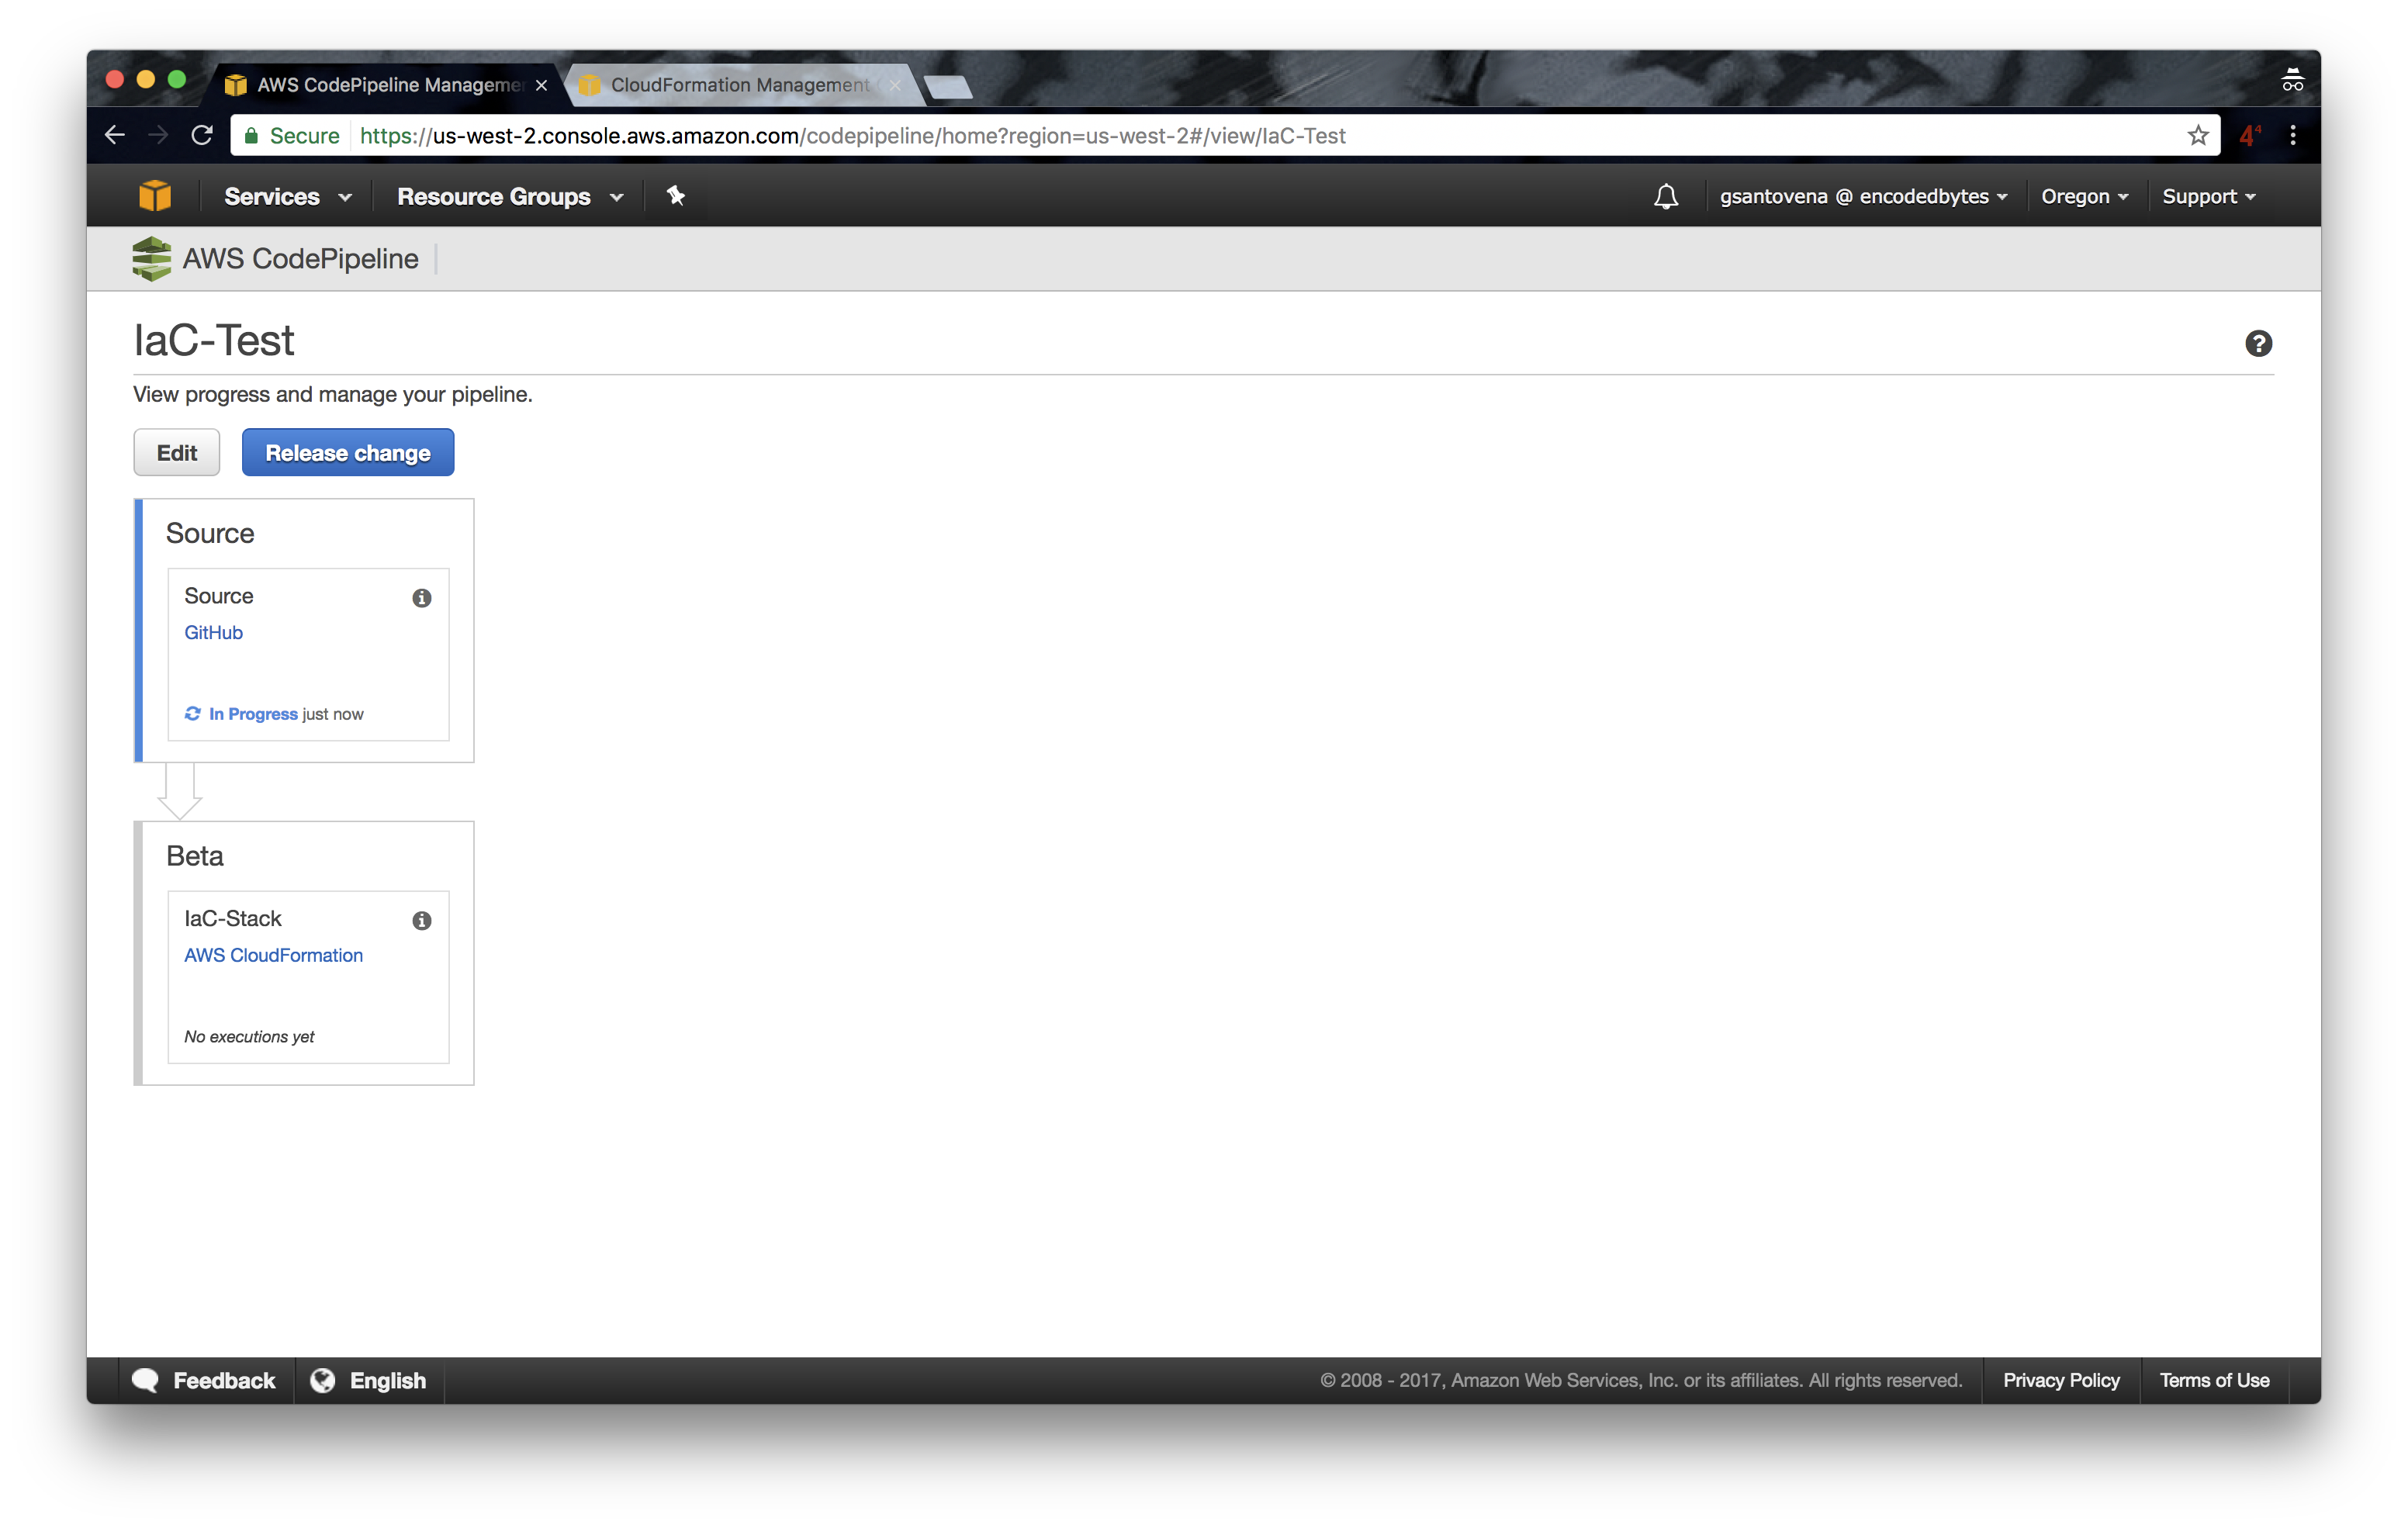
8. Now, our pipeline is being created; this is when things get interesting.
9. When our pipeline is finished, it will pull our code, our infrastructure, in the first step. In other words, it will grab the source code:
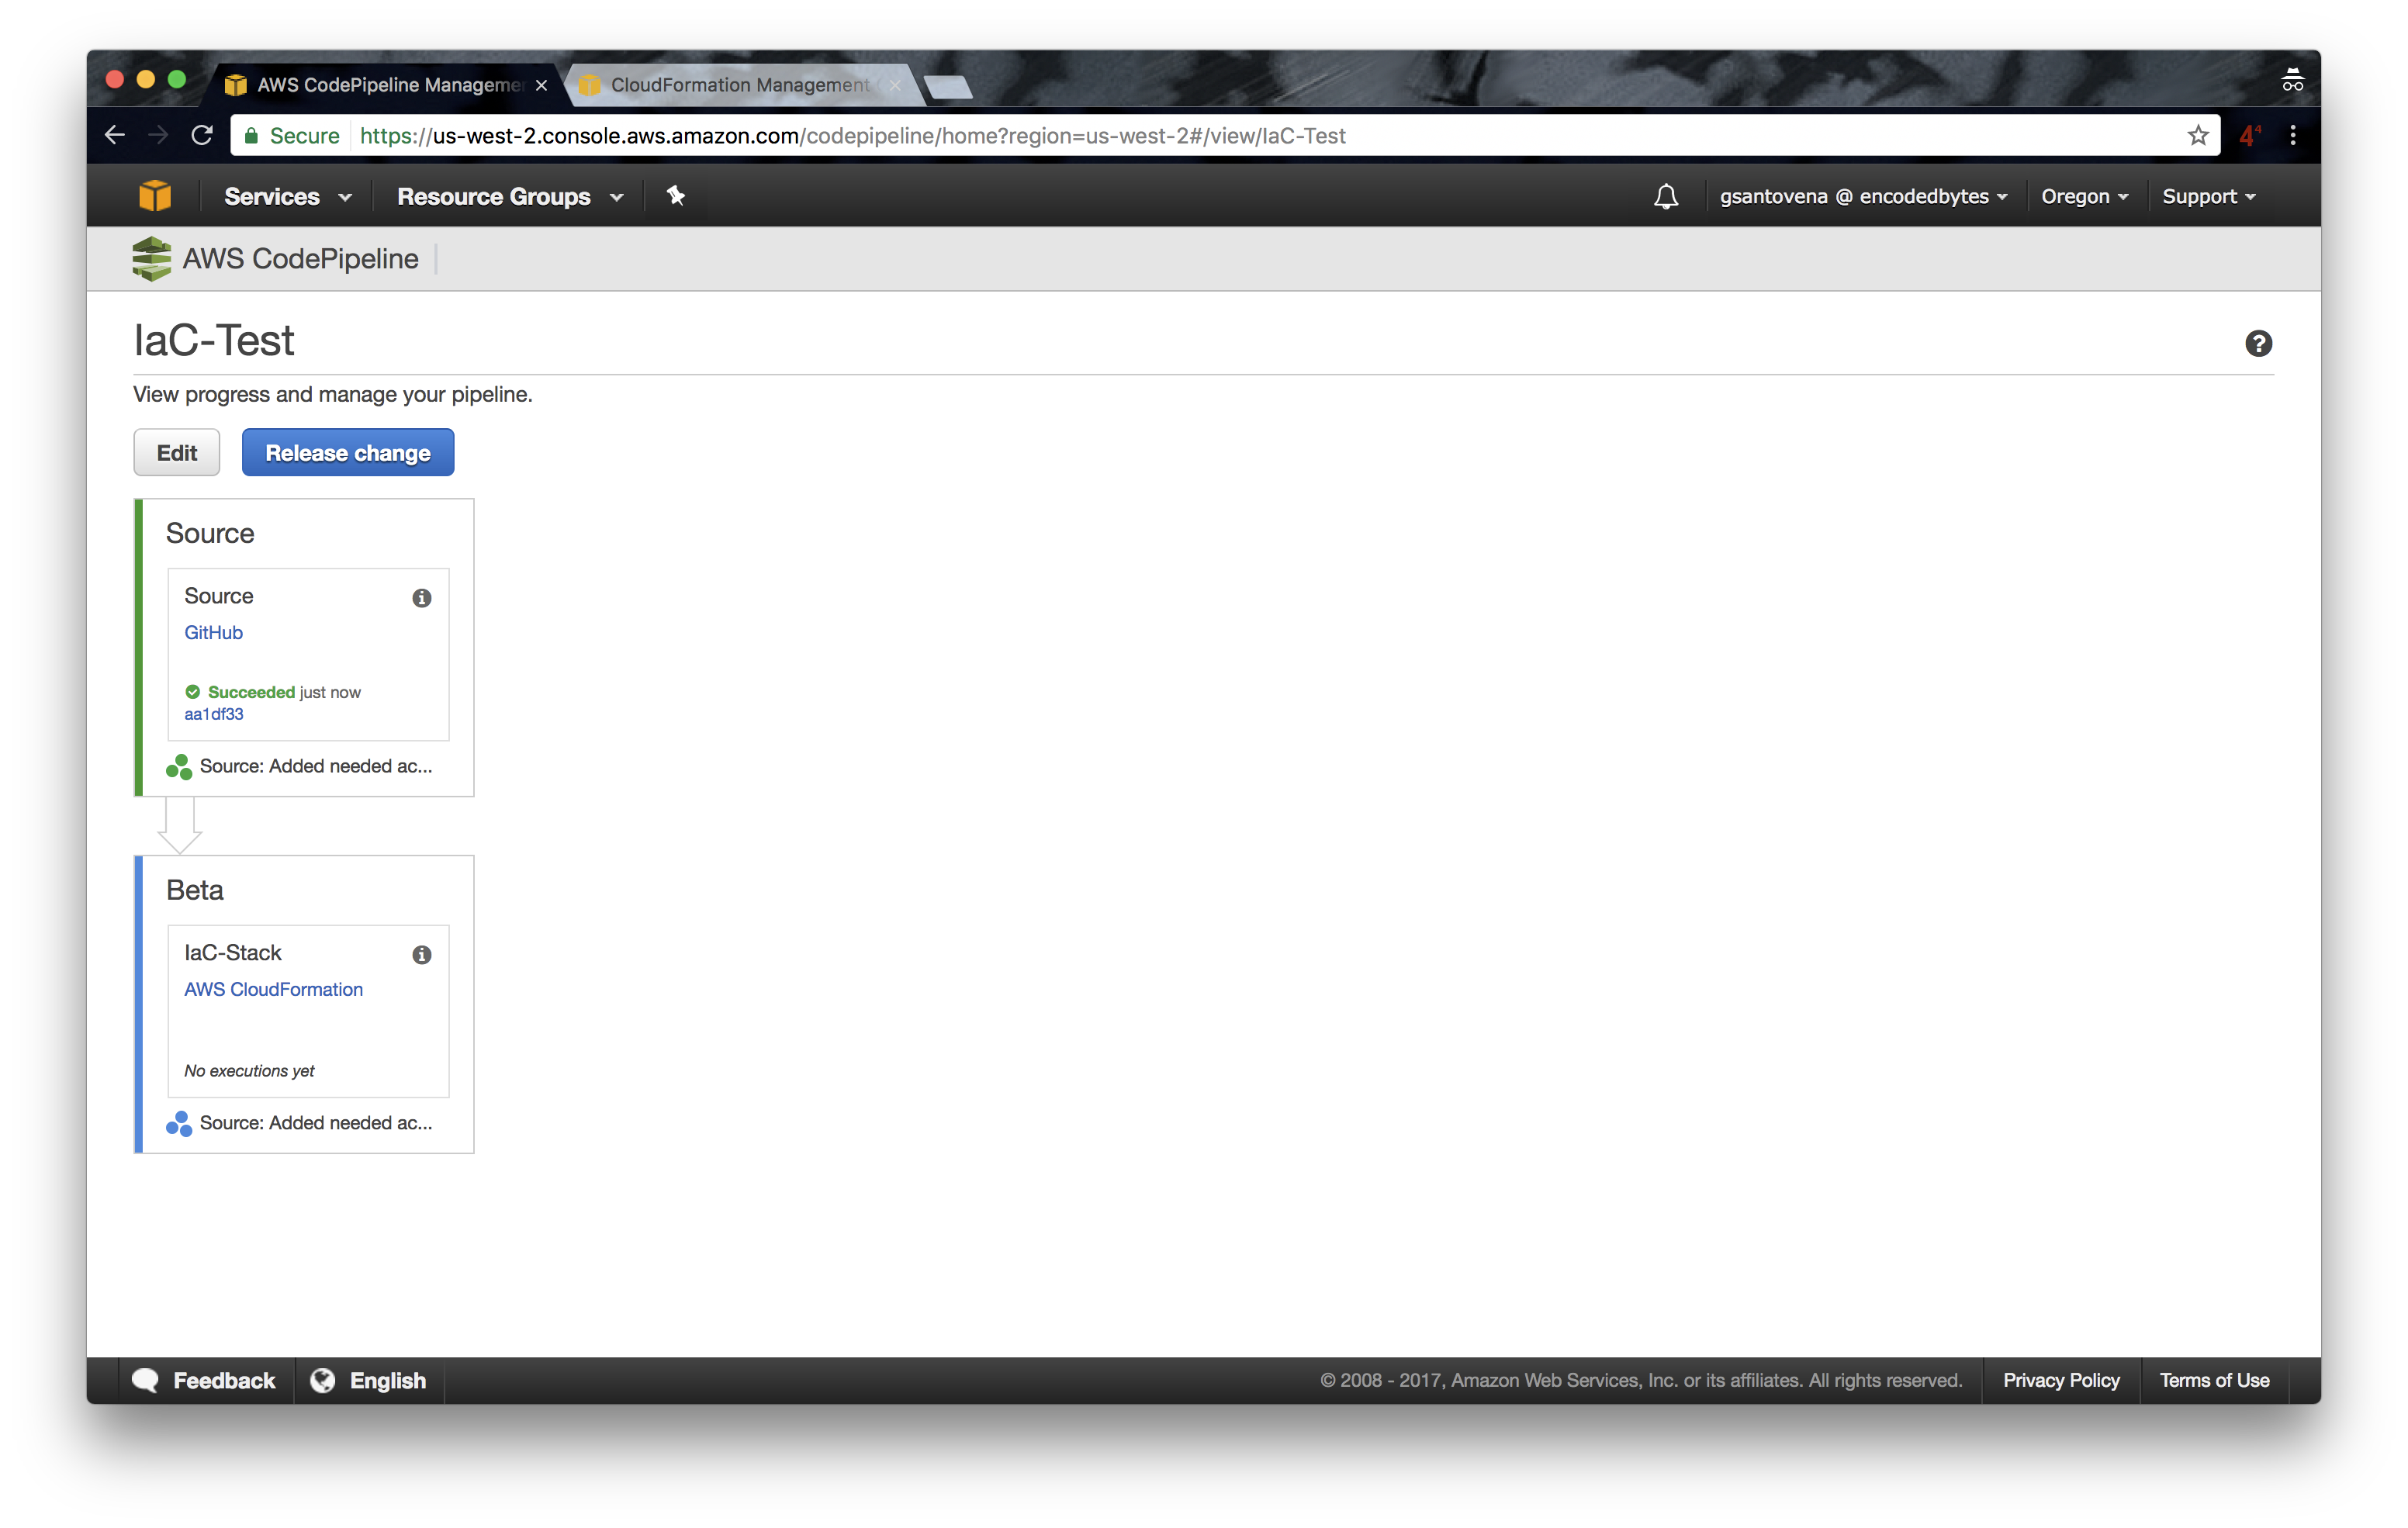
10. If successful, it will show the last commit made in our repository, and it will move to the next step, in our case, the deployment of our infrastructure using CloudFormation:
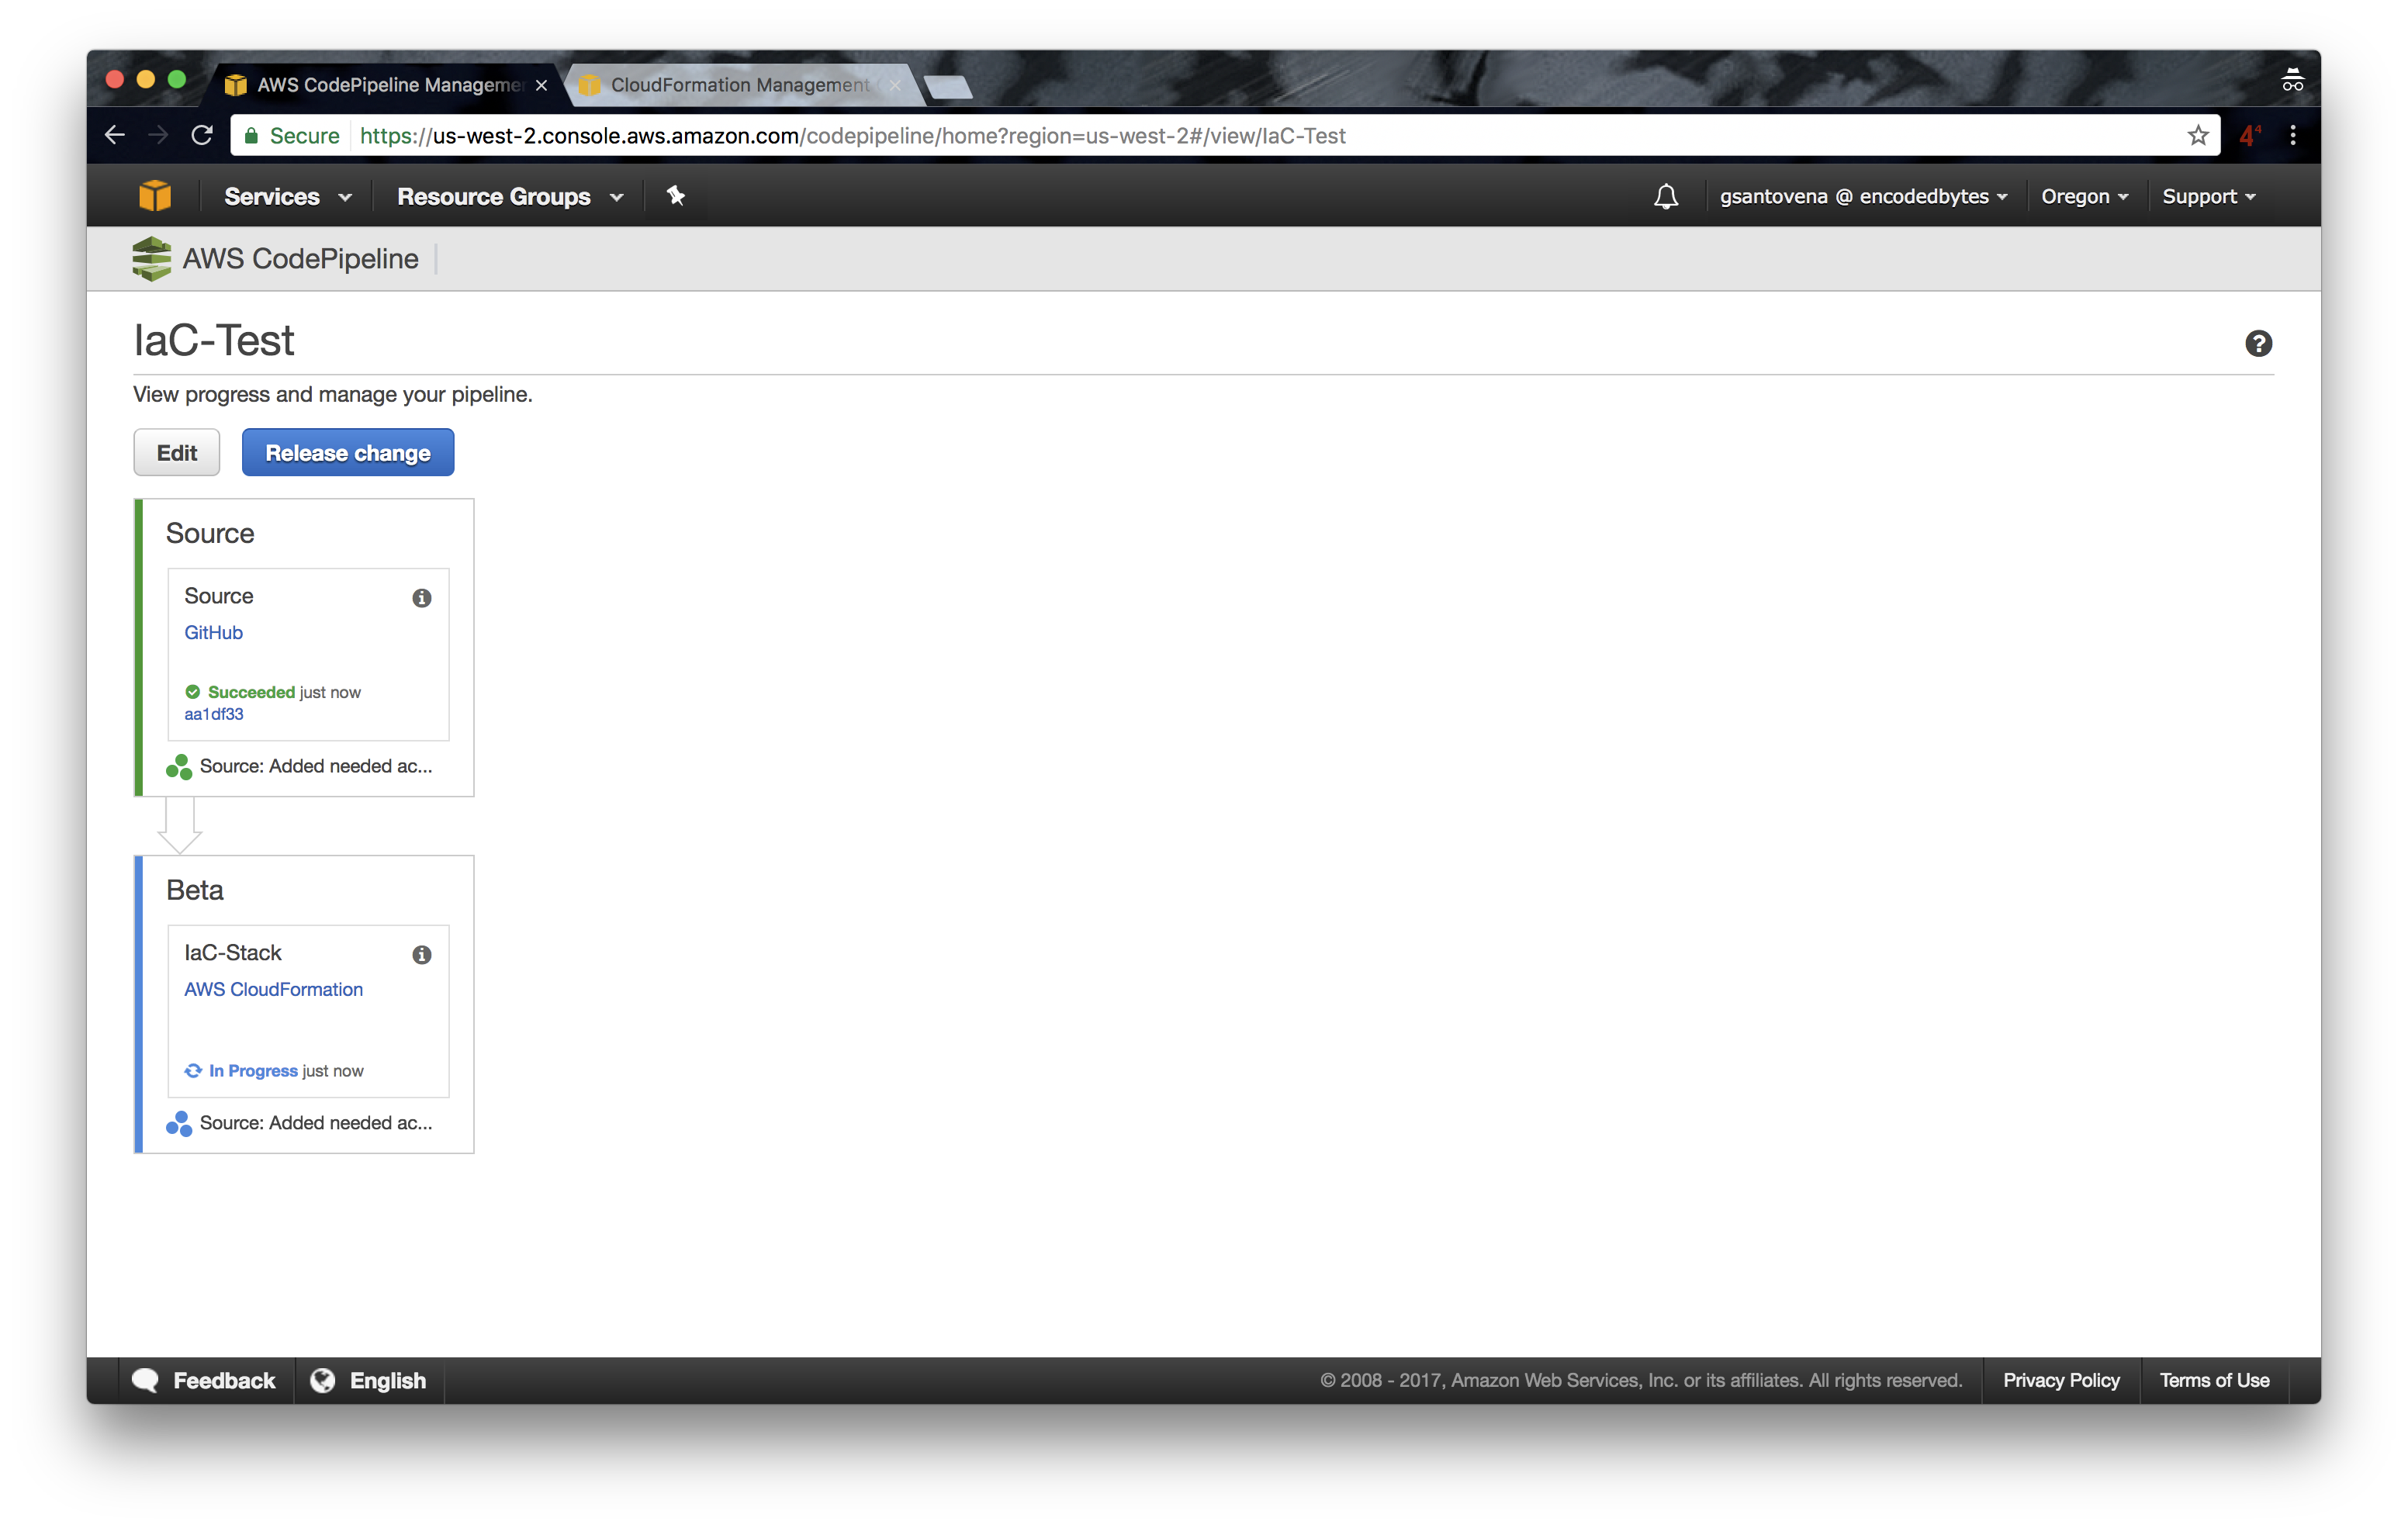
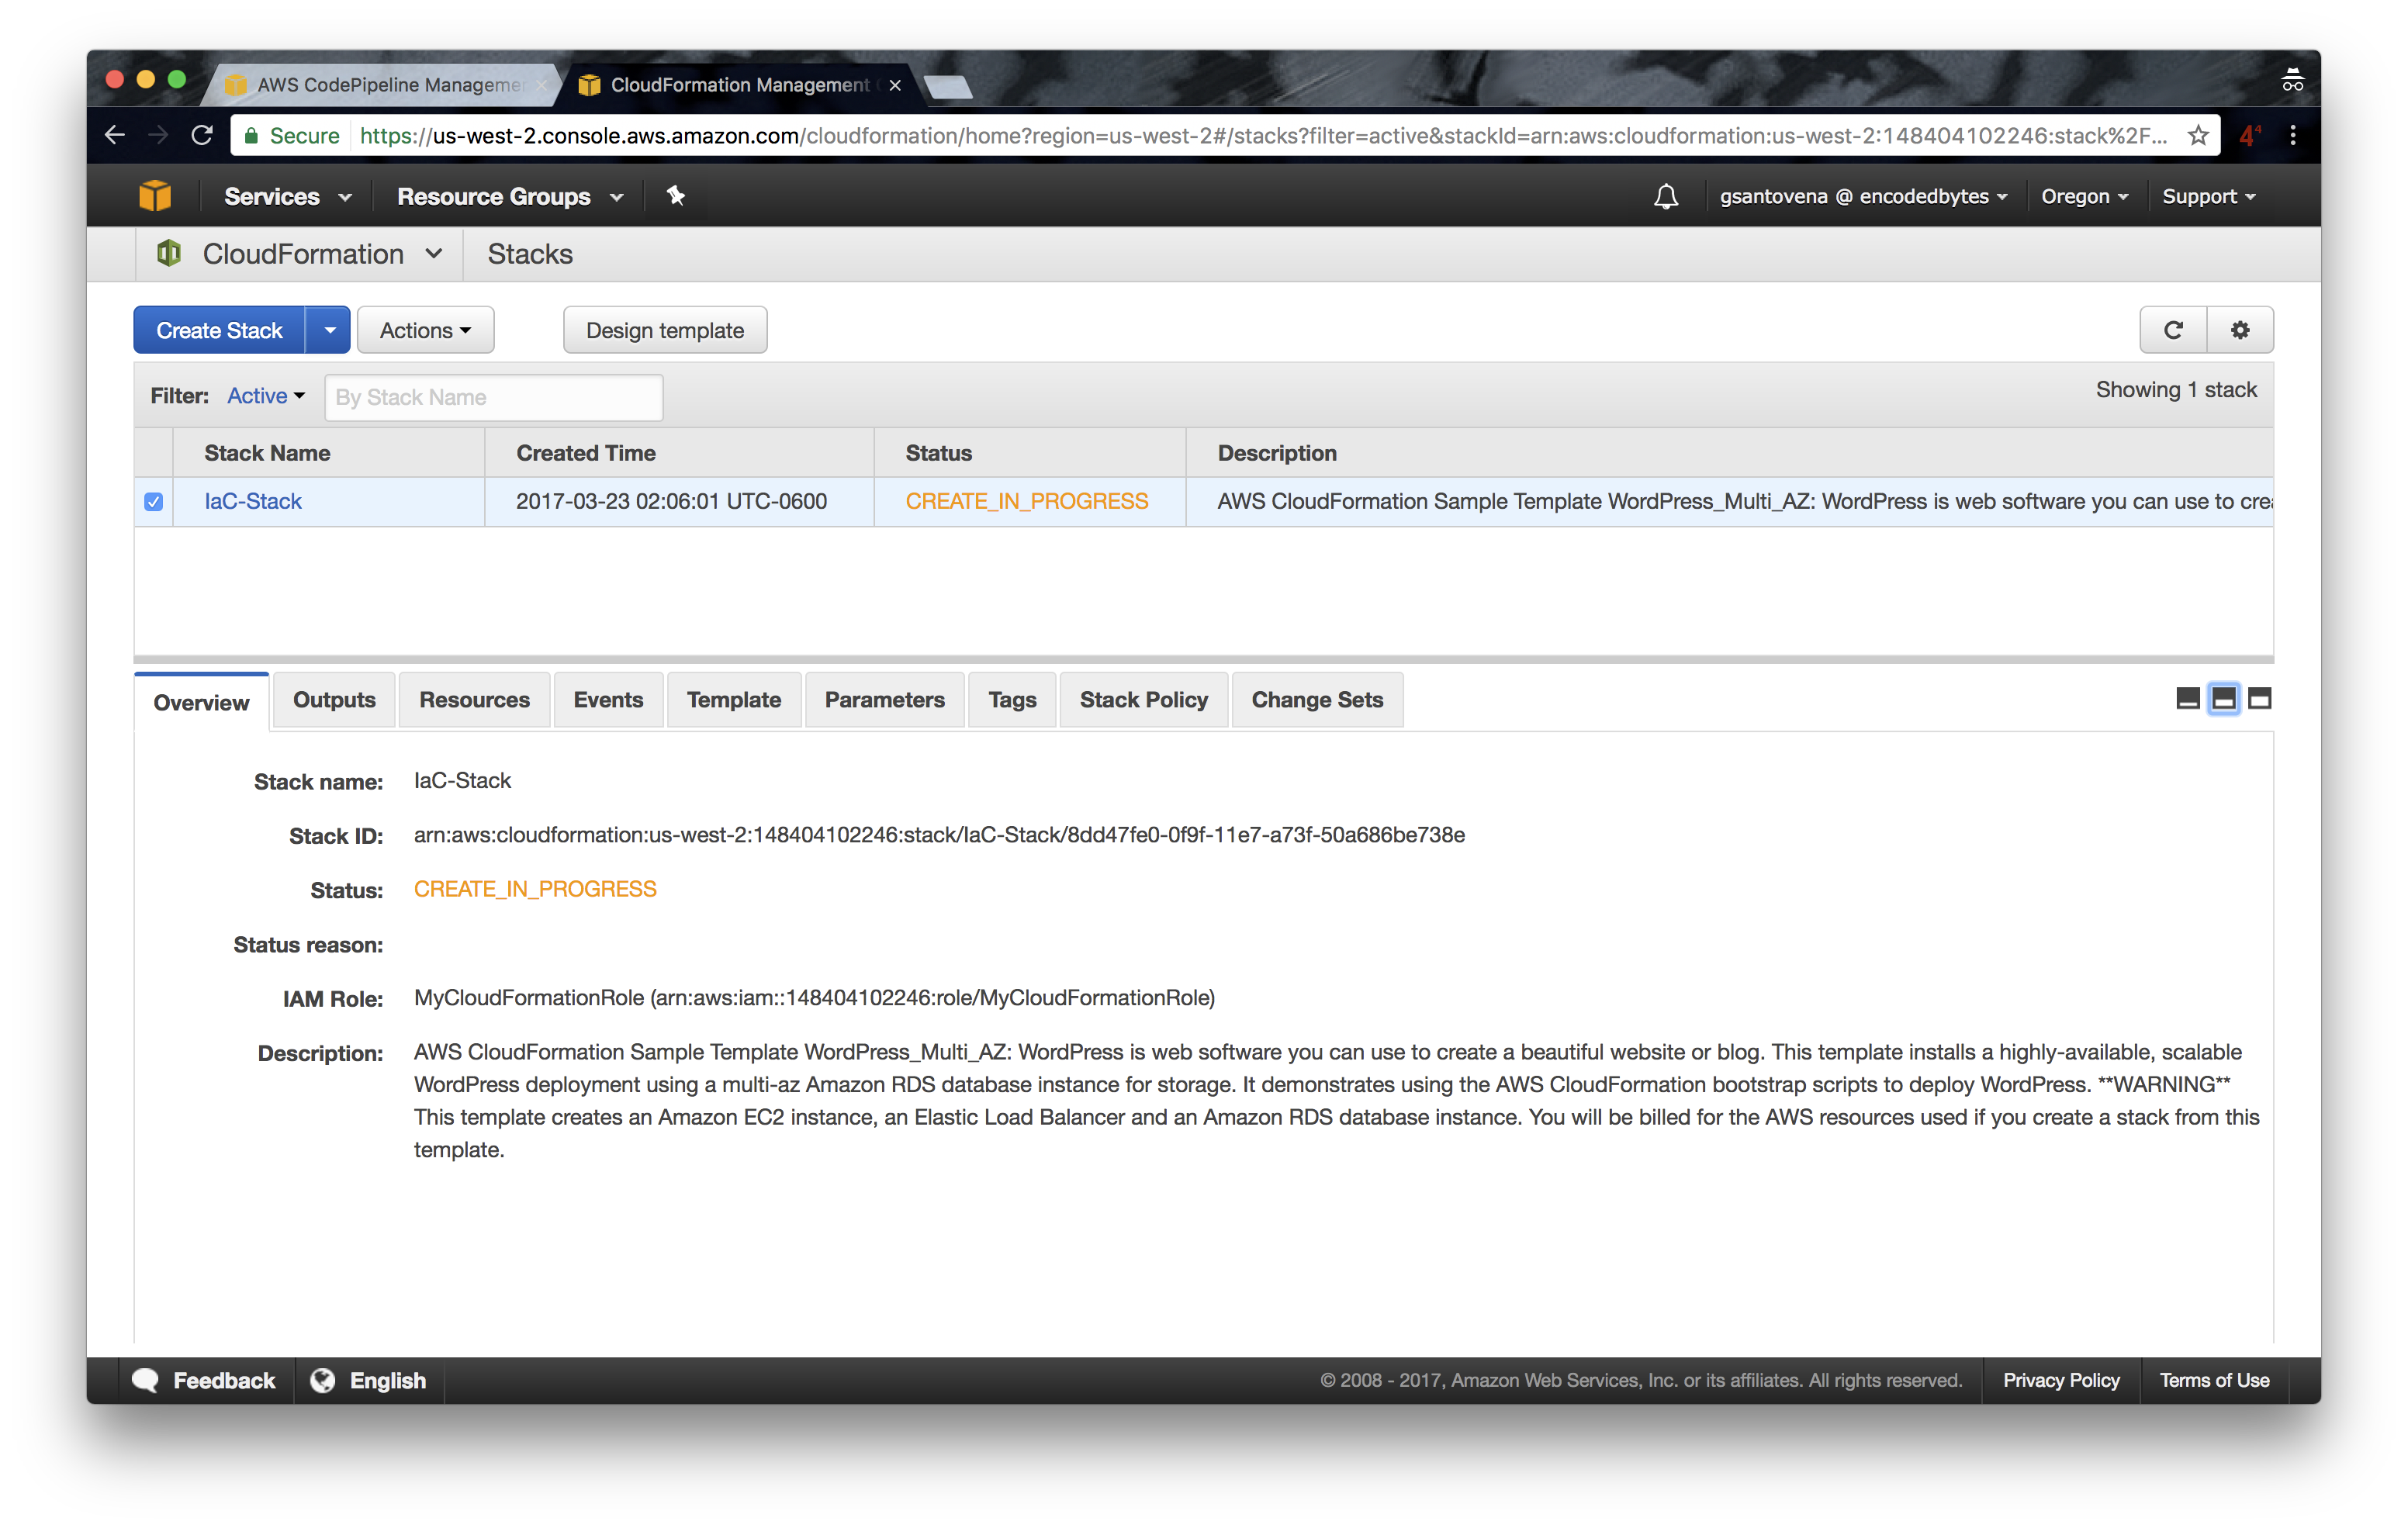
11. You can go to https://console.aws.amazon.com/cloudformation/home to check that our new stack is in the process of being created:
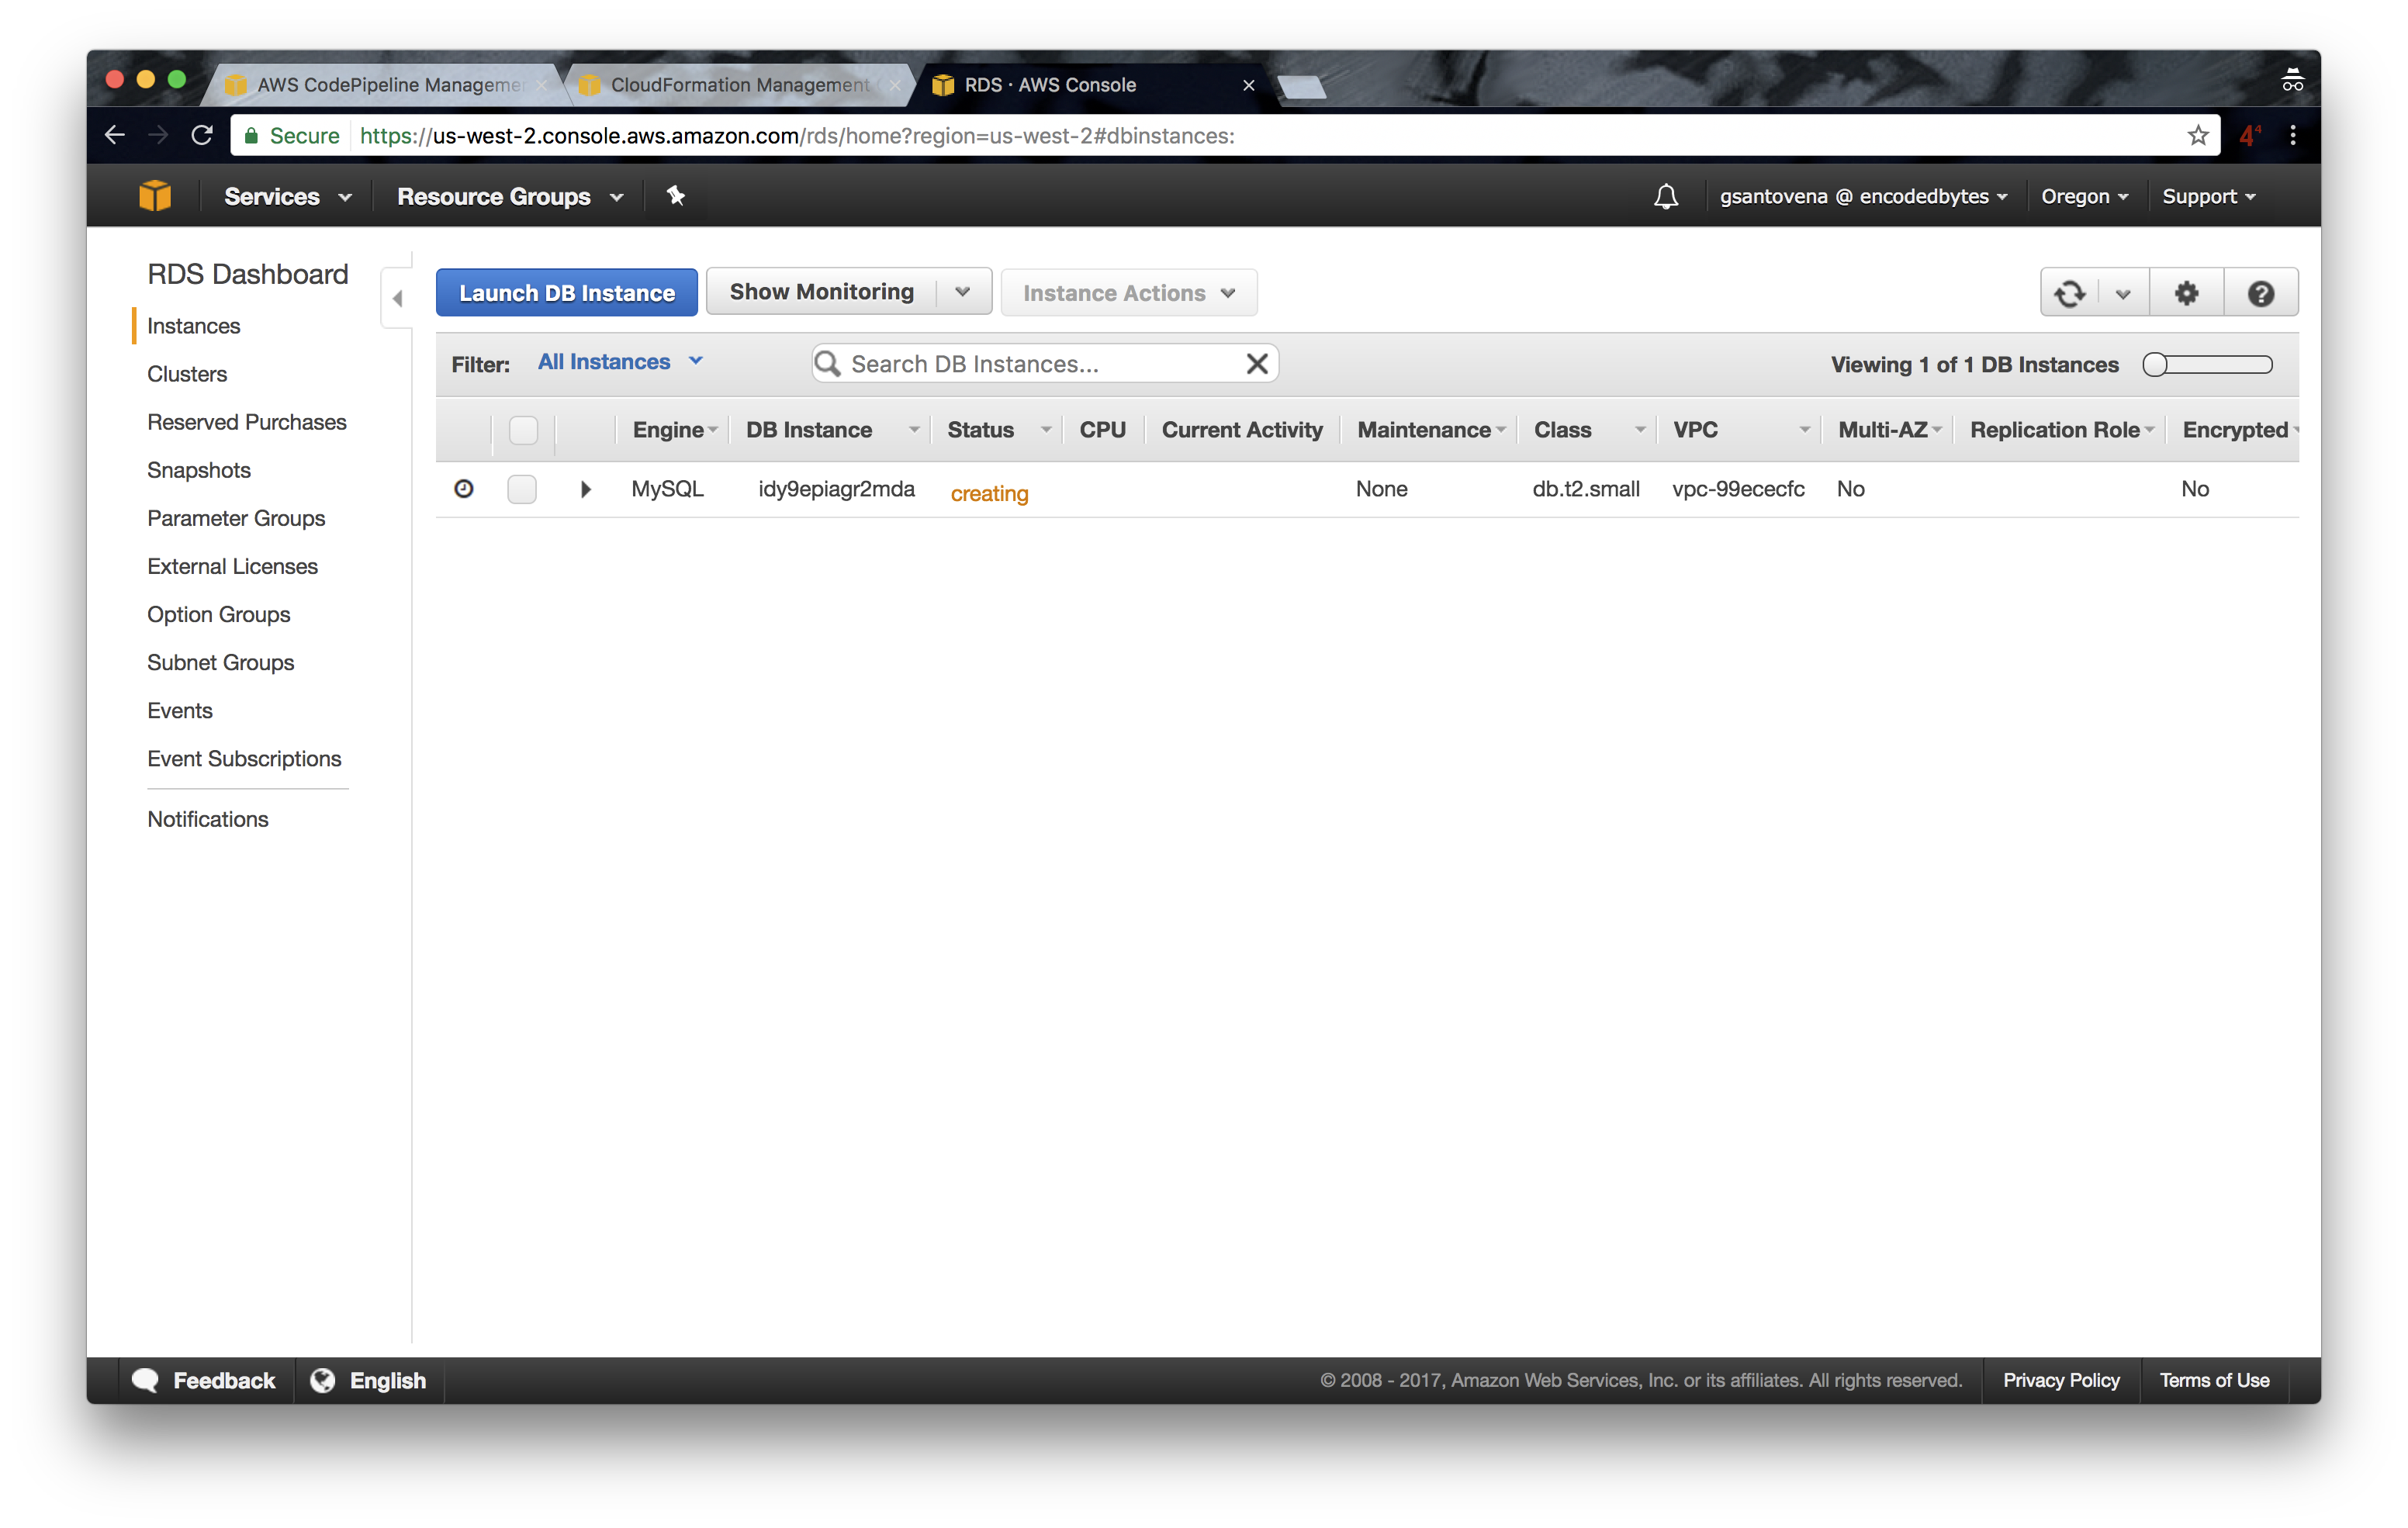
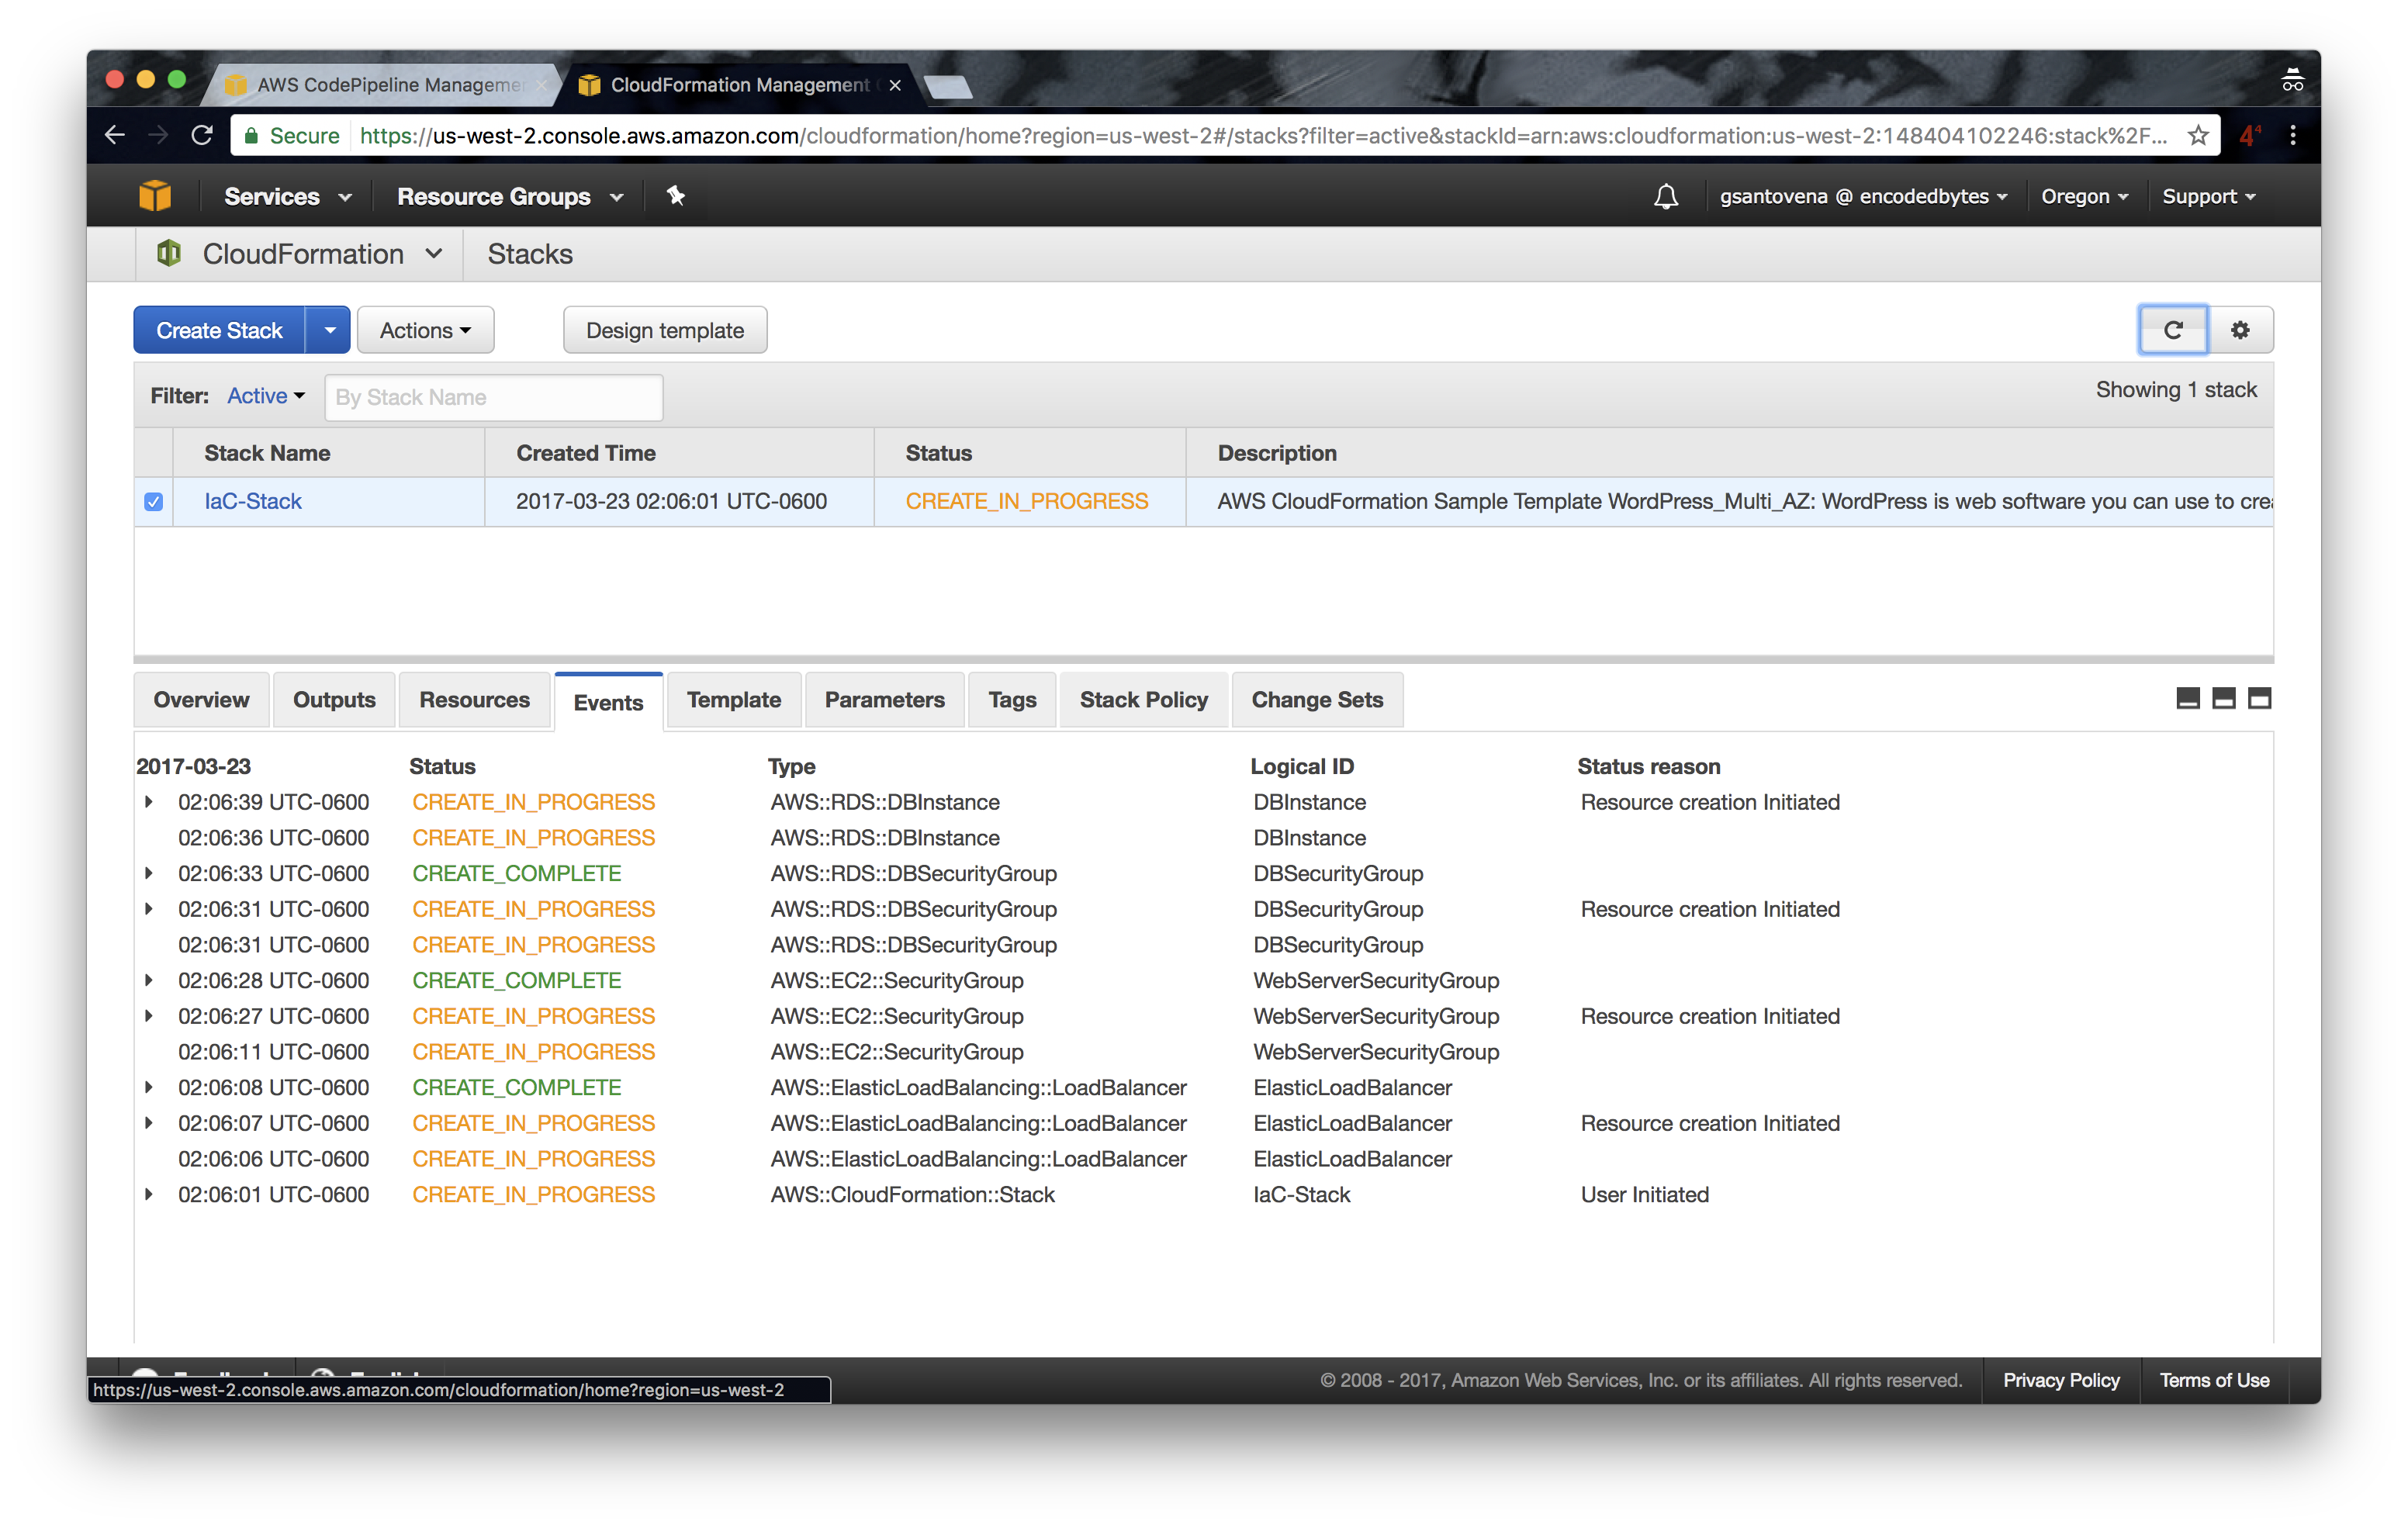
12. While the stack is being created, you can see that all of the artifacts are also being created:
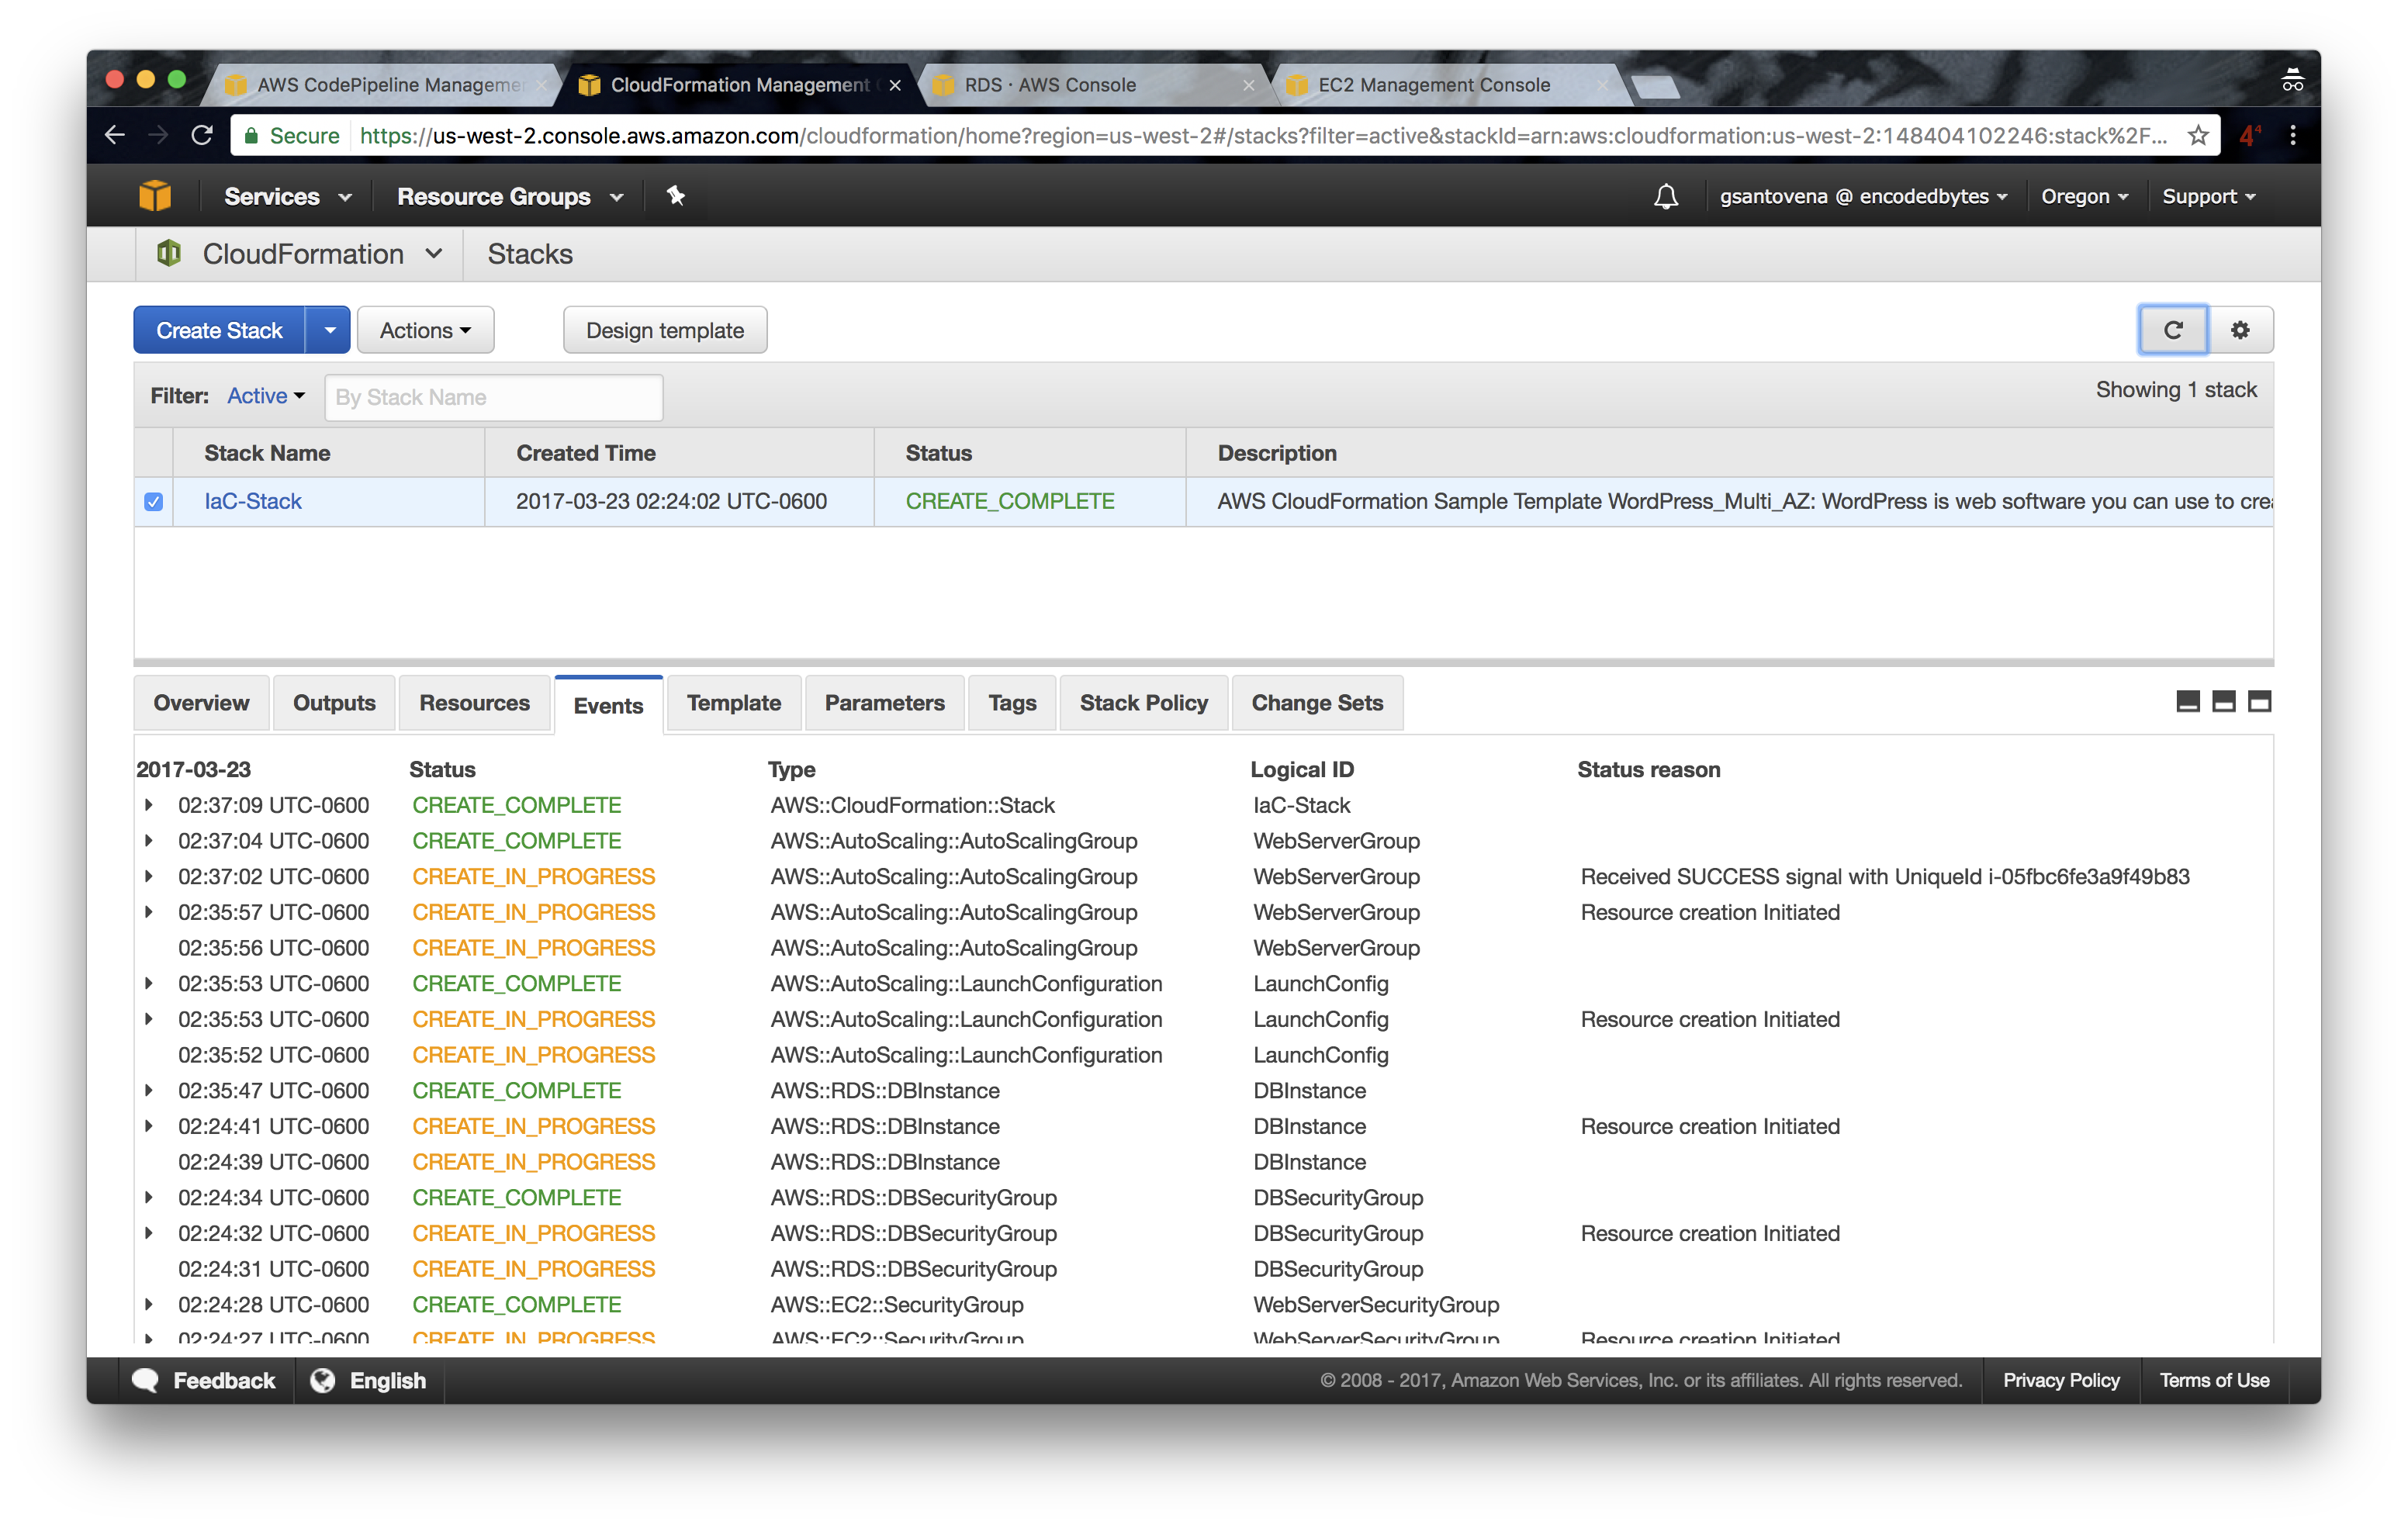
13. You will see that the message in the last step reads “Succeeded”:
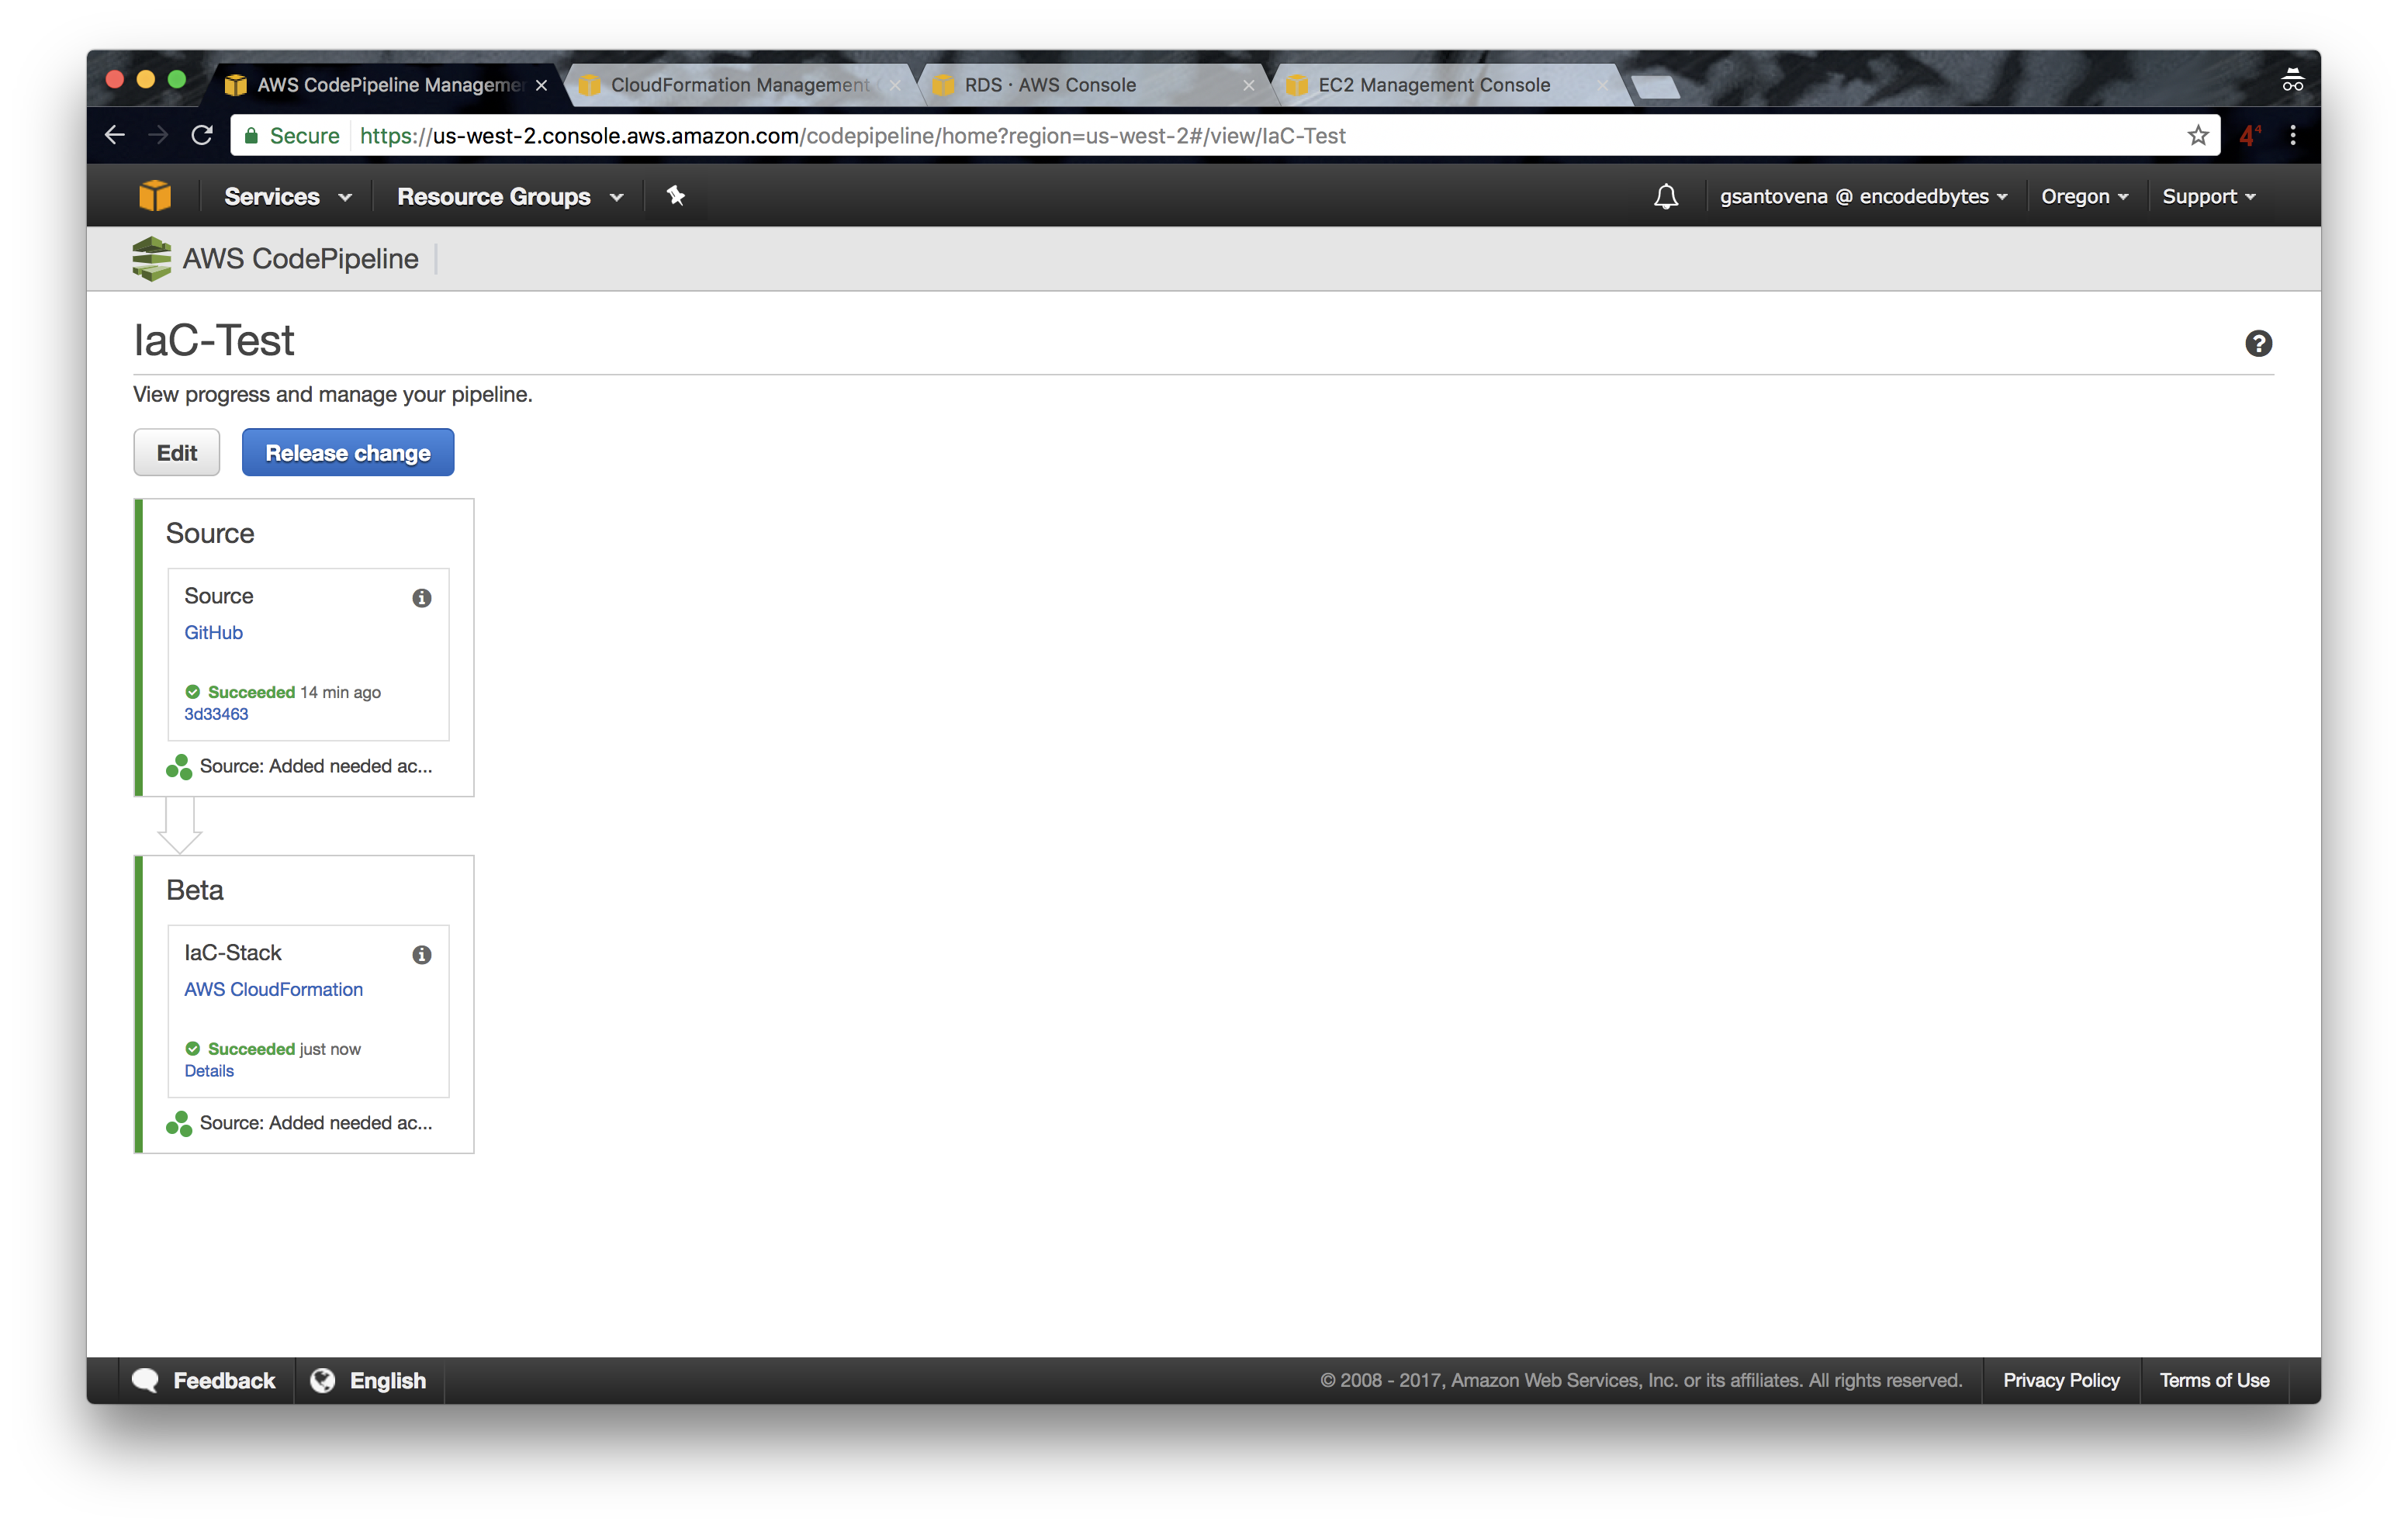
Until now, things are very straightforward. We have the first version of our infrastructure deployed and running. You can verify that our WordPress site is up and running by checking the output of our stack:

Clicking the URL that appears as the value for the WebsiteURL key will open a new web browser window showing the WordPress installation process.
Now that we have everything configured, we can make changes to our infrastructure code, push them, and see how AWS CodePipeline performs all of the steps automatically. We don’t need to do anything! Cool, huh?
With any new commit to the master branch, we are going to see how our pipeline makes all of the steps once again. And, depending on the changes that we made, we will see how our CloudFormation is updated.
AWS CodePipeline allows us to add more steps, such as deployment to different environments, tests, approvals, etc.
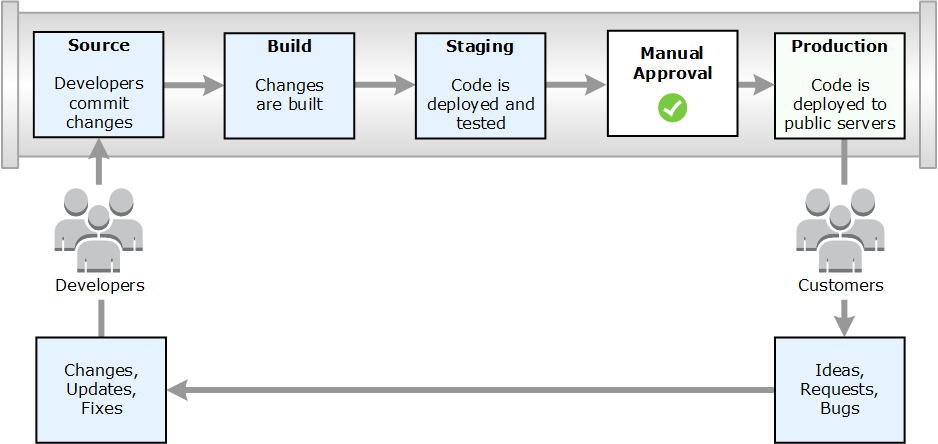
The same tools we use to deploy our source code can be used to deploy and test the infrastructures and platforms where our code runs. And, as we saw in this post, it isn’t difficult! In addition to AWS CodePipeline + AWS CloudFormation, there are many other ways to have our infrastructure with continuous delivery. For instance, we can use Terraform along with Jenkins. Or, we can use all AWS services: AWS CodePipeline + AWS CodeCommit + AWS CloudFormation. Or better still, we can get the installation of our app out from the CloudFormation template and use Chef, Puppet, or Ansible.