![]()
BigML offers a managed platform to build and share your datasets and models
Machine Learning as a Service (MLaaS) has become a real thing in the Cloud market and BigML‘s mission is simple and clear: making Machine Learning easy, beautiful and understandable for everybody.
I would say that BigML offers something much closer to Software as a Service (SaaS) than its IaaS and PaaS competitors. I recently played with AmazonML, AzureML and Google Prediction API, all of which are part of rich ecosystems of web services, from Cloud storage and CDNs, to VPCs, deployment automation and much more.
On the other hand, BigML, while somehow remaining platform-agnostic, has successfully managed to exploit existing Cloud solutions to its advantage. Consider, for example, how it allows data imports from AWS S3, MS Azure, Google Storage, Google Drive, Dropbox, etc. This detail seems trivial at first, but might be a game changer in the long-term: once public Cloud infrastructures become a commodity, a cross-provider solution will be the best option.
BigML Features
Being focused “only” on Machine Learning, BigML offers a wider set of features, all well integrated within a usable Web UI. As you would expect, you can load your dataset, train and evaluate your models, and generate new predictions (either one by one or in a batch).
Here is a list of additional useful features I haven’t see elsewhere:
- Plenty of ways to load your raw data, including most Cloud storage systems, public URLs or your own CSV/ARFF files.
- A vast gallery of free datasets and models to play with, well organized into categories and publicly accessible.
- Clustering algorithms and visualization: data analysis and visualization tools are essential to come up with a high-quality model.
- Anomaly detection: dealing with outliers can be a pain, and detecting pattern anomalies can save you time and money, even before hitting your model.
- Flexible pricing: you can choose between subscription plans (starting from $15/mo for students), pay as you go with BigML credits, or even buy your personal VPC.
How to import your data
Depending on your use scenario, you may want to import your data from an existing Cloud storage system, provide a public URL, or directly upload a CSV file. In Development mode, you can even create an inline source on the fly.

Even at this step, BigML offers a nice set of features:
- CSV parsing configuration.
- Fields type selection.
- Strings locale selection (English, Dutch, Spanish, or Portuguese).
- Headers parsing (CSV with or without a header row).
- Date-time fields expansion.
- Text analysis (language detection, tokenization, stop words, stemming).
Interestingly, you can update your Source configuration at any time, without any additional upload.
As soon as your Source is ready and correctly parsed, you can use it to generate a new Dataset. Alternatively, you can import ready-to-use data from their public datasets gallery.
Datasets are fully reusable, expandable and exportable
BigML Datasets are very easy to reuse, edit, expand and export. Indeed, you can easily rename and add descriptions to each one of your fields, add new ones (through normalization, discretization, mathematical operations, missing values replacement, etc), and generate subsets based on sampling or custom filters.
Furthermore – even before training your model – you are given values distribution and statistics for each field, and also a great Dynamic Scatterplot tool to visualize your data, two dimensions at a time. Here you may want to explore your features space, look for patterns, export chars or simply have fun.

In practice, Datasets are your starting point for most operations. Let’s assume that our goal is training and evaluating a classification model. We will first need to split our dataset into smaller training and test sets: you can achieve this with the Training and Test set Split operation. Of course, you are free to select how to allocate your records: 80/20 is the default split logic. This process will actually create two new independent datasets, which you can analyze and manipulate as you want.
As soon as the split is completed, you’ll want to select your new training set and launch the Configure Model operation.
BigML decision trees
A Machine Learning model could potentially be anything that’s able to analyze your raw data (eventually labeled) and that can somehow learn how to deal with new, unseen data.
Decision Trees are probably the most intuitive type of model you can build. They are easy to visualize and understand, and easier to store, since they can be almost directly converted into procedural code. Even if you are not a programmer, you can think of it as a nested structure of binary decisions.
That’s exactly what every BigML model is. When you train a model – starting from a training Dataset – you are asked to select your objective field (i.e. your target column). In order to reduce the effect of data overfitting and the size of your model, you will normally need some sort of statistical pruning, although you can decide to disable it.
Optionally, you can configure a few more options.
- Missing split: whether or not to include missing values when choosing a split (disabled by default).
- Node threshold: maximum number of nodes (512 by default).
- Weights: you can choose to weight your records specifying one weighting field, or assign relative weights to your classes.
- Sampling and Ordering: you can choose a custom sub-sample and shuffling logic.

At the end of the training process, you will be able to visualize your model and obtain an informative report to better understand which of your fields are more relevant (see the screenshot above). Moreover, your model is graphically represented as an actual tree (below on the left) or as a sunburst (below on the right).
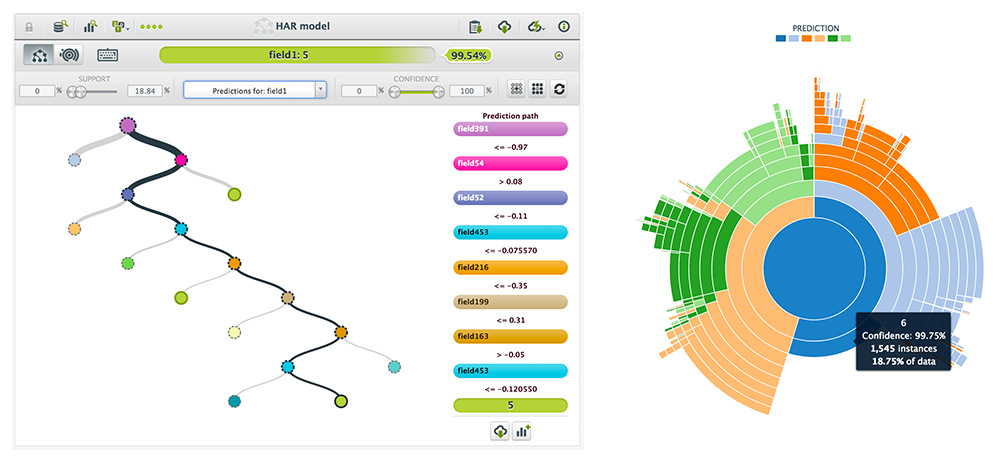
At this point, you can already start generating new predictions, but of course, we want to evaluate our model’s accuracy first.
Ensembles can improve your prediction accuracy
Ensembles, involving multiple alternative models which will provide better predictive performance, are a well-documented way to improve the accuracy of your single-model system. Each model can be trained using a subset of your data, or focused on specific classes so that they will collaborate in generating a better prediction.
In BigML you can easily train Decision Forests with the Configure Ensemble dataset operation: you are simply asked how many models will be trained.
This approach drastically corrects the decision trees’ habit of overfitting your training data – and therefore improves your overall accuracy. In my case, I managed to improve my accuracy of 3% using an ensemble of 10 models, which might make sense if you can afford the additional time.
I also generated an ensemble of 100 models but, even though it increased the accuracy of an additional 1%, it was clearly not a great idea, both in terms of cost and speed.

How to evaluate your results
Being able to quickly evaluate your models and compare multiple evaluations are critical features for a Machine Learning as a Service product, and I personally believe BigML has done a great job.
Typically, you want to test your models against a smaller part of your dataset. We previously created a 20% test set and I used it to generate an evaluation for both my model and my ensemble. You can either launch the Evaluate operation on your model or the Evaluate a Model operation on your dataset. Not much configuration is needed unless you have specific sampling or ordering needs.
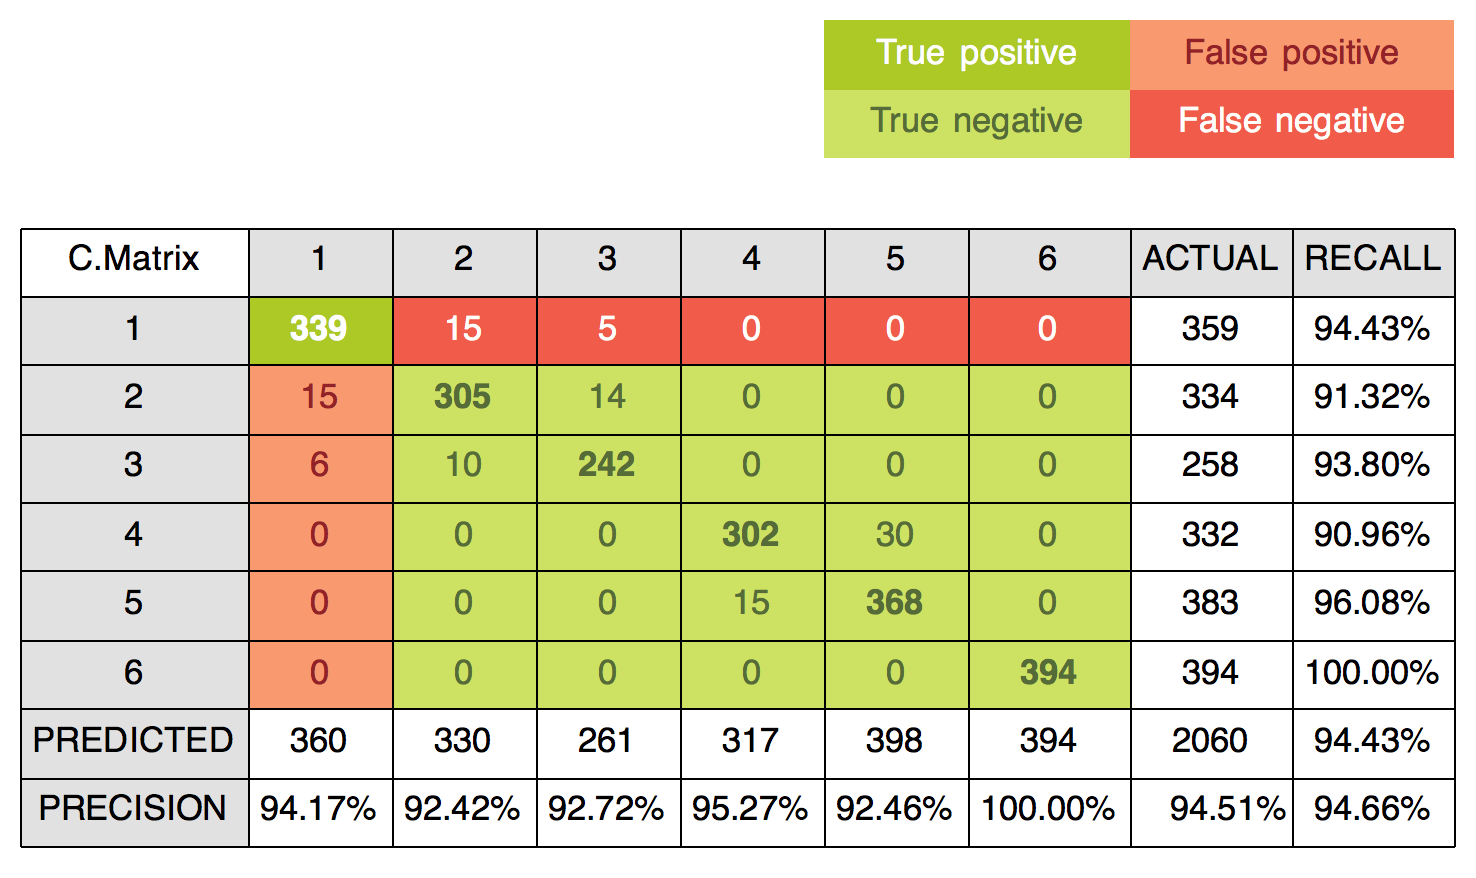
Each Evaluation is an object itself and will be listed in your Evaluations list. Of course, based on your model type (regression or classification) you’ll be shown different kinds of metrics. If your model is a classifier you’ll be shown a Confusion Matrix, including statistics like Accuracy, Precision, Recall, F-Measure and Phi.
In case your Confusion Matrix is too big to be rendered on a web page (let’s say you have 6 possible classes as I did), you will be able to download it in Excel format. It will look similar to the figure below, where the top legend shows you what every single cell means with respect to the first element of the main diagonal (you can do the same for each cell on the main diagonal).
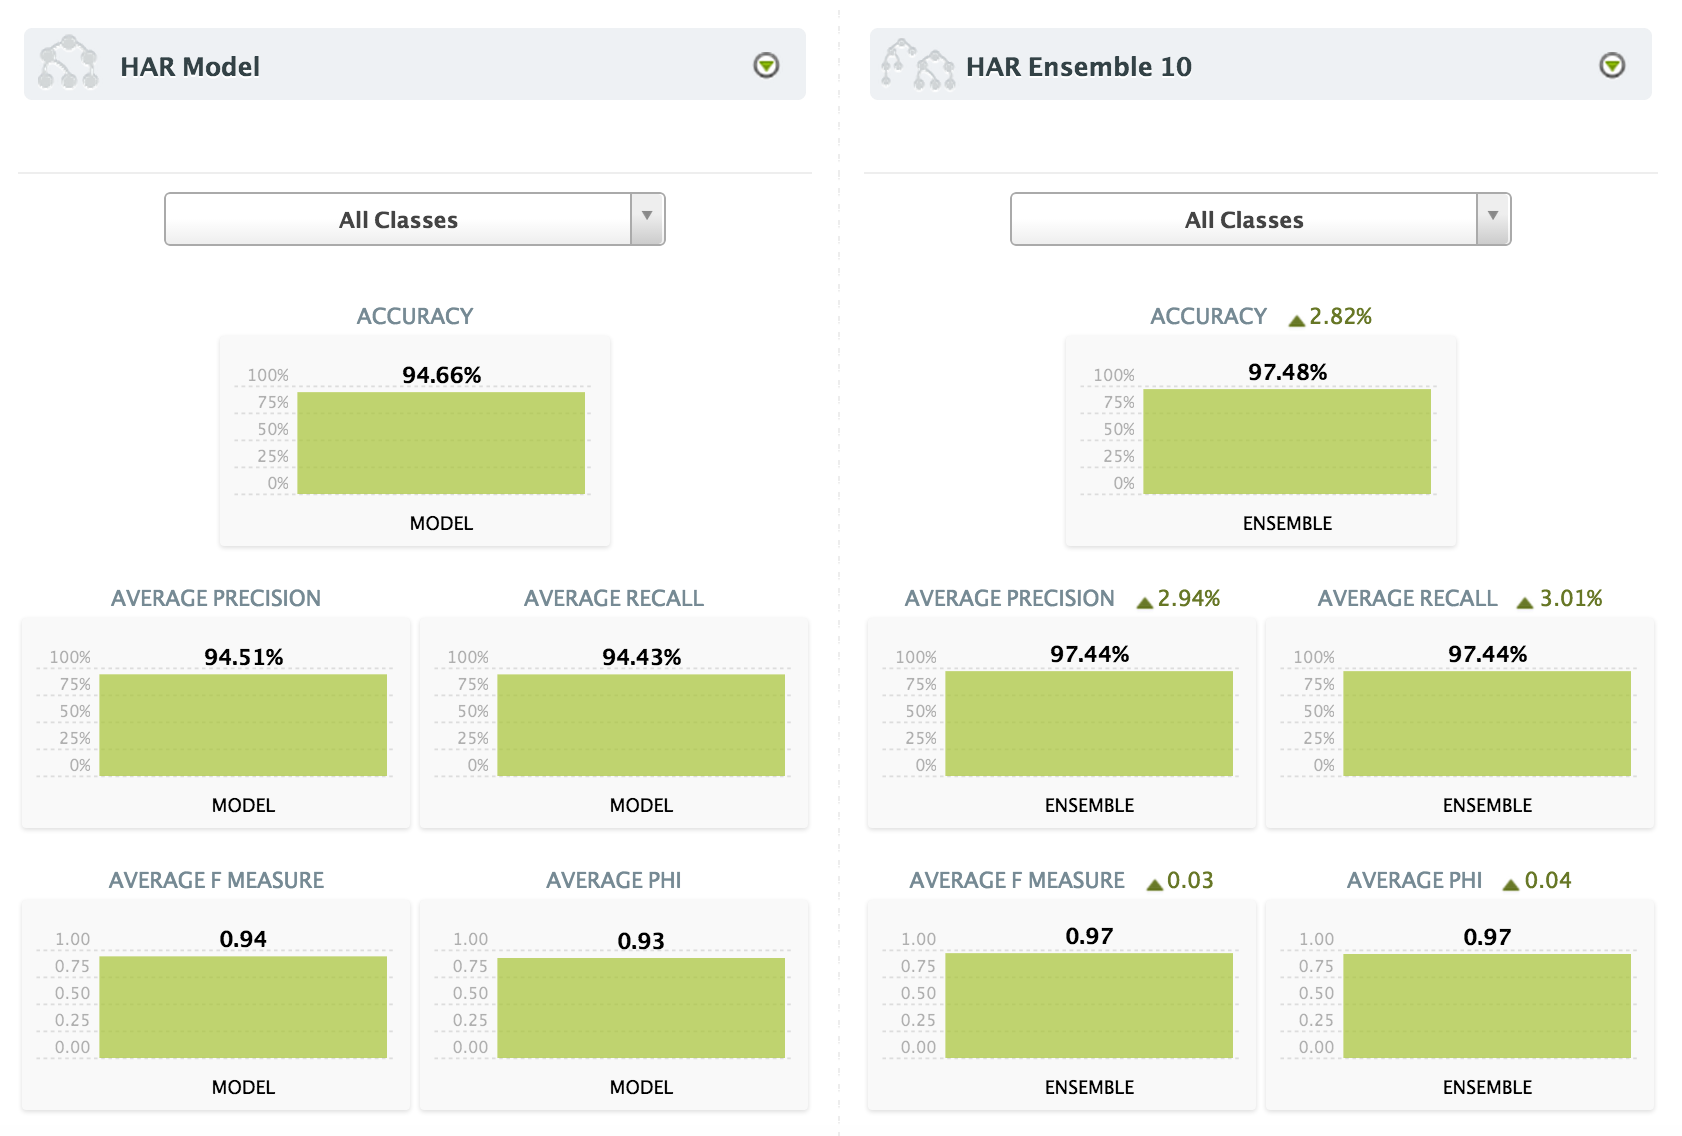
But how about my ensemble? Does it perform better?
Apparently, it does. It achieved +2.82% of overall accuracy and as high as 5.34% for some classes. You can compare two evaluations with the Compare Evaluation operation and be shown the same statistics of a single evaluation, plus a relative percentage for each metric.
 My model alone was pretty effective and I probably wouldn’t choose to pay the additional cost of an ensemble – both in terms of price and speed – although in many cases overfitting will kill your predictive power and ensembles can drastically boost your accuracy.
Generating new Predictions with API bindings and BigMLer
I would say that BigML is both user-friendly and developer-friendly. They took the time to code plenty of API clients, and even a command-line tool called BigMLer.
Of course, you can perform every operation mentioned above via API, but I believe that offline phases are better handled with a clear and solid UI, especially during the model and dataset definition. Choose the Python binding and coded a simple script to generate new predictions.
from bigml.api import BigML
from bigml.model import Model
from bigml.ensemble import Ensemble
USE_ENSEMBLE = False
labels = {
    '1': 'walking', '2': 'walking upstairs',
    '3': 'walking downstairs', '4': 'sitting',
    '5': 'standing', '6': 'laying'
}
def main():
    api = BigML("alex-1", "YOUR_API_KEY", storage="./cache")
    if USE_ENSEMBLE:
        predictor = Ensemble('ensemble/5557c358200d5a7b4300001e', api=api)
    else:
        predictor = Model('model/5557ac99200d5a7b42000001', api=api)
    #generate new prediction
    #Note: params might differ btw Ensemble and Model, this is an example
    prediction = predictor.predict(get_input_data(), with_confidence=True)
    label = prediction[0]
    confidence = prediction[1]
    print("You are currently %s (class %s, %s%%)." % (labels[label], label, confidence) )
def get_input_data():
    """ Retrieve input data from local CSV file """
    with open('record.csv') as f:
        record_str = f.readline()
    #generate 'fieldN' dict (I had 562 un-named columns!)
    record = {}
    for i,val in enumerate(record_str.split(',')):
        record['field%s' % (i+2)] = val
    return record
if __name__ == '__main__':
    main()
As far as performance is concerned, calls to my model took between 1.5 and 2 seconds, until I enabled the local storage option: this will store all your models’ parameters locally and avoid blocking API calls for every future prediction. With a warmed up local cache, my script execution time dropped down to 150ms. My 10 models ensemble took about 20 seconds to load at first, while every next call took only 1 second at most: it’s actually about 10 times slower than a single model – as 10 predictions are performed – but I think 1% of additional prediction confidence is worth the time. Please also keep in mind that my model worked on more than 560 input features and 6 possible output classes, therefore I’m sure that an average model would run much faster than mine!
Alternatively, you can convert your model to procedural code in fifteen different languages/formats by clicking on Download Actionable Model. I gave the Python version a try and it really takes just a few milliseconds to execute locally: this might be a good solution in case you don’t want to install new libraries (for example, I can think of embedded devices or network isolated clients).
I am definitely satisfied with the service and – as a developer – I greatly appreciate the effort in supporting so many programming languages and platforms, making everyone’s work simpler.