![]()
At present, most backends/APIs are dominated by a REST architecture, which allows us to create and access data in a structured manner. This approach has solved a lot of the issues that we previously faced regarding routes, resources, naming conventions, accessibility, etc. But this is 2017, and data is not requested from a single client or device. Today, different services need access to different data in different structures and formats. This makes it challenging to manage everything as we update our APIs, and it exposes some of the drawbacks of a RESTful Architecture. GraphQL solves this problem. Today, we’re going to show you how to write GraphQL Apps using AWS Lambda.
We’ll start with an overview of GraphQL and why it’s better than the normal REST Architecture. Next, we’ll talk about Serverless Architecture and how AWS Lambda comes into play. Finally, we will build a live application using these technologies. Let’s get started.
What is GraphQL?
GraphQL allows us to specify the data we need and the structure in which we need the data. As a result, we get the data we asked for in the structure that we specified. This means that clients/third party services can request different data in different formats and we will not have to change our code or write additional code to accomplish it. In addition, we can continue to add features to our application without affecting its existing usage.
One feature that I found really useful in GraphQL is that it documents our code really well (even if this is not automated). As a result, this makes it really easy to add documentation to our code when we’re writing it. In turn, this saves us a lot of time, and it makes our code easy to understand.
GraphQL Query
GraphQL Query and Response Structure (see below screenshot):
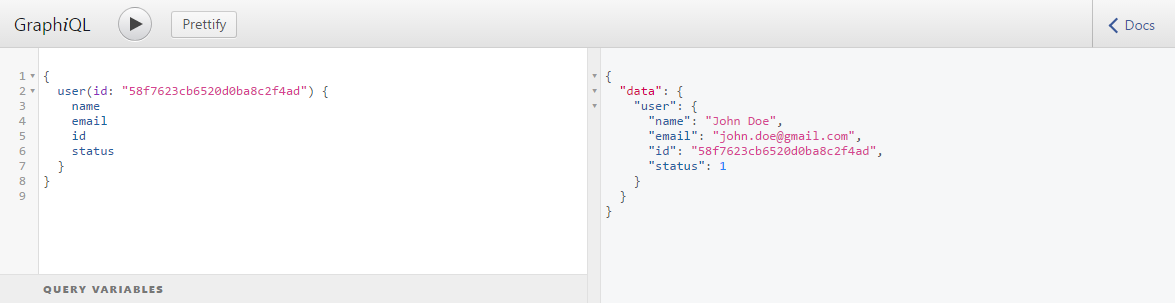
In this example, we specified the structure along with the data we needed. As you can see in the screenshot above, the response has the same structure we specified and contains only the data we asked for.
Talk about easy! Let’s take a look at what’s going on behind the scene.
Serverless and AWS Lambda
Serverless is a fancy name for a server, except that it has added benefits that are not provided by normal servers. These benefits include paying only for code execution, not worrying about scalability and the fact that we can create several microservices/micro applications instead of building a huge application.
This means that we can create hundreds of micro services that will scale automatically and we don’t have to worry about things like server management, load balancing, OS updates, security, and everything that a normal server would require from us. In addition, we only pay when our services are actually executing some code and not for times when they are idle.
As a result, this will save us lot of money from the start, which will allow us to focus only on the things we care about (our product, for example).
So, how can we use serverless architecture? The answer is AWS Lambda.
What is AWS Lambda?
I could be wrong here, but I believe that Amazon was the first company to introduce us to serverless with their Lambda service. As a result, all major cloud providers have some sort of serverless functionality, such as Cloud Functions by Google and Azure Functions by Microsoft Azure.
By using AWS Lambda, we can write our applications using the programming languages we’re already familiar with. AWS Lambda supports Node JS, Python, Java, and C#. And, we only pay when our code is executed. In addition, we get 1 million requests for FREE per month.
If you’re using other AWS services, AWS Lambda can do a lot more for us. As a result, we can use AWS event-driven architecture and plug our Lambda functions to different services and specify when our function should be executed. The possibilities are endless.
I hope this gives you a general understanding of what serverless is and how AWS Lambda fits into the picture. Now, let’s finally start working on our application.
To learn all about AWS Lambda, take a look at the Cloud Academy AWS Lambda page.
What will we be building?
My goal for this tutorial is to show how you can use your existing APIs and integrate them easily with GraphQL. We will build a GraphQL application that will allow us to query Subreddits and display its posts. If you’re not familiar with a Subreddit, don’t worry. Just consider this as an API that will return some JSON data.
You can use your own API by replacing the Reddit API that we will be using (everything will remain almost the same but you will have to make few changes to the code).
What do we want our GraphQL app to do?
- Allow us to query Subreddits
- Return the fields we ask for. In this case, it will be
id,title, url, author, score, ups (upvotes), downs (downvotes) and content - Allow us to specify a different Subreddit (default: javascript)
While there are several frameworks or packages that you can use to easily write Lambda functions, I won’t be using them because I want to show you how to do it from scratch.
Let’s get started.
Step #1: Setting up our GitHub repository and installing project dependencies
It’s a good practice to use version control while writing applications. Git is a highly used version control system, and GitHub is highly used for storing code in the cloud. As a result, we will be using both Git and GitHub in this tutorial.
Start by creating a new repository by going to https://github.com/new. Enter the name, description, check “Initialize this repository with a README“. For the .gitignore file select “Node” and for the license select “MIT“.
Feel free to make changes based on your preferences. Finally, click on “create repository”. Once created, clone the repository to your local system so we can start writing some code.
Run the command git clone REPOSITORY_URL in this case `git clone https://github.com/dhruv-kumar-jha/aws-lambda-graphql.git`. This will clone our repository locally.
Now, open the terminal/command prompt in the directory where you cloned this repository, and run the command npm init -y . This will initialize a package.json file with the default options.
Package.json file is used by NPM/Yarn for managing project dependencies. This means that others can easily clone our repository and run npm install to install all of the dependencies.
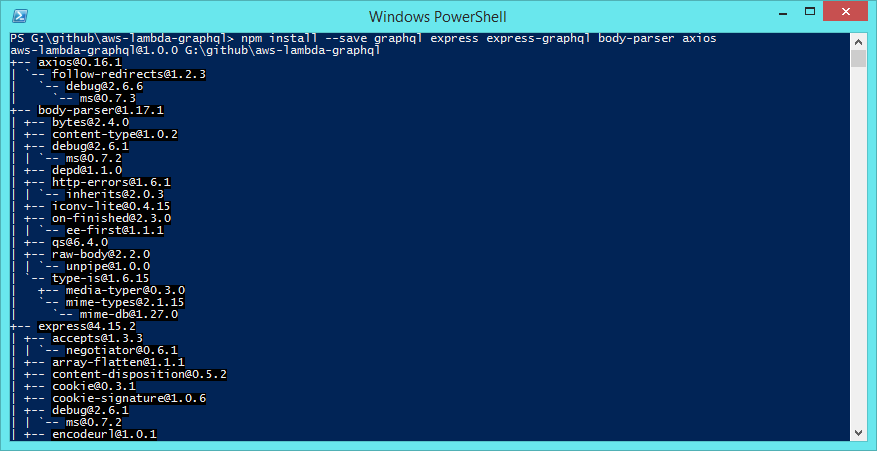
Run the command `npm install –save graphql express express-graphql body-parser axios`. This will install all of these packages. (Our project is dependent on these packages. See the screenshot below for reference.)
Finally, create a directory named src in our Projects Root directory. We will place all of our application logic in this directory.
In summary, we have: Created our repository, installed our dependencies, and we have created a directory for storing our application logic. Let’s move on to the next step.
Step #2: Setting Up GraphQL, its types, queries, and resolvers
We should familiarize ourselves with the following GraphQL terminology:
- Types: Specifies the schema of our resource (field name, type, description, etc.)
- Queries: List of queries/actions that the client can make to our GraphQL application
- Resolvers: They fetch the data and return it to GraphQL for further processing. We can fetch the data from any data source, like a database, API, social media, other GraphQL Apps, etc.
- Mutations: Mutations are just like queries. However, we use them to insert, update, and delete the data instead of just reading the data.
We will not be using mutations in this tutorial because we’re not saving anything. Don’t worry, we will cover this in future tutorials. For now, we will add these into our application.
Create few files and directories named `src/app.js`, `src/graphql`, `src/graphql/types/Post.js`, `src/graphql/queries/Post.js`, `src/graphql/resolvers/Post.js`. Also, create files named `server.js`and `lambda.js` in the project root directory.
Creating our GraphQL Type
Because GraphQL needs types to understand the different fields we have and the content that can be added to these fields, let’s create our type by editing the file src/graphql/types/Post.js and add this code in it:
'use strict';
const GraphQL = require('graphql');
const {
	GraphQLObjectType,
	GraphQLString,
	GraphQLID,
	GraphQLInt,
} = GraphQL;
const PostType = new GraphQL.GraphQLObjectType({
	name: 'Post',
	description: 'Post Type, For all the posts present in Reddit.',
	fields: () => ({
		id: {
			type: GraphQLID,
			description: 'ID of the post',
		},
		title: {
			type: GraphQLString,
			description: 'Title of the post',
		},
		url: {
			type: GraphQLString,
			description: 'URL of the post',
		},
		author: {
			type: GraphQLString,
			description: 'Name of the Author who created this post',
		},
		ups: {
			type: GraphQLInt,
			description: 'Total number of Upvotes received for this post',
		},
		downs: {
			type: GraphQLString,
			description: 'Total number of Downvotes received for this post',
		},
		content: {
			type: GraphQLString,
			description: 'Markdown content of the post',
		}
	})
});
module.exports = PostType;
Here, we are specifying all of the fields for our post resource that clients can query. Only the fields specified here can be asked by clients. (Here, “clients” refers to anyone who will be accessing the application.)
Creating our GraphQL Query
Queries are the methods that clients can call. To create our query, open the file osrc/graphql/queries/Post.js and add this code into it:
'use strict';
const GraphQL = require('graphql');
const {
	GraphQLList,
	GraphQLString,
	GraphQLNonNull,
} = GraphQL;
// import the Post type we created
const PostType = require('../types/Post');
// import the Post resolver we created
const PostResolver = require('../resolvers/Post');
module.exports = {
	index() {
		return {
			type: new GraphQLList(PostType),
			description: 'This will return all the posts we find in the given subreddit.',
			args: {
				subreddit: {
					type: GraphQLString,
					description: 'Please enter subreddit name',
				}
			},
			resolve(parent, args, context, info) {
				return PostResolver.index(args);
			}
		}
	},
};
Here, we’re requiring the post type that we just created, along with the post resolver, which we haven’t created yet. When the index method is called, this code passes all of the arguments it receives to the resolver method (because the resolver method needs access to the Subreddit name) and returns the data provided by PostResolver.
In the args we have specified a field named “subreddit“. This means that clients can optionally specify the subreddit name but it will not be a requirement.
Creating our GraphQL Rsolver
Creating a resolver is just as easy. Open the file src/graphql/resolvers/Post.js and add this code into it:
'use strict';
const axios = require('axios');
const PostsController = {
	index: ( args ) => {
		const URL = `https://www.reddit.com/r/${ args.subreddit || 'javascript' }.json`;
		return axios.get( URL )
			.then( (response) => {
				const __posts = [];
				const posts = response.data.data.children;
				posts.map( post => {
					post.data.content = post.data.selftext_html;
					__posts.push( post.data );
				} );
				return __posts;
			})
			.catch( (error) => {
				return { error: error }
			});
	}
}
module.exports = PostsController;
This file exports a very simple JavaScript object. The index method on the PostsController object returns a promise (which GraphQL accepts).
A promise is useful when we don’t know how long it will take for our app to fetch the data we need. Axios library uses Promise to make API calls. We’re using it to make a GET request to the specified Subreddit url, which defaults to JavaScript if the client doesn’t specify the Subreddit name.
After receiving the response, we have to re-structure the data because the structure of the response is not how we want it to be. We need to create an empty array to store the posts and then we iterate through all of the posts that we received in the response. While iterating, we’re adding the post data to the array that we created. After we iterate through all the posts, we just return the array.
Creating our GraphQL schema
To create our schema, create a file named src/graphql/schema.js and add this code into it:
'use strict';
const GraphQL = require('graphql');
const {
	GraphQLObjectType,
	GraphQLSchema,
} = GraphQL;
// import the user query file we created
const PostQuery = require('./queries/Post');
// lets define our root query
const RootQuery = new GraphQLObjectType({
	name: 'RootQueryType',
	description: 'This is the default root query provided by our application',
	fields: {
		posts: PostQuery.index(),
	},
});
// export the schema
module.exports = new GraphQLSchema({
	query: RootQuery,
});
This exports a GraphQL Schema object and that object contains the Query we created earlier.
Step #3: Creating server and Lambda function handler file
Let’s create a file named src/app.js and add this code into it:
'use strict';
const express = require('express');
const body_parser = require('body-parser');
const expressGraphQL = require('express-graphql');
// let's import the schema file we just created
const GraphQLSchema = require('./graphql/schema');
const app = express();
app.use( body_parser.json({ limit: '50mb' }) );
app.use(
	'/',
	expressGraphQL( () => {
		return {
			graphiql: true,
			schema: GraphQLSchema,
		}
	})
);
module.exports = app;
Here, we’re just requiring the dependencies that we installed earlier: Express, body-parser, express-GraphQL and also the GraphQL Schema that we just created.
Then, we’re setting up expressGraphQL as an express application middleware. This middleware will run every time our index route is called and for every method call. It will handle everything related to GraphQL because we have specified our schema there.
Creating our server
Finally, let’s create our server by editing the file server.js in our project root directory and add this code into it:
'use strict';
const app = require('./src/app');
// let's set the port on which the server will run
app.set( 'port', 1337 );
// start the server
app.listen(
	app.get('port'),
	() => {
		const port = app.get('port');
		console.log('GraphQL Server Running at http://127.0.0.1:' + port );
	}
);
This is a very simple express server. It runs at the port we specified and includes the app object we exported from the file src/app.js .
Since our server has been set up, we can now test our application by running the command node server.js . You should see the URL where our server is running.
Although our application works, it won’t work with AWS Lambda because it is an express application. To make it work, we have to install another package and also write some more code.
Creating our Lambda function handler file
Let’s install the package aws-serverless-express provided by AWS by running the command `npm add –save aws-serverless-express`. This will install the AWS serverless express package for us.
We will also have to create a new file that AWS Lambda will call each time it is executed. Create a file named lambda.js in our root directory and add this code into it:
'use strict'
const awsServerlessExpress = require('aws-serverless-express');
const app = require('./src/app');
const server = awsServerlessExpress.createServer(app);
exports.handler = (event, context) => awsServerlessExpress.proxy(server, event, context);
This file requires the aws-serverless-express package that we just installed. This is the package that makes it easier for us to use express with AWS Lambda.
This was a lot of work, but we’re finally done! Let’s move on to our next step.
Step 4: Deploying our code on AWS Lambda and integrating it with AWS API Gateway
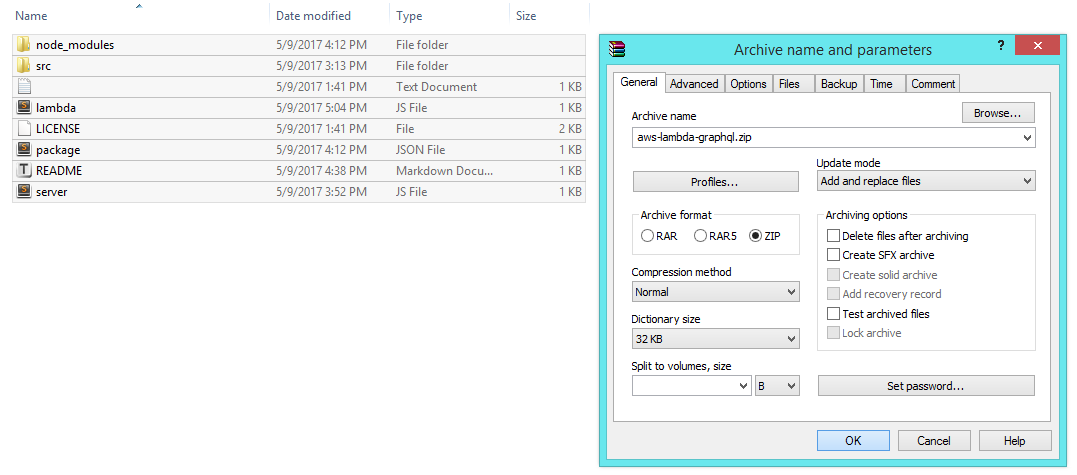
Let’s zip everything in our root directory (including node_modules) because Lambda expects a zip file.
Next, log in to the AWS Console by going to https://console.aws.amazon.com/console/home
Creating our Lambda function
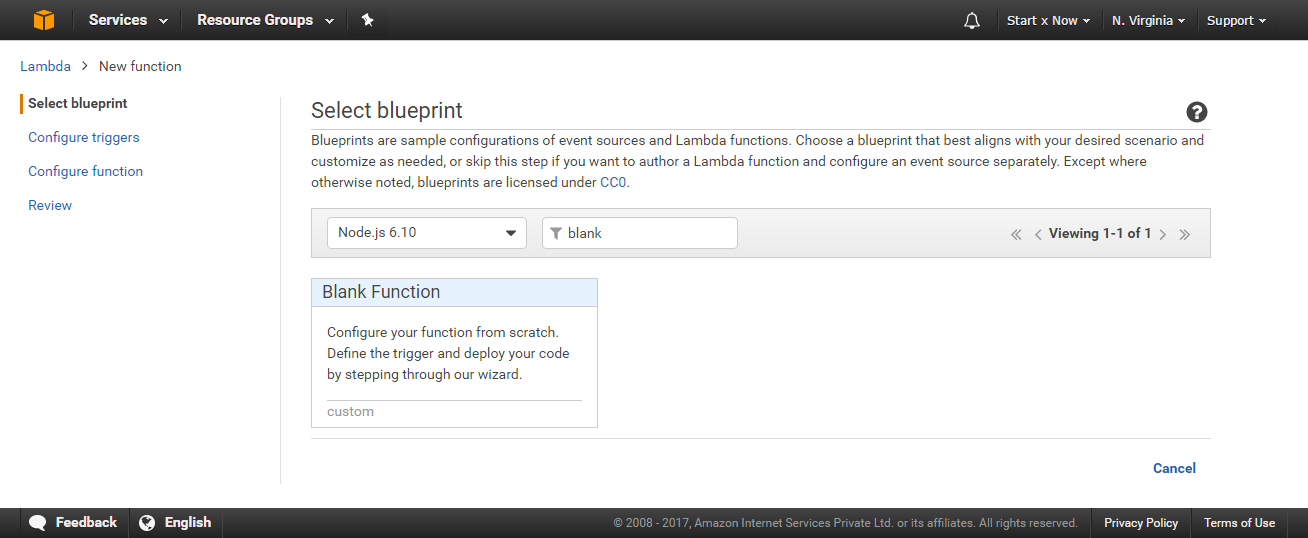
After logging in, open https://console.aws.amazon.com/lambda/home and click on create a Lambda Function., Select “Node.js 6.10” as the runtime and “Blank Function” as a template (click on Blank Function).
Next, you will see the Configure Triggers page. Just click on Next because we will be manually setting up triggers later on.
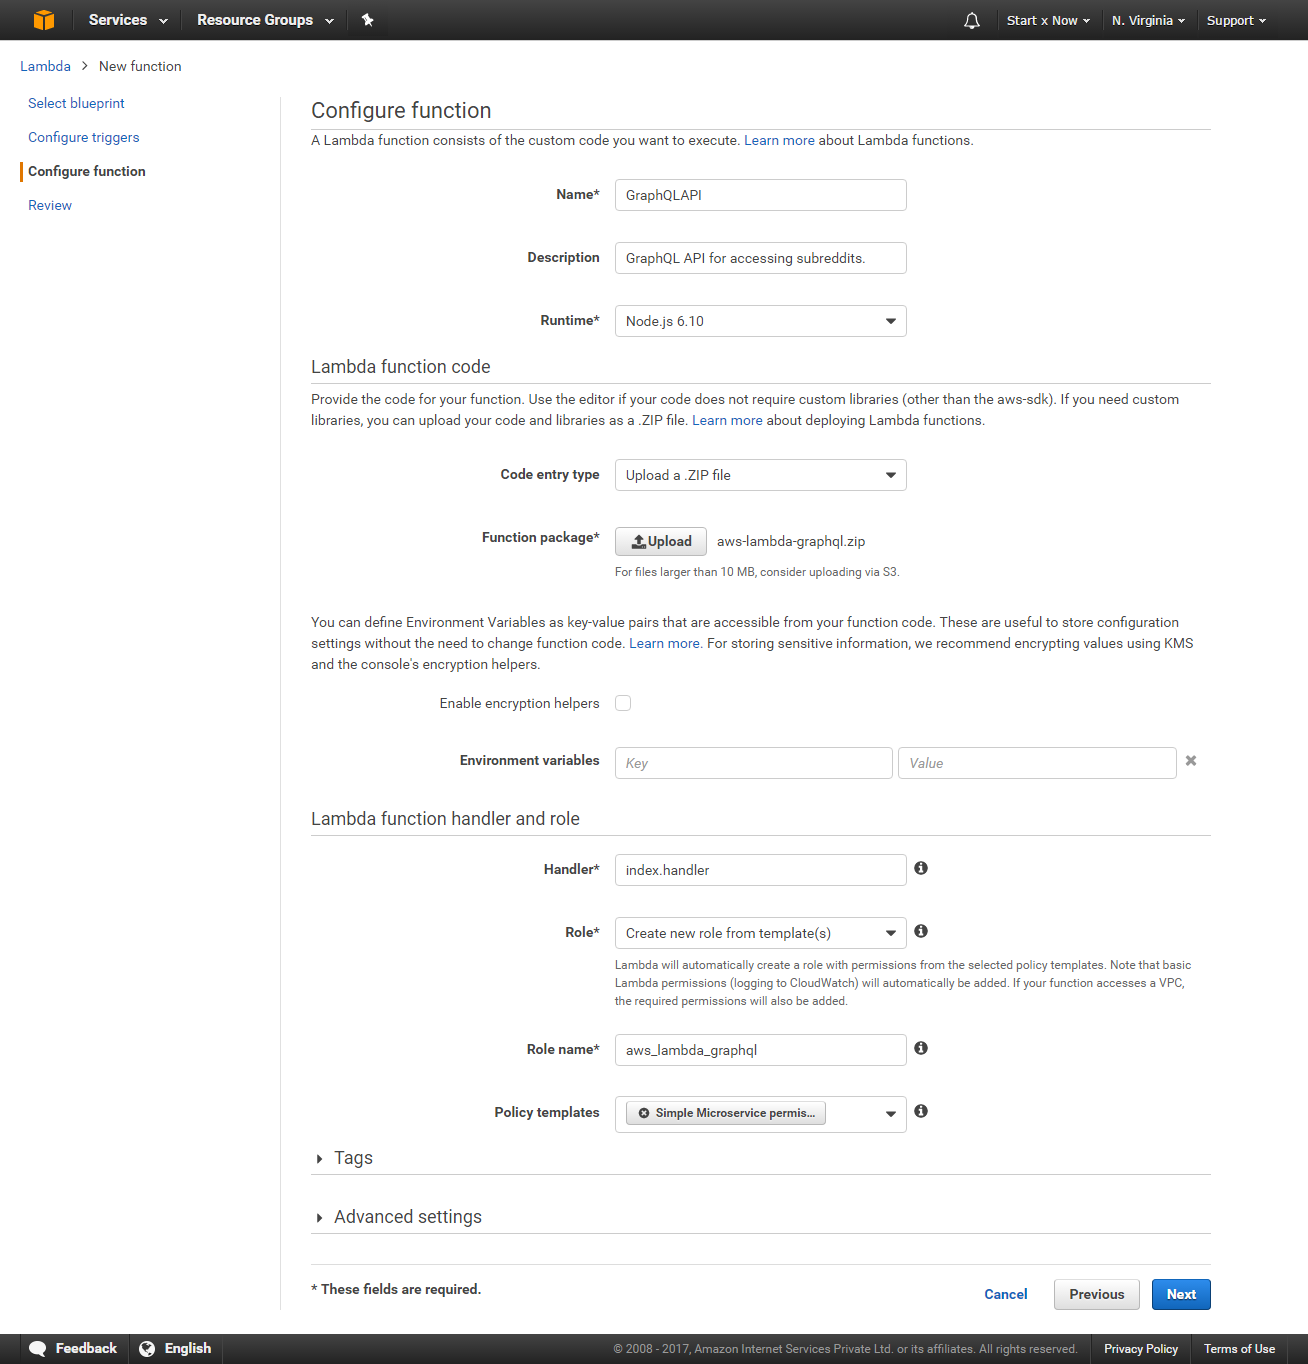
Now you will be asked to enter function name, description, runtime, etc. Enter it as follows:
- Name: Enter your function name. This can be anything, just don’t use spaces
- Description: Although optional, I recommend that you add a simple description
- Runtime: By default, it will be set to the runtime we selected earlier, otherwise, change it to the highest version of Node.js
- Code Entry Type: By default, this will be set to “Edit code inline”; change it to “Upload a .Zip file”
- Function Package: This new option will appear: Click on Upload and then select the zip file that we created earlier (which contains all of our code)
- Environment variables: Skip this, we haven’t used it for this project
- In Lambda function Handler and Role, Handler: Change it from “index.handler” to “lambda.handler“
- Role: Click on “Create new Role from template(s)”
- Role Name: Enter any name you want, for example, aws_lambda_graphql
- Policy Templates: Select “Simple Microservice Permissions” from the drop-down menu
Finally, click Next.
Now you will see the confirmation page. If everything seems correct click on “Create function“.
This will create our function. Ignore the warnings you see (if any).
Can we test the function/service now? NO.
Although the function exists, it’s not yet accessible because we haven’t specified how it should be accessed. Next, we’ll make our Lambda function accessible by using AWS API Gateway.
Setting Up AWS API Gateway
Open the URL https://console.aws.amazon.com/apigateway/home and click on Get Started and then select New API. Enter the API name and description and then click on Create API.
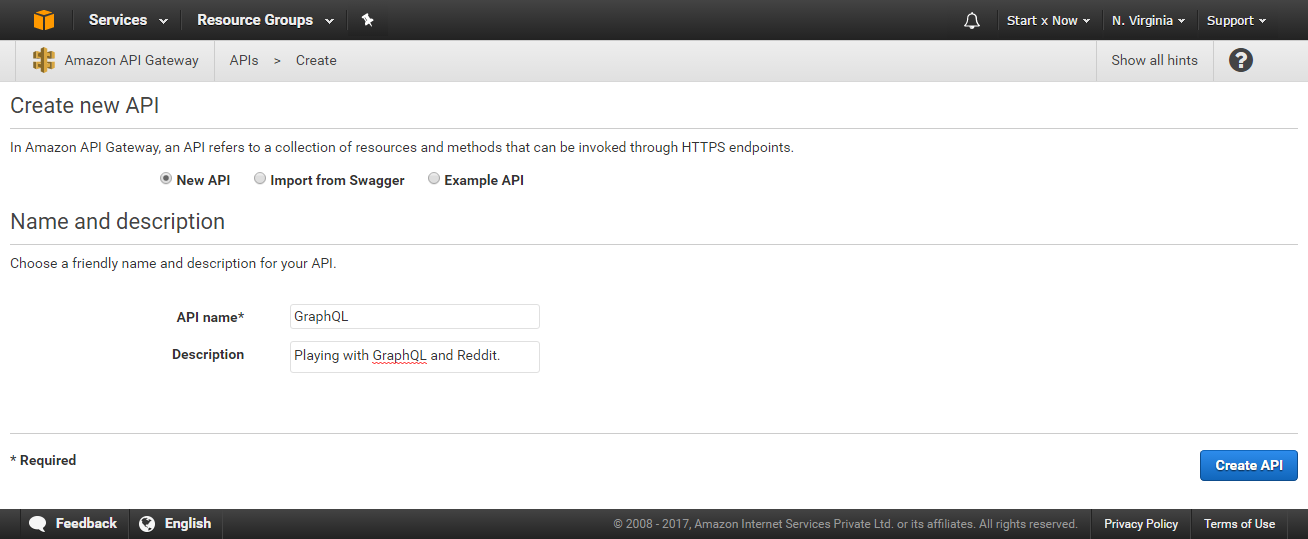
This will create an empty API for us.
Because our application needs to handle both GET and POST methods, we have to add them in API Gateway.
Adding our GET Method
We need to add a GET method for our index (/) path.
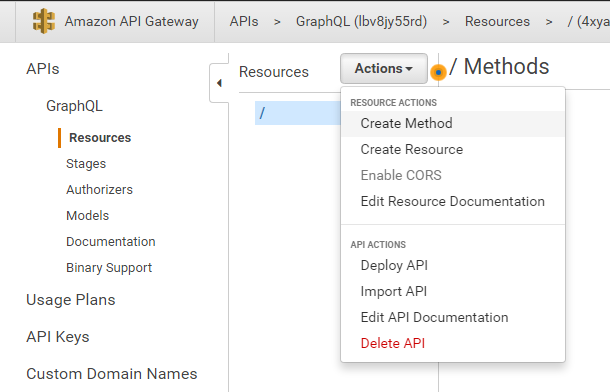
Click the Actions button -> Create Method
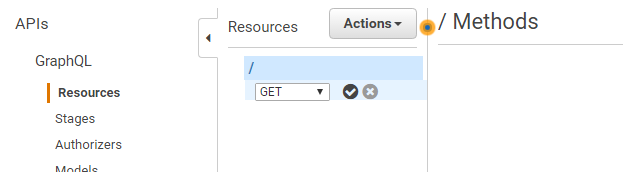
Select the GET option and then click on the correct icon
Now you will see the setup screen for our GET method. Select the options as follows:
- Integration Type: Lambda Function
- Use Lambda Proxy integration: Yes; check this field
- Lambda Region: Select the region in which you created the Lambda function (in my case, us-east-1)
- Lambda Function: Enter the function name, in my case, GraphQLAPI
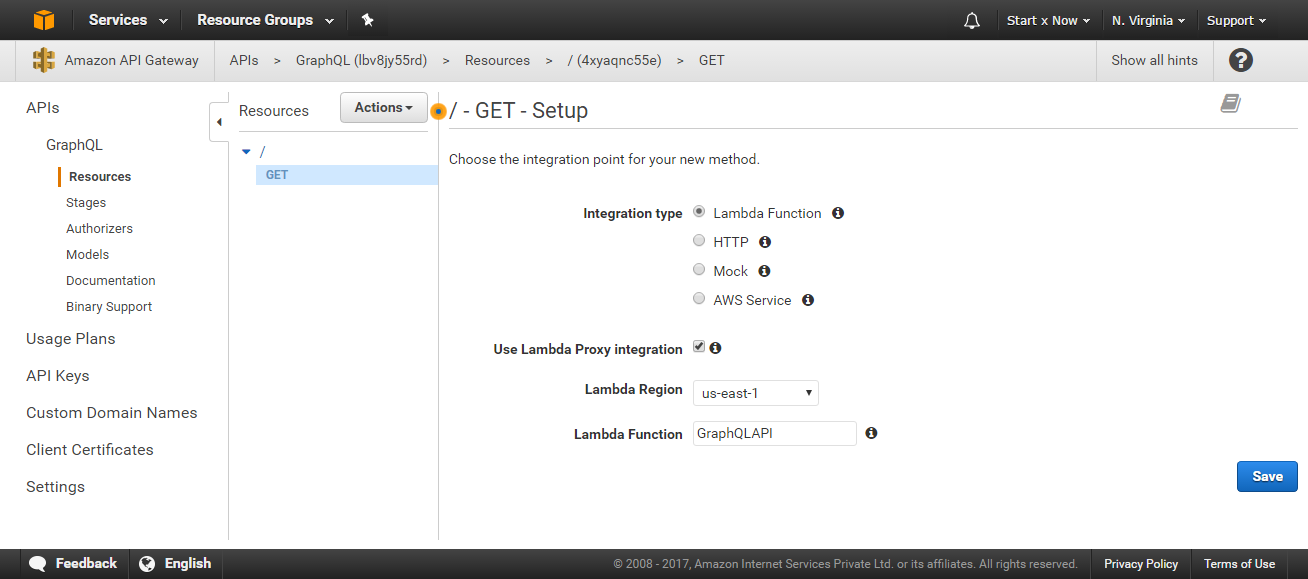
Click Save. This will prompt a popup: “Add Permission to Lambda Function”. Click OK. This will set up our GET method. We need to do the same for our POST method.
Adding our POST method
First, click on the ‘/‘ (root url) link and then follow the same steps for adding a GET method. Click on Actions -> Create Method -> POST -> and cClick on Check mark.
Again, select the same Lambda function and the same options and then click Save.
Deploying our API
We’re finally ready to deploy our API for others to access! Click on the Actions button again, but this time select “Deploy API“.
You will be asked the following information:
- Deployment Stage: Select New Stage if there are no other stages
- Stage Name: Enter the stage name, for example, production, prod
- Enter Stage Description: Just a general description about this stage, for example, Testing or Production
- Deployment Description: Enter the changes that you made; we added GET and POST methods to our API
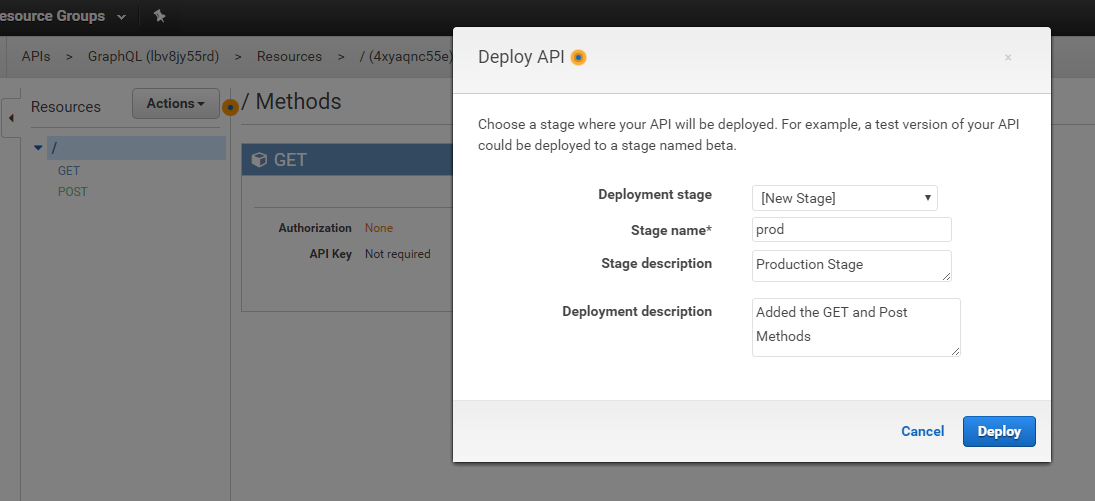
Click Deploy.
And we’re done. We have successfully created, uploaded, and deployed our API. You can now see the invoke URL. Just click on it. (In my case it’s https://lbv8jy55rd.execute-api.us-east-1.amazonaws.com/prod.)
If you cannot see the invoke URL, click Stages > prod and you should be able to see it.
Testing our Live GraphQL application
Open the invoke URL and you can see our GraphQL application running along with its UI. It is good practice to disable the UI while in production. (Since we’re learning, it’s OK that we didn’t diable it.)
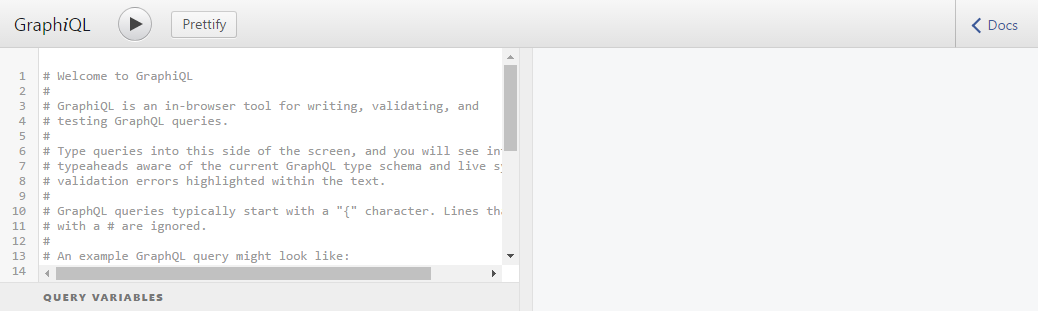
Now, let’s play with our application. Add the following code in the text area and then click on Big Run > Icon in the header. You can also click on the Docs link to explore the documentation that was generated for us based on the descriptions we provided in our code.
{
  posts {
    id
    title
    url
    ups
    author
  }
}
After running the query, you will see the result.
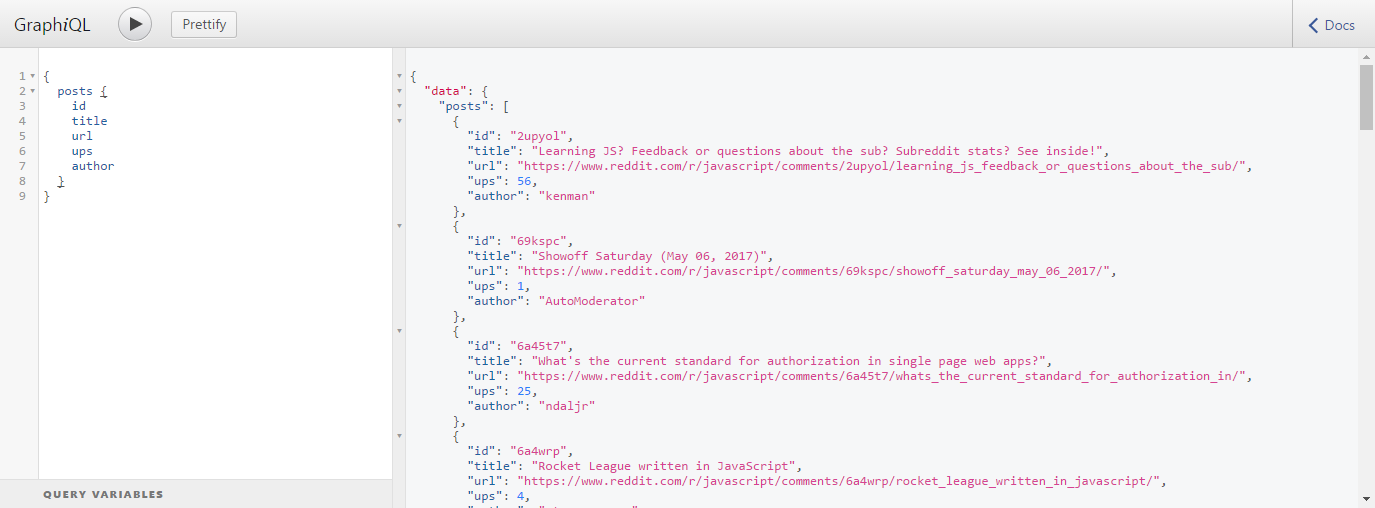
Perfect. This shows us only the data we asked for and in the format we requested. If you don’t see this result, open your Lambda function and make sure you have set its handler as “lambda.handler“.
You can access the same query by opening this Amazon Console.
By default, our resolver method finds all the posts from the JavaScript Subreddit, so everything works even if you don’t specify a subreddit.
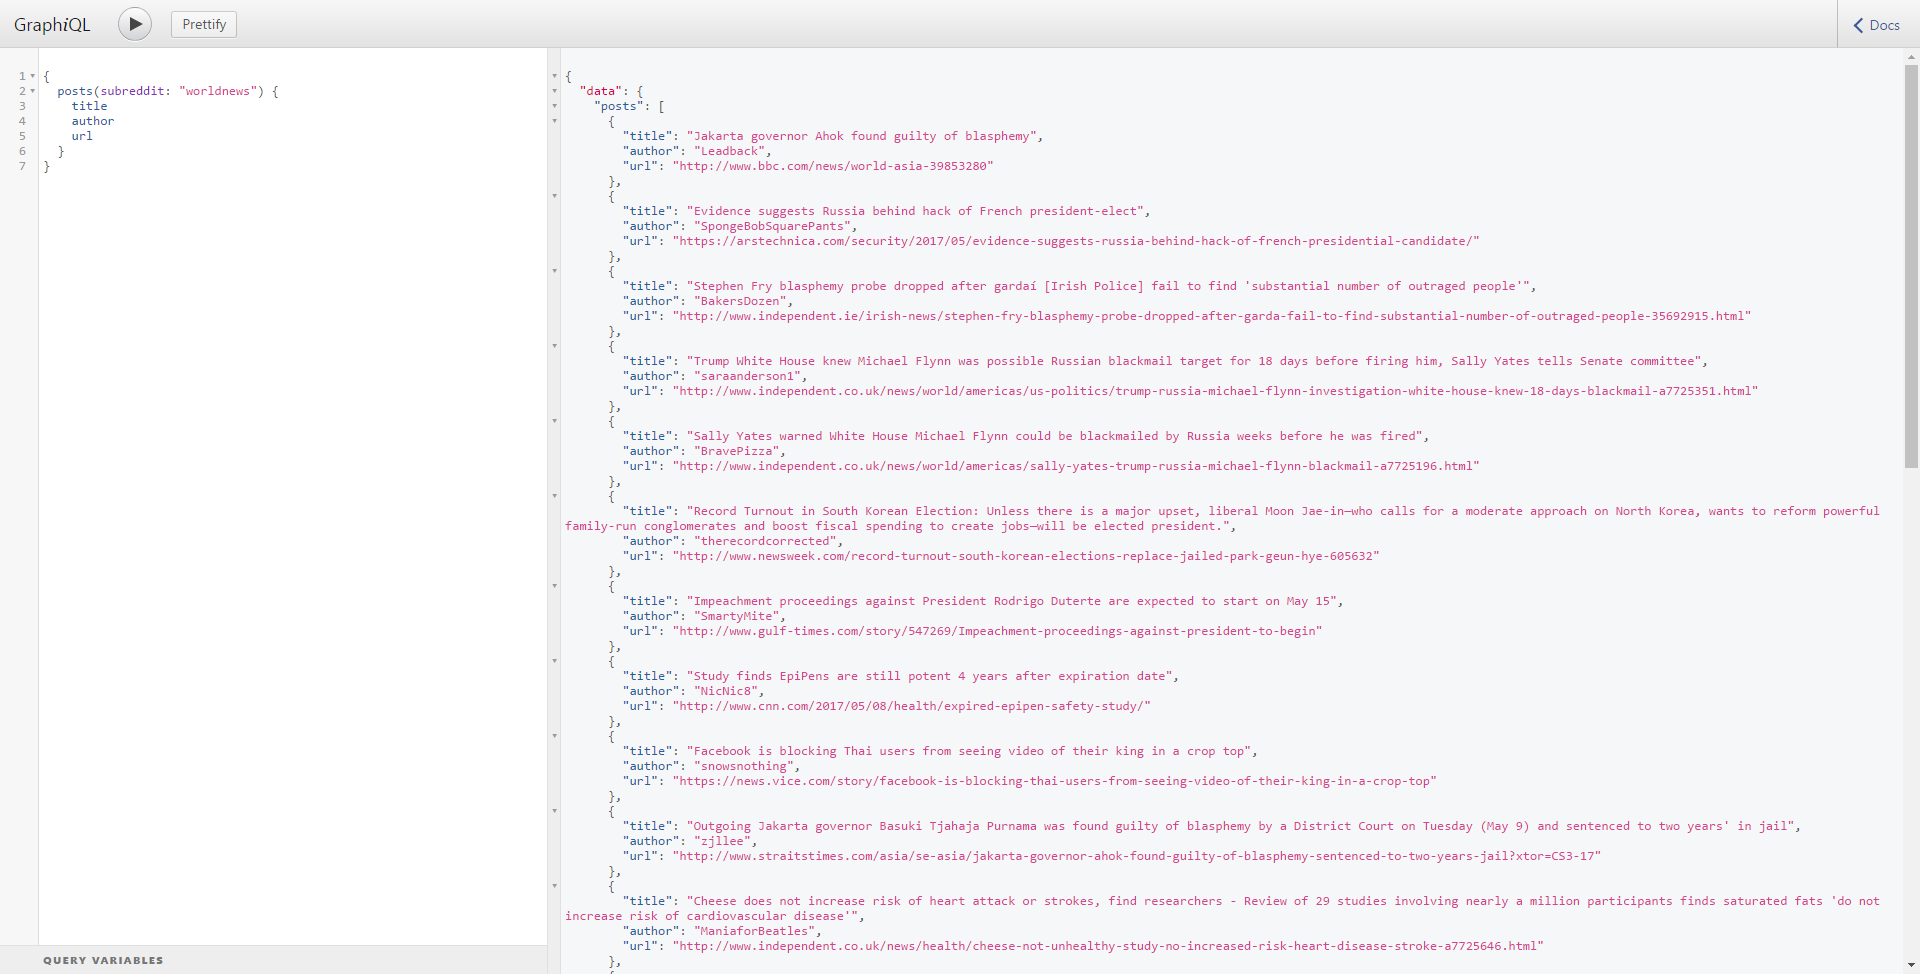
Let’s test the query again. This time we will select another Subreddit and a different set of fields in a different format just to make sure everything is working.
{
  posts(subreddit: "worldnews") {
    title
    author
    url
  }
}
Run this query and you will see the expected response.
You can access this query by opening this URL.
Our application is working perfectly. It shows us the data we requested and in the format we specified because GraphQL does all the heavy lifting for us. If you enter any non-existing field it will show an error even before making the query. There is a lot more to GraphQL in addition to the features I used here. Feel free to explore.
Conclusion
In this tutorial, we created a simple GraphQL application and saw how easy it is to use and how to use it with other and existing APIs.
I hope this will inspire you to explore more and build your own APIs. Please leave any questions below in the comments and head to our training library to start your learning journey.
You can access the code used in the project at: https://github.com/dhruv-kumar-jha/aws-lambda-graphql
You can access the GraphQL application at: https://lbv8jy55rd.execute-api.us-east-1.amazonaws.com/prod