Publish a SharePoint Farm Using CloudFormation

{
    "AWSTemplateFormatVersion": "2010-09-09",
    "Resources": {
        "myWaitHandle": {
            "Type": "AWS::CloudFormation::WaitConditionHandle",
            "Properties": {}
        },
        "myWaitCondition": {
            "Type": "AWS::CloudFormation::WaitCondition",
            "DependsOn": "Instance",
            "Properties": {
                "Handle": {
                    "Ref": "myWaitHandle"
                },
                "Timeout": "4500"
            }
        },
        "ElasticIP": {
            "Type": "AWS::EC2::EIP",
            "Properties": {
                "InstanceId": {
                    "Ref": "Instance"
                }
            }
        },
        "LoadBalancer": {
            "Type": "AWS::ElasticLoadBalancing::LoadBalancer",
            "Properties": {
                "Instances": [
                    "INSTANCE ID"
                ],
                "Listeners": [
                    {
                        "InstancePort": "80",
                        "LoadBalancerPort": "80",
                        "Protocol": "HTTP"
                    }
                ],
                "SecurityGroups": [
                    "SECURITY GROUP ID"
                ],
                "Subnets": [
                    "SUBNET ID"
                ],
                "HealthCheck": {
                    "Target": "TCP:80",
                    "HealthyThreshold": "10",
                    "UnhealthyThreshold": "2",
                    "Interval": "10",
                    "Timeout": "5"
                }
            }
        },
        "SecurityGroup": {
            "Type": "AWS::EC2::SecurityGroup",
            "Properties": {
                "GroupDescription": "Enable HTTP and RDP",
                "VpcId": "[YOUR VPC ID]",
                "SecurityGroupIngress": [
                    {
                        "IpProtocol": "tcp",
                        "FromPort": "80",
                        "ToPort": "80",
                        "CidrIp": "0.0.0.0/0"
                    }
                ]
            }
        },
        "Instance": {
            "Type": "AWS::EC2::Instance",
            "Properties": {
                "InstanceType": "t1.micro",
                "SubnetId": "SUBNET ID",
                "ImageId": "AMI ID",
                "EbsOptimized": "true",
                "SecurityGroupIds": [
                    {
                        "Ref": "SecurityGroup"
                    }
                ],
                "KeyName": "SharePoint",
                "UserData": {
                    "Fn::Base64": {
                        "Fn::Join": [
                            "",
                            [
                                "<powershell>\n",
                                "Add-PSSnapin 'Microsoft.SharePoint.PowerShell'\n",
                                "$publicIPAddress = 'http://",
                                {
                                    "Ref": "SecurityGroup"
                                },
                                ".td-bea-services.com'\n",
                                "New-SPAlternateURL $publicIPAddress -Zone Internet -WebApplication '[YOUR WEB APPLICATION's NAME]'\n",
                                "c:\\sharepoint\\IIS-Warmup.ps1\n",
                                "Set-DefaultAWSRegion -Region eu-central-1\n",
                                "Set-AWSCredentials -AccessKey '[YOUR ACCESS KEY]' -SecretKey '[YOUR SECRET KEY]'\n",
                                "Initialize-AWSDefaults\n",
                                "cfn-signal.exe --success true ",
                                {
                                    "Fn::Base64": {
                                        "Ref": "myWaitHandle"
                                    }
                                },
                                "\n",
                                "</powershell>"
                            ]
                        ]
                    }
                }
            }
        },
        "MyDNSRecord": {
            "Type": "AWS::Route53::RecordSet",
            "Properties": {
                "HostedZoneId": "[YOUR HOSTED ZONE ID]",
                "Comment": "CNAME redirect to Load Balancer.",
                "Name": {
                    "Fn::Join": [
                        "",
                        [
                            {
                                "Ref": "SecurityGroup"
                            },
                            ".[YOUR HOSTED ZONE's DOMAIN]."
                        ]
                    ]
                },
                "Type": "CNAME",
                "TTL": "60",
                "ResourceRecords": [
                    {
                        "Fn::GetAtt": [
                            "LoadBalancer",
                            "DNSName"
                        ]
                    }
                ]
            }
        }
    },
    "Outputs": {
        "URL": {
            "Description": "\n\n\n\nClick the URL below to access SharePoint",
            "Value": {
                "Fn::Join": [
                    "",
                    [
                        "<a href='http://",
                        {
                            "Ref": "SecurityGroup"
                        },
                        ".[YOUR HOSTED ZONE's DOMAIN]",
                        "' target='_blank'>",
                        "Click here to open SharePoint",
                        "</a>"
                    ]
                ]
            }
        }
    }
}
{
    "AWSTemplateFormatVersion": "2010-09-09",
    "Resources": {
        "LoadBalancer": {
            "Type": "AWS::ElasticLoadBalancing::LoadBalancer",
            "Properties": {
                "Instances": [
                    "INSTANCE1"
                ],
                "Listeners": [
                    {
                        "InstancePort": "80",
                        "LoadBalancerPort": "80",
                        "Protocol": "HTTP"
                    }
                ],
                "SecurityGroups": [
                    "SECURITYGROUP1"
                ],
                "Subnets": [
                    "SUBNET1"
                ],
                "HealthCheck": {
                    "Target": "TCP:80",
                    "HealthyThreshold": "10",
                    "UnhealthyThreshold": "2",
                    "Interval": "10",
                    "Timeout": "5"
                }
            }
        }
    },
    "Outputs": {}
}
We recommend trying this snipped by yourself and checking what happens. Simply update the resource IDs at the marked lines and create a new CloudFormation Stack with the text file.
{
    "AWSTemplateFormatVersion": "2010-09-09",
    "Resources": {
        "TestDriveInstance": {
            "Type": "AWS::EC2::Instance",
            "Properties": {
                "InstanceType": "t2.micro",
                "SubnetId": "SUBNET ID",
                "ImageId": "AMI ID",
                "EbsOptimized": "true",
                "SecurityGroupIds": [
                    {
                        "Ref": "SecurityGroup"
                    }
                ],
                "KeyName": "KeyPair",
                "UserData": {
                    "Fn::Base64": {
                        "Fn::Join": [
                            "",
                            [
                                "<powershell>\n",
                                "Add-PSSnapin 'Microsoft.SharePoint.PowerShell'\n",
                                "$publicIPAddress = 'http://",
                                {
                                    "Ref": "SecurityGroup"
                                },
                                ".YOUR INTERNET DOMAIN'\n",
                                "New-SPAlternateURL $publicIPAddress -Zone Internet -WebApplication 'WEB APPLICATION URL'\n",
                                "c:\\sharepoint\\IIS-Warmup.ps1\n",
                                "Set-DefaultAWSRegion -Region eu-central-1\n",
                                "Set-AWSCredentials -AccessKey 'ACCESS KEY' -SecretKey 'SECRET KEY'\n",
                                "Initialize-AWSDefaults\n",
                                "cfn-signal.exe --success true ",
                                {
                                    "Fn::Base64": {
                                        "Ref": "myWaitHandle"
                                    }
                                },
                                "\n",
                                "</powershell>"
                            ]
                        ]
                    }
                }
            }
        }
    }
}
The AWS::EC2::Instance is the core resource in our CloudFormation and we will spend some tome on it. We will go through the resource’s properties now:
InstanceType, SubnetId, ImageId, EbsOptimized, SecurityGroupIds, and KeyName are all properties you are should be familiar with so I won’t spend much time on them.
UserData is the last property remaining and where the magic happens. You can use either <script></script> or <powershell></powershell> tags. In this case, we will use <powershell> since all the administrative cmdlets for SharePoint are in PowerShell.
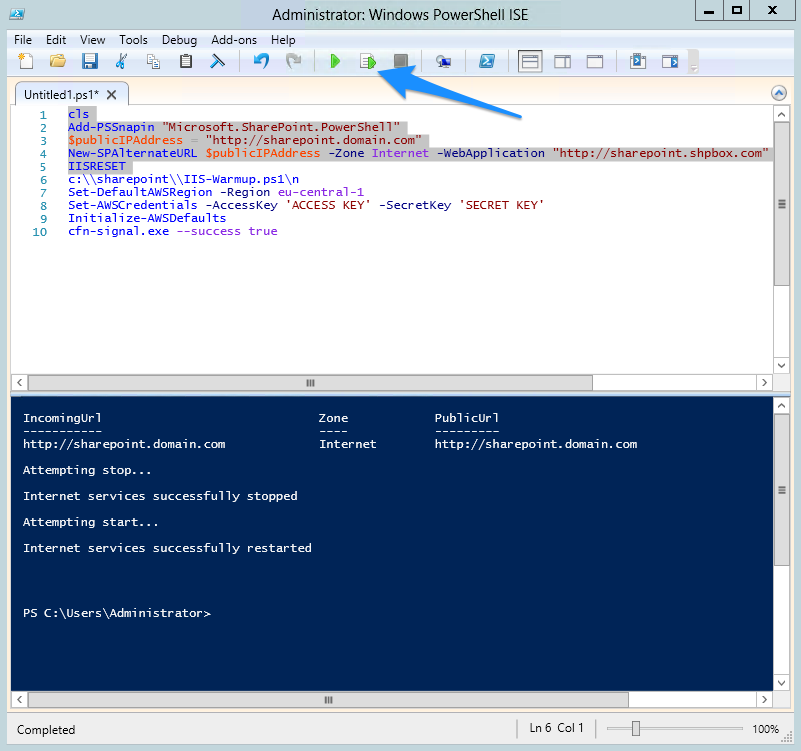
See below how the script would look if it was running in a real EC2 instance on a PowerShell console:


After running the selected text, go to Alternate Access Mappings in Central Administration and check whether you got a new “Internet” zone with your public URL.


The other part of the script was not really necessary for this example, but it is very important that you warm up your IIS after a reset command as we did above. This means that when the CloudFormation script is done running, users will start immediately accessing your SharePoint Farm with the URL provided on the Output and you don’t want the first ones to wait several minutes while your IIS is compiling and loading the memory for the first time. If you’ve never heard about IIS-Warmup, let us know and we’d be glad to answer you or even do a separate post about it if needed. There is a recent post that addresses CloudFormation and AWS deployment automation very well and it might be worth reviewing.
Set-DefaultAWSRegion -Region eu-central-1
Set-AWSCredentials -AccessKey 'ACCESS KEY' -SecretKey 'SECRET KEY'
Initialize-AWSDefaults
cfn-signal.exe --success true {"Fn::Base64": {"Ref":"myWaitHandle"}}
With the 4 cmdlets above, you accomplish the following tasks (numbers correspond to the lines above):
You have the choice to set the first 3 cmdlets as default settings in a pre-baked AMI, which means you would only use have the cfn-signal in your UserData instead.
{
    "AWSTemplateFormatVersion": "2010-09-09",
    "Resources": {
        "MyDNSRecord": {
            "Type": "AWS::Route53::RecordSet",
            "Properties": {
                "HostedZoneId": "[YOUR HOSTED ZONE ID]",
                "Comment": "CNAME redirect to Load Balancer.",
                "Name": {
                    "Fn::Join": [
                        "",
                        [
                            {
                                "Ref": "SecurityGroup"
                            },
                            ".[YOUR HOSTED ZONE's DOMAIN]."
                        ]
                    ]
                },
                "Type": "CNAME",
                "TTL": "60",
                "ResourceRecords": [
                    {
                        "Fn::GetAtt": [
                            "LoadBalancer",
                            "DNSName"
                        ]
                    }
                ]
            }
        }
    }
}
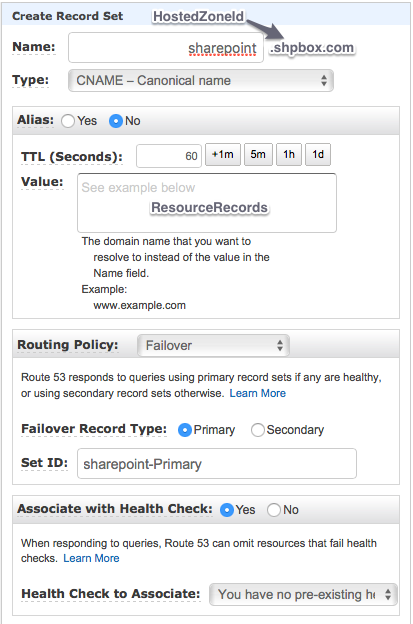
One of the last steps of your CloudFormation script is creating the CNAME entry in Route 53 pointing to your Load Balancer’s DNS Name.
The highlighted lines are the most important settings and where a new CNAME entry is created. This entry has a TTL of 60 seconds (btw 60 seconds is the minimum available) and will consider health checks first:
This will be the resulting CNAME record after the CloudFormation script ends running:


Some of the CloudFormation’s resource properties do not have the same names on the Console and you should see the additional names.

