![]()
The November 2016 AWS re:Invent brought us a variety of awesome new tools, products, and services. Amazon Athena, Amazon QuickSight, Amazon EC2 F1, I3, R4 Instance types, AWS Glue, Amazon Lex, MXNet, Amazon Lightsail, Amazon X-ray are just a few of the long list of tools announced at the re:Invent show. Digging a little deeper into these new tools, I found one that I have been waiting for: AWS Serverless Application Model, or AWS SAM, previously known as Project Flourish.
In the past, I’ve worked with similar tools or frameworks to have my infrastructures as code and, of course, versioned. Serverless Framework, Apex, Terraform, and Chalice are just a few of the ones I’ve tried, and I found them all useful for simplifying the creation, deployment, and management of AWS Lambdas and other resources like API Gateway, DynamoDB, etc.
Let’s talk a little more about the AWS Serverless Application Model and then we can dive into an example of how to use it.
What is the AWS Serverless Application Model?
The AWS Serverless Application Model allows you to describe or define your serverless applications, including resources, in an easier way, using AWS CloudFormation syntax. In other words, AWS SAM is a CloudFormation extension optimized for serverless applications. It supports anything that CloudFormation supports. You can use YAML or JSON syntax to write your templates.
Clear enough? Maybe not. To understand it better, let’s look at a very simple example.
AWS SAM: Hello World
Let’s start with the first well-known application: Hello World.
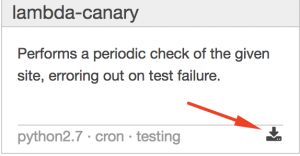
I will use an existing blueprint that the AWS Lambda console provides: lambda-canary.
Follow these steps to download the blueprint:
- Open your AWS Lambda Console.
- Click on Create a Lambda Function.
- Select “Python 2.7” in the “Select runtime” list.
- Click the little icon located on the bottom right. This will open an “Export blueprint” dialog box:
- Click on “Download blueprint” button.
You will have now a lambda-canary.zip with 2 files inside:
lambda_function.pytemplate.yaml
Unzip it in a directory somewhere in your computer, and let’s examine each one.
The first one is a simple Lambda function that will check for a string within a site. Go ahead and take a look at it. You will find another interesting and new feature in AWS Lambda: Environment Variables. In Python we use environment variables by importing first the “os” package and then using them in the following way:
import os
SITE = os.environ['site']
EXPECTED = os.environ['expected']
This is very useful when we have different environments like development, testing, production, etc. We won’t discuss them in depth right now, but you can check it out here: AWS Lambda Supports Environment Variables.
The second one is our blueprint or template, and this is where things get interesting:
AWSTemplateFormatVersion: '2010-09-09'
Transform: 'AWS::Serverless-2016-10-31'
Description: 'Performs a periodic check of the given site, erroring out on test failure.'
Resources:
  lambdacanary:
    Type: 'AWS::Serverless::Function'
    Properties:
      Handler: lambda_function.lambda_handler
      Runtime: python2.7
      CodeUri: .
      Description: >-
        Performs a periodic check of the given site, erroring out on test
        failure.
      MemorySize: 128
      Timeout: 10
      Events:
        Schedule1:
          Type: Schedule
          Properties:
            Schedule: rate(1 minute)
      Environment:
        Variables:
          site: 'https://www.amazon.com/'
          expected: Online Shopping
As you can see, the syntax is pretty much the CloudFormation syntax that we already know, but with a slight difference:
Transform: 'AWS::Serverless-2016-10-31'
This line is used to include resources defined by AWS SAM inside a CloudFormation template.
Note also the part where the properties of our Lambda function are:
Handler: This is the method that will be called when our Lambda function runs.Runtime: The programming language in which our Lambda function is written.Description: A brief text that describes what our function does.MemorySize: How much memory our function will use.Events: This describes what will trigger our function. In this case, we have a CloudWatch Scheduled event, and it will run every minute.Environment: The environment variables that our function will use.Timeout: The time required for the function to finish and mark it as failed.CodeUri: Where our Lambda function and libraries are located… wait, a dot?
Wait, what is that dot in CodeUri?! For now, let’s keep it that way. (We’ll come back to this later in the post.)
So, now that we have our blueprint and our Lambda function, what’s next?
AWS Serverless Application Model: Package and Deploy
The first thing to do is to create a package. This package will be uploaded to an Amazon S3 bucket, and from there we are going to deploy it.
But before going further in our guide, let’s make a little change in our template:
- Open the
template.yamlfile with your favorite text editor. - Go to line 24, where the ‘expected’ environment variable is, and change the value from ‘Online Shopping’ to ‘About Amazon’.
We have to make that change because the ‘Online Shopping’ string does not appear anywhere on ‘https://www.amazon.com’. Therefore, our check is going to fail every time.
You can change the site and the expected string to your own website if you’d like.
Now, we can continue…
You have the AWS CLI already installed, right? No? Ok, no worries. Let’s do it right now. Go to AWS Command Line Interface, and follow the instructions for installing it.
Or follow these easy steps:
If you haven’t done it yet, you need to generate your Access key ID and Secret access key from the Identity and Access Management Console. Download them and store them in a safe place.
If you are using Linux, you can run the following command to have the AWS CLI ready for action (you need Python Pip installed first though):
pip install awscliOr, if you are using MacOS, you have the alternative to install the CLI via Homebrew:
brew install awscliIf you use Windows, you have to download the 64-bit or the 32-bit installer.
Finally, run the following command to configure the AWS CLI:aws configureYou will be asked for:
AWS Access Key ID [None]:
AWS Secret Access Key [None]:
Default region name [None]:
Default output format [None]:
Please fill each field with the correct values.
Now we are ready to package and deploy!
Let’s do this!
aws cloudformation package \
    --template-file template.yaml \
    --output-template-file output.yaml \
    --s3-bucket example-bucket
We just created a new CloudFormation template, output.yaml, with the URI of our code to have it ready for deployment. This is actually the only difference between our original template and the one generated by the package command.
The output will be something like this:
Uploading to cdaf78f67aefd46edeac3ceae77124ed  349733 / 349733.0  (100.00%)
Successfully packaged artifacts and wrote output template to file output.yaml.
Execute the following command to deploy the packaged template
aws cloudformation deploy --template-file /Users/gsantovena/Projects/SAM/output.yaml --stack-name
This is very useful when we are implementing continuous integration and continuous delivery. The package command will zip our code, upload it to S3, and add the correct CodeUri property to the output template. This is why the CodeUri is empty, or is set to a dot, in our original template. Each time we run the package command, it will generate a different ID for our package and will fill the CodeUri field with the correct address. In this way, we can deploy new versions of our Lambda function or roll back to a previous version. Go ahead and open the AWS S3 console and see it with your own eyes.
Now, we are ready to deploy it. Run the following command:
aws cloudformation deploy \
    --template-file output.yaml \
    --stack-name MyHTTPMonitor \
    --capabilities CAPABILITY_IAM
The output will be something like this:
Waiting for changeset to be created..
Waiting for stack create/update to complete
Successfully created/updated stack - MyHTTPMonitor
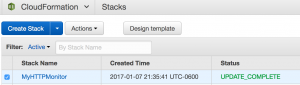
This command will create or update a stack named MyHTTPMonitor with our serverless application based on the template we just created.
Let’s check our AWS CloudFormation console:

Also, take a look at the Template tab of our stack. You will see two new things:
- View original template
- View processed template
The first one is obvious, it is our original template, the one we deployed. So, no changes here.
The second one is the template that was created by transforming our original template, by explicitly adding all of the resources needed for our function to work properly.
Click on that radio button and take a look at it. You will see the definition of: AWS::Lambda::Permission, AWS::Events::Rule, AWS::IAM::Role, and of course, AWS::Lambda::Function:
Original template:

Processed template:

Now, let’s check our AWS Lambda Functions console:

We are adding the --capabilities CAPABILITY_IAM parameter because the AWS::Serverless::Function resource is going to create a role with the permissions to execute our Lambda function, and we want CloudFormation to be able to create it for us.
Easy, huh? We have our CloudFormation stack with all the artifacts needed by our Lambda function.
Now, let’s change something in our original template, re-package it, and re-deploy it to see what happens:
First, open the template.yaml and change the site environment variable at line 23 to 'http://www.example.com' and the expected environment variable at line 24 to 'Example Domain'. Again, you can set those variables to anything you want, just be sure that the expected string is found in the site you are using.
Now, run the package command again. (You can change the name of the output template file if you want to see that the new CodeUri is different):
aws cloudformation package \
    --template-file template.yaml \
    --output-template-file output.yaml \
    --s3-bucket example-bucket
If you go to the AWS S3 console now, you will see the new package there along with the first one we already deployed.
And then the deploy command:
aws cloudformation deploy \
    --template-file output.yaml \
    --stack-name MyHTTPMonitor \
    --capabilities CAPABILITY_IAM
Remember to put the correct filename if you changed it in the package step.
Let’s check our AWS CloudFormation console one more time:
Let’s check our AWS Lambda Function environment variables:

Let’s check the CloudWatch logs for our lambda function (Here you can troubleshoot your Lambda functions too):

As you can see, the stack was updated, the environment variables were updated, and the CloudWatch logs are showing that our function is checking the new site we set.
What’s next?
Automate everything!
You have passed the first 4 steps of something called Application Lifecycle Management:
- Author
- Package
- Test
- Deploy
However, you have passed them manually. Always doing this by hand is not a good idea.
What about making more changes to our code or our template? We would need to package it again, test it again, and finally, deploy it again.
These steps can be, and should be, automated. So, the next step would be to implement continuous integration and continuous delivery, or CI/CD.
First, let’s look at our requirements:
- VCS: The first thing to do is version our code using any Version Control System we are comfortable with. In my case, I prefer to use Git:
- CI/CD: Next, we have to use a Continuous Integration and Continuous Delivery tool. There are many we can use, including:
Basically, we are going to configure our CI/CD tool in such a way that when our code is updated by someone, or by us, it will trigger a compilation of it and generate a build. If the build is successful, then it will be deployed to a test environment. It will run some tests, and if it passes all of the tests, then it will be deployed to our production environment.
As you can see, you can use Amazon Web Services for all the steps I just described!
Implementing all of this, and integrating what we just learned about the AWS Serverless Application Model into this flow is not that difficult. We will learn how to do it in an upcoming post.
And, if you haven’t already read about it, there is another cool and useful new service by Amazon Web Services: AWS CodeBuild. This can be integrated into our CI/CD flow.
Conclusion
Creating and deploying AWS Lambda functions is now easier than ever! With the AWS Serverless Application Model, you will be creating, deploying, and managing your Lambda functions in no time. Check out the documentation for more information.