![]()
The AWS Test Drive – based on Orbitera’s framework – offers almost unlimited opportunities for simplified customer outreach and support.
If you are already a member of the AWS Partner Network (APN), AWS Test Drive is one of a number of programs from which you or your company can really benefit. At this point, most of you know what Test Drive is, and that it is powered by CloudFormation. But do you know where those state-of-the-art JSON scripts are hosted or how to configure the framework which handles those guys in the background?
Stick with us to learn about how your AWS Test Drive is completely automated by Orbitera’s framework in three basic steps. Today we will focus on correctly configuring Orbitera’s framework following this order:
Amazon’s website doesn’t yet provide everything you’ll need to understand every single detail of the process (unless you contact one of your region’s APNs for support). In fact you would need to go even farther and talk directly to people at Orbitera who will provide you with things like the login information you’ll need to get started.
We did not get a framework manual, but we did enjoy a quick conference call with one of the Orbitera’s engineers who showed us the basic set up of the Test Drives. We were on our own when it came to figuring out how it all worked, and we don’t see any reason why you should waste your time, too. Therefore we are providing you with this post as a quick reference to the framework. If you cannot find everything you are looking for here, feel free to start a discussion in the comments down below and we will be glad to help you.
Once you get all set up and logged in on the framework, you will probably find yourself with a structure looking something like this:
- Two logins for each environment
- one for admins: http://[your domain].orbitera.com/c2m/
- one for customers: http://[your domain].orbitera.com/c2m/customer
- One environment for each language
If you are a global and/or multi-language company, you might want to request additional environments, since Orbitera does not yet support multi-language. This means that if you need two languages, say English and German, you will have two environments:
http://[your German domain].orbitera.com/c2m/
http://[your English domain].orbitera.com/c2m/
AWS Test Drive customers

If you are an AWS Partner, you’ll likely have some requirements to meet, like generating X business within Y amount of time. To help you and your company get there, take a look at the “Customers” section of the Obitera’s framework, which is as important as the AWS Test Drive engine itself. We will take a good look right now before diving deep into all the Test Drive goodies.
The first thing you need to know is that your customers cannot run AWS Test Drive without either being logged in as an existing user (which you can create in advance) or going through the registration process. The framework allows you to store important information about the users who are running your instances, such as contact data, support plans, login management, invoices, subscriptions models, and credit.
By the way, with that kind of versatility, you could probably use Orbitera as your own Marketplace: there’s nothing forcing you to use this resource just for the AWS Test Drive program. This means that if you are not an APN member and are reading this, don’t go away just yet. This framework will not only help you generate new business but, if you think about how easy it is to set up new users, subscriptions and corresponding permissions, it could also make the pre-sales, purchase, and delivery phases almost seamless to the customers.
Once you get into the Customers section, this is what you will see:
 Here’s a brief overview of what you can manage on each of the four tabs: Customers, Reports, Groups, and Requests:
Customers
- AWS Support Plans: You can assign different support plans for each individual user running your Test Drives. You can configure new support plans here.
- Login Credentials: A user may have multiple login credentials.
- Invoices: Everything that should be billed to the customer will appear here.
- Subscriptions: Another option to charge users hourly, daily, weekly, monthly, quarterly or yearly.
- Credit: Here you can guarantee users will be charged after passing a limited instance usage threshold.
Reports
- Customer Test Drives report.
- Top five resellers.
- Top ten resellers.
- All resellers.
- Top five resellers by increase over previous month.
- Top ten customers.
- All customers (ranked).
- Top five customers who reduced their spend month over month.
- Top five customers by increase over last month.
- Top ten best margin SKUs.
- Top ten lowest margin SKUs.
- Margin by SKU.
Groups: Each AWS Test Drive is a new group, but you can create new custom groups as well.
Request: By default, new users are automatically approved, but you can change the framework’s settings and force users to request access to the Test Drives.
AWS Test Drive general settings
General settings are the core of Orbitera’s framework, where you can configure your “root” accounts, users, source data (like cloud accounts), cost centers, VAT, TAX, support plans, e-mail templates, widgets, and much more. If you want to use AWS Test Drive not only for demonstrations but also to generate business, once you get to a point where you need to deal with invoices, subscriptions, support plans, and everything else that can convert your prospects into real customers, you’ll be using these settings a lot.
Getting to these settings is not quite as intuitive as the others we’ve seen: you’ll need to click on “Account” in the upper right corner:

There, you will find the following main tabs:
Account
- Account Data: Personal information from your own Orbitera account.
- Public Profile: This is what your customers will see when they access your AWS Test Drive page. Make sure you double and triple check everything here, as this is your “face” to the customers running your Test Drives.

After configuring your public profile, you should go to “Options” (the right-most tab) and look for the “Widget” section. There you can select two different JavaScript codes to embed in your company’s site. One is the Store and the other is for the Test Drives.
Store JS:
<!-- Begin Orbitera Widget Code -->
<script type="text/javascript" charset="utf-8">
  var is_ssl = ("https:" == document.location.protocol);
  var setsHost = is_ssl ? "https://orbitera.com/c2m/" : "http://orbitera.com/c2m/";
  document.write(unescape("%3Cscript src='" + setsHost + "js/widget_over.js?_t="+(new Date).getTime()+"' type='text/javascript'%3E%3C/script%3E"));
</script>
<script type="text/javascript" charset="utf-8">
  var orbitera_widget_options = {};
  orbitera_widget_options.display = "overlay";
  orbitera_widget_options.placement = "left"; /* "left","hidden" */
  orbitera_widget_options.account = "YOUR AWS ACCOUNT";
  orbitera_widget_options.page = "store";
  orbitera_widget_options.orbiteraURL = setsHost;
  var orbitera_widget = new OrbiteraWidget.widget(orbitera_widget_options);
</script>
<!-- End Orbitera Widget Code -->

AWS Test Drive JS:
<!-- Begin Orbitera Widget Code -->
<script type="text/javascript" charset="utf-8">
  var is_ssl = ("https:" == document.location.protocol);
  var setsHost = is_ssl ? "https://orbitera.com/c2m/" : "http://orbitera.com/c2m/";
  document.write(unescape("%3Cscript src='" + setsHost + "js/widget_over.js?_t="+(new Date).getTime()+"' type='text/javascript'%3E%3C/script%3E"));
</script>
<script type="text/javascript" charset="utf-8">
  var orbitera_widget_options = {};
  orbitera_widget_options.display = "overlay";
  orbitera_widget_options.placement = "left"; /* "left","hidden" */
  orbitera_widget_options.account = "YOUR AWS ACCOUNT";
  orbitera_widget_options.page = "testdrives";
  /* Optionally you can specifying the Test Drive to be used with this widget, like this: */
  /* orbitera_widget_options.page = "testdrives/view/TEST_DRIVE_ID"; */
  orbitera_widget_options.orbiteraURL = setsHost;
  var orbitera_widget = new OrbiteraWidget.widget(orbitera_widget_options);
</script>
<!-- End Orbitera Widget Code -->

The “AWS Test Drive” widget is self-explanatory. That’s where customers will see all your published Test Drives. We will jump to the publishing part soon, but first a few final details from the general configurations. To avoid forcing you to browse through hundreds of images, but not wanting to leave you in the dark, here’s a gif that will quickly cycle through the main general settings:

Users
Here you can add the administrators you want managing your Orbitera environment. It’s like having admin access to the AWS Console while customers can only access the EC2 instances and/or AWS Services.
Tables
- Cloud Accounts: you can associate AWS accounts here.
- Costs Centers
- TAX
- VAT
- Support Plans
- Currencies
- Marketplaces
 Logs, Approval Requests, Email Templates, Terms
These are pretty straightforward settings. We don’t need to go through them individually.
Options

- Customer Signup Options: Basically a white and red list for e-mail domains (such as your competitors, for example). Here you can also set the automatic approval for starting Test Drives and Subscriptions.
- Customers Portal: As you can see in the images, you can choose which sections of the widget will be visible to your clients.

All the other sections are pretty standard so we won’t invest much time here. Now we will jump in to the AWS Test Drive configuration. If you still have any questions about working with the general settings, feel free to ask them in the comments down below and we will be glad to answer them.
AWS Test Drives
Now let’s jump to the Test Drives. We will show you how to configure a new AWS Test Drive instance, setting when presentation text will appear, how long should it run, how many concurrent instances the users may run, and so on. This is where the stuff happens.
Navigate back to your Orbitera’s home screen and click on the “Test Drive” play icon. Click “add” and work through the settings you will find there:


Then you will add your CloudFormation script and select its region:


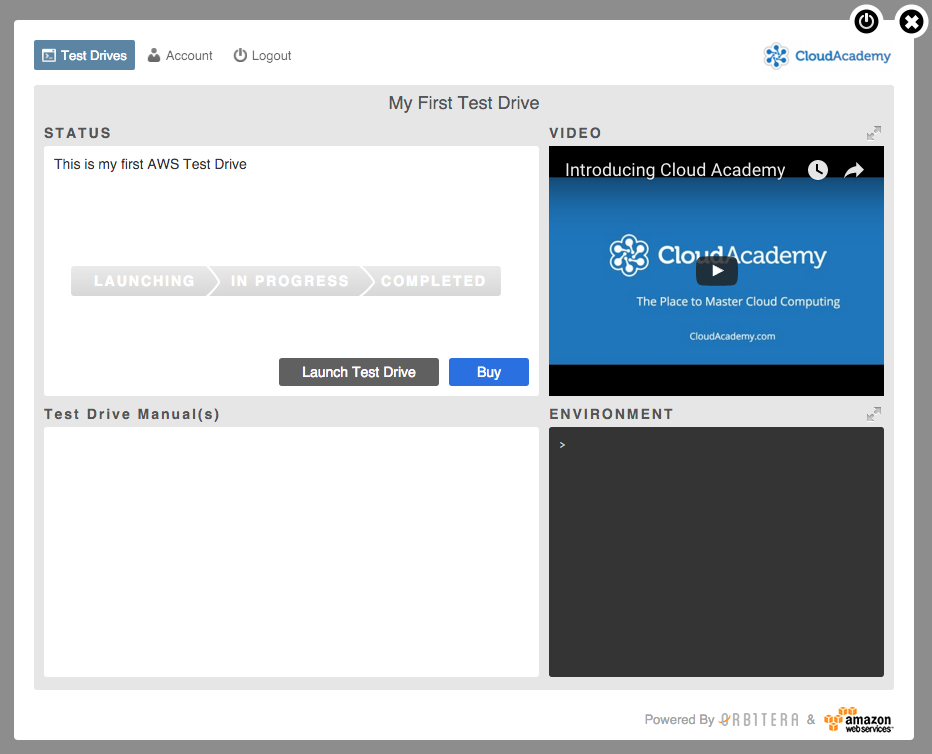
You are able to save the Test Drive just like the screenshot above. If it is active, customers will see it, but they will only see a button “Buy”, which will redirect them to the “AWS Marketplace” URL:

You definitely want to create a new and exclusive IAM user for your AWS Test Drive instead of using your root account. Go to IAM, create a new user under any root account you want, and use the Access Key ID and Secret Access Key you have generated to fill your fields under the Credentials section in the form. Do not forget to set the necessary roles for your new user or your CloudFormation script will not have enough privileges to save the current form…as it will first try to validate the .txt file against AWS’ API using the credentials you provided. For more on this, consider taking Cloud Academy‘s IAM video course.
Next step, upload your CloudFormation script and fill in all the required parameters, if any. Refresh the widget and you will now see the button “Launch Test Drive”:

Always remember that Test Drives might not only be facing your current customers, but future prospects as well. Therefore you should always take your time – and we mean quality time – to check all the publishing settings and documentation (such as manuals, links, videos, presentations). AWS Test Drives not only require your technical skills but also marketing skills. Manuals, descriptions, and texts should be intuitive and clearly explain what your Test Drive is about, which means you need to know who your audience is and what do they need. Are they techies or business stakeholders? Think about that when designing your whole AWS Test Drive experience.
Conclusion
We showed you how much Orbitera’s framework can do for your showcases, adding one more layer on top of your AWS Console, making it even easier for your customers and/or prospects to focus on what your company will deliver and not so much about the technical aspects under the hood. This is the real Cloud concept embraced by SaaS and IaaS together: Abstraction + automation.
As we mentioned, this framework may be used as a Marketplace for your own cloud solutions, which your users can buy, pay for the usage or subscribe to. There are many possibilities and we hope we’ve helped you understand and become even more productive.
We are not quite done with Test Drives yet. On the contrary: we are just getting started. Keep an eye on the Cloud Academy blog for our next posts as we will bring you even more Test Drive-related content, including CloudFormation scripts, infrastructure as code (no use of pre-baked AMIs) and more cool solutions for your showcases.