![]()
(Update) We’ve recently published a new post on AWS Tagging Best Practices where we review what to keep in mind when tagging your resources and how tags are important for your business.
One of the most under-appreciated features of EC2 I’ve found is tagging. Almost any resource in EC2 can be tagged via a key-value pair, including volumes, instances, and snapshots. There are a few restrictions, for example, the length of the EC2 tags themselves, and you cannot use some AWS reserved keywords. But, as usual, the best place to confirm this is in the official AWS documentation.
In this post, I’d like to demonstrate a potential use case for tagging, and a practical example of how to access these tags programmatically via the Java AWS SDK.
EC2 Tagging
In practice, the most likely tag you might have encountered when starting out with EC2 is the (non-compulsory) name tag as presented by the launch wizard:
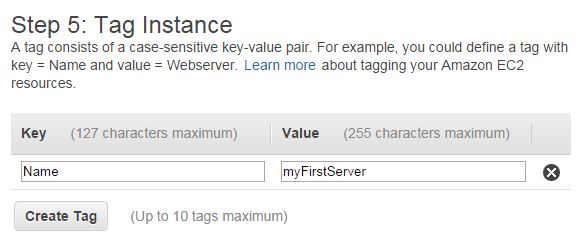
An important concept to keep in mind is that tags do not carry semantic meaning, which gives you free rein to interpret the values as you deem fit.
So let’s get our hands dirty with an example…
EC2 tags use case and a potential solution
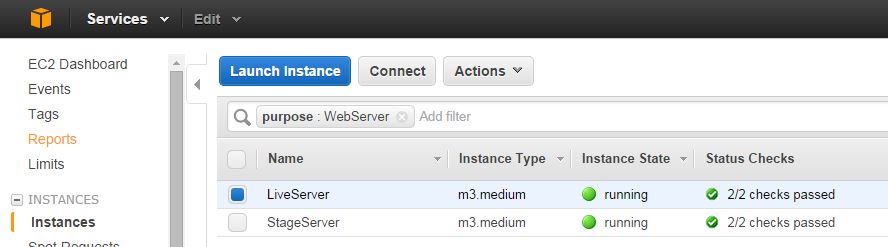
Let’s say you’re running two EC2 on-demand instances on your AWS account. One of them hosts your live server, and the other runs your staging environment for testing. On the AWS Management Console, it might look something like this:
Like the good, responsible engineer that you are, you’d soon realize the need to periodically back up the block devices (storage) on your live environment in case it gets corrupted, or an inexperienced engineer in your team accidentally messes up the configuration beyond repair. You could, of course, do it manually from the management console. However, if your number of instances start growing, a much better solution would be to do this programmatically somehow and execute that code as often as you feel necessary via a cron job or a scheduled task.
Via tags, you could approach it this way:
- Create a tag with the same key (for example ‘Stack’) on both instances. On your live instance(s) give it the value ‘Production’, and on the staging ones give it the value ‘Stage’.
- Via the AWS SDK, get a list of the instances on your account, and if the tag with the key value ‘Stack’ has the value ‘Production’, you know you can take a snapshot of that instance’s storage volume(s).
Creating Tags
With this strategy in mind, we can go over to action.
On the management console, select your live instance, select the ‘Tags’ tab and click on ‘Add/Edit Tags’.
In the Key field, type ‘Stack’ and in the Value type ‘Production’. You should end up with something that looks like this:
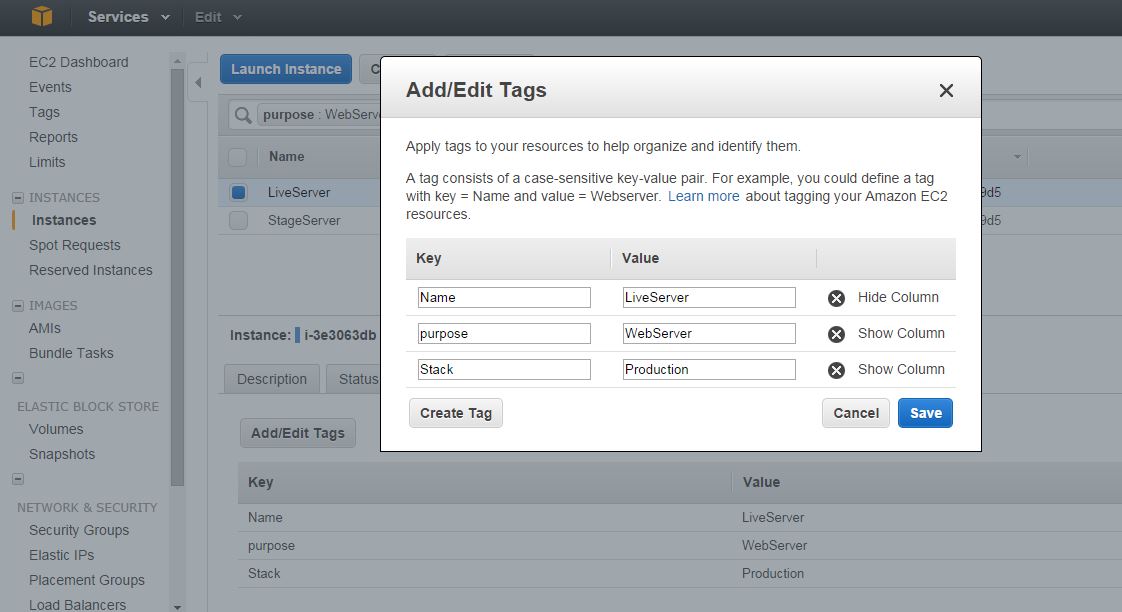
For your staging instance, create another tag with the same Key value, but in the Value field, type ‘Staging’ instead.
That’s it. You’re set up for the programming part. We’re using Java for this example, for which Amazon generously provided an API to interact their services.
AWS Java SDK tag iteration
Provided that your access keys have been configured correctly, you should be able to authenticate your SDK session successfully to allow access to your resources. Remember to set the region as well:
    private static final String STACK_TAG_KEYNAME = "Stack";
    private static final SimpleDateFormat sdf = //To date your backups
            new SimpleDateFormat("yyyy-MM-dd_HH_mm_ss");
    public static void main(String[] args) {
        AWSCredentials credentials = null;
        log = LogFactory.getLog(SimpleLog.class);
        log.info("Starting EC2 live backups");
        try {
            credentials = new ProfileCredentialsProvider()
                    .getCredentials();
        } catch (Exception e) {
            throw new AmazonClientException(
                    "Cannot load the credentials from the "
                    + "credential profiles file. "
                    + "Please make sure that your "
                    + "credentials file is at the correct "
                    + "location (~/.aws/credentials), and is in valid format.",
                    e);
        }
        ec2 = new AmazonEC2Client(credentials);
        ec2.setRegion(Region.EU_Ireland.toAWSRegion());
Getting access to all the instances (reserved and otherwise) is pretty straightforward. We then check each instance for a tag key and value that matches our criteria to identify the ones we’re interested in backing up:
       //Gets all reservations for your region
        Iterator vReservations = ec2.describeInstances()
                .getReservations().iterator();
        List vInstancesToBackUp = new ArrayList();
        //Step through all the reservations...
        Reservation vResItem = null;
        while (vReservations.hasNext()) {
            //For each reservation, get the instances
            vResItem = vReservations.next();
            Iterator vInstances = vResItem.getInstances().iterator();
            //For each instance, get the tags associated with it.
            while (vInstances.hasNext()) {
                Instance vInstanceItem = vInstances.next();
                List pTags = vInstanceItem.getTags();
                Iterator vIt = pTags.iterator();
                while (vIt.hasNext()) {
                    Tag item = vIt.next();
                    //if the tag key macthes and the value we're looking for, we return
                    if (item.getKey().equals("Stack")
                     && item.getValue().equals("Production")) {
                        vInstancesToBackUp.add(vInstanceItem);
                    }
                }
            }
        }
        log.info("Number of instances to back up:" + vInstancesToBackUp.size());
When we’ve got the list of instances we’re interested in, we then create a snapshot of the block devices on that instance. We’ll use the instance name in the description of the snapshot to confirm that we’ve backed up the correct instance:
        for (Instance item : vInstancesToBackUp) {
            List devices = item.getBlockDeviceMappings();
            //For each block device, take a snapshot
            for (InstanceBlockDeviceMapping blockMapping : devices) {
                log.info("Creating snapshot for device " + blockMapping.getDeviceName());
                CreateSnapshotRequest csr = new CreateSnapshotRequest(blockMapping.
                        getEbs().getVolumeId(), "SnapshotOf_" +
                        getInstanceName(item) + " on " + sdf.format(new Date()));
                CreateSnapshotResult result = ec2.createSnapshot(csr);
                log.info("Snapshot ID created="+result.getSnapshot().getSnapshotId());
            }
        }
If everything goes well, when executed this code should output the following:
run:
Oct 13, 2014 9:52:51 PM org.apache.commons.logging.impl.SimpleLog main
INFO: Starting EC2 live backups
Oct 13, 2014 9:52:54 PM org.apache.commons.logging.impl.SimpleLog main
INFO: Number of instances to back up:1
Oct 13, 2014 9:52:54 PM org.apache.commons.logging.impl.SimpleLog main
INFO: Creating snapshot for device /dev/sda1
Oct 13, 2014 9:52:54 PM org.apache.commons.logging.impl.SimpleLog main
INFO: Snapshot ID created=snap-3506c2c8
Note the snapshot id returned is snap-3506c2c8. If we go back to the management console, expand the Elastic Block Store node and click on Snapshots, you should see your newly created snapshot there. Note the live instances name in the description field, that is proof that we snapped the correct instance:
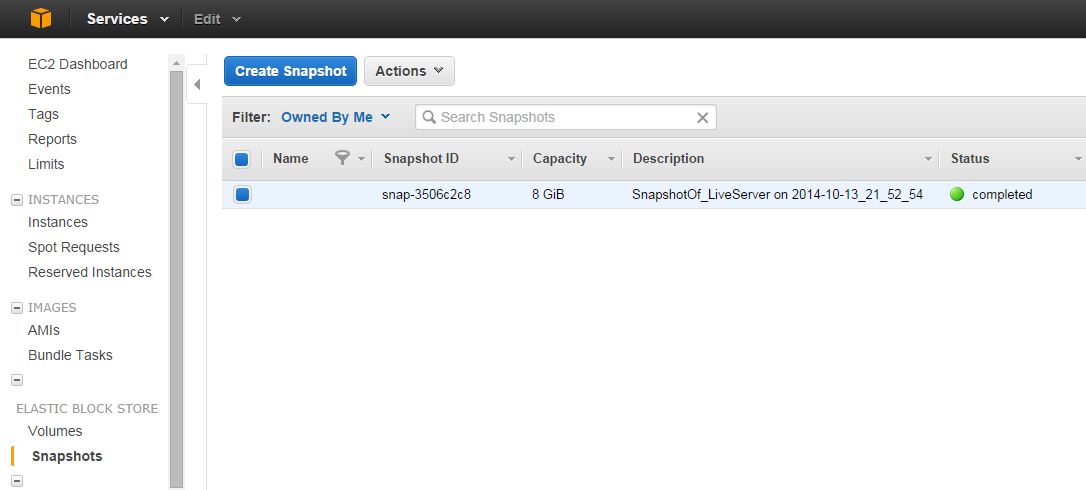
You can use this snapshot to restore your storage volume to a previous version.
Conclusion
We’ve seen but one of the potential applications of tags. Using their semantic neutrality, their usage is of course not only limited to create volume snapshots, but also grouping billing cost centers more effectively, or whatever organizational application you can think of. Happy tagging!